User Guide
© Copyright 2020 HP Development Company, L.P. HDMI, the HDMI Logo and High-Definition Multimedia Interface are trademarks or registered trademarks of HDMI Licensing LLC. Windows is either a registered trademark or trademark of Microsoft Corporation in the United States and/or other countries. NVIDIA, the NVIDIA logo, and G-SYNC are trademarks and/or registered trademarks of NVIDIA Corporation in the U.S. and other countries.
About this guide This guide provides technical specifications and information about monitor features, setting up the monitor, and using the software. Depending on the model, your monitor may not have all the features included in this guide. WARNING! Indicates a hazardous situation that, if not avoided, could result in serious injury or death. CAUTION: Indicates a hazardous situation that, if not avoided, could result in minor or moderate injury.
iv About this guide
Table of contents 1 Getting started ............................................................................................................................................. 1 Important safety information ............................................................................................................................... 1 Product features and components ........................................................................................................................ 2 Features .........
Cleaning the monitor ......................................................................................................................... 20 Shipping the monitor ......................................................................................................................... 21 Appendix A Technical specifications ................................................................................................................. 22 59.94 cm (23.6 in) model specifications ...........................
1 Getting started Important safety information A power cord is included with the monitor. If you use another cord, use only a power source and connection appropriate for this monitor. For information about the correct power cord set to use with the monitor, see the Product Notices provided in your documentation kit. WARNING! To reduce the risk of electric shock or damage to the equipment: • Plug the power cord into an AC outlet that is easily accessible at all times.
Product features and components Features The monitor includes the following features: ● 59.94 cm (23.
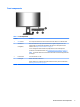
Front components Table 1-1 Front components Control Function 1 Menu button Press to open the OSD menu, select a menu item from the OSD, or close the OSD menu. 2 OSD buttons When the OSD menu is open, press the buttons to navigate through the menu. The function light icons indicate the default button functions. For a description of these functions, see Using the function buttons on page 15. (assignable) You can reassign the function buttons to quickly select the most commonly used operations.
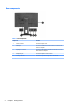
Rear components Table 1-2 Rear components 4 Component Function 1 Power connector Connects the power cord. 2 HDMI port Connects an HDMI cable from the monitor to a source device such as a computer. 3 DisplayPort connector Connects the DisplayPort cable from the monitor to a source device such as a computer. 4 Headphone jack Connects headphones to the monitor. 5 Security cable slot Connects an optional security cable to the monitor.
Setting up the monitor WARNING! To reduce the risk of serious injury, read the Safety & Comfort Guide. It describes proper workstation setup and proper posture, health, and work habits for computer users. The Safety & Comfort Guide also provides important electrical and mechanical safety information. The Safety & Comfort Guide is available on the web at http://www.hp.com/ergo. IMPORTANT: To prevent damage to the monitor, do not touch the surface of the LCD panel.
Mounting the monitor head The monitor head can be attached to a wall, swing arm, or other mounting fixture. IMPORTANT: This monitor supports the VESA industry-standard 100 mm mounting holes. To attach a thirdparty mounting solution to the monitor head, four 4 mm, 0.7 pitch, and 10 mm long screws are required. Longer screws might damage the monitor head. Be sure to verify that the manufacturer’s mounting solution is compliant with the VESA standard and is rated to support the weight of the monitor head.
4. Remove the four screws that attach the stand to the back of the monitor (1), and lift the stand up off of the monitor head (2). Attaching the monitor head to a mounting device Attach the monitor to the wall or swing arm of your choice by inserting the four new VESA screws provided with the VESA mounting bracket. IMPORTANT: Use the four new VESA screws that are attached to the new mounting bracket. Do not reuse the four VESA screws that you removed from the back of the monitor head.
Connecting the cables NOTE: The monitor ships with select cables. Not all cables shown in this section are included with the monitor. 8 1. Place the monitor in a convenient, well-ventilated location near the computer. 2. To provide a video signal to the monitor, connect an HDMI or DisplayPort video cable between the monitor and source device (computer). ● Connect one end of an HDMI cable to the HDMI port on the rear of the monitor and the other end to the HDMI port on the source device.
3. Connect one end of the power cord to the power connector on the rear of the monitor and the other end to a grounded AC outlet. WARNING! To reduce the risk of electric shock or damage to the equipment: Do not disable the power cord grounding plug. The grounding plug is an important safety feature. Plug the power cord into a grounded (earthed) AC outlet that is easily accessible at all times. Disconnect power from the equipment by unplugging the power cord from the AC outlet.
Adjusting the monitor WARNING! To reduce the risk of serious injury, read the Safety & Comfort Guide. It describes proper workstation setup and proper posture, health, and work habits for computer users. The Safety & Comfort Guide also provides important electrical and mechanical safety information. The Safety & Comfort Guide is available on the web at http://www.hp.com/ergo. 10 1. Tilt the monitor head forward or backward to set it to a comfortable eye level. 2.
3. Swivel the monitor head to the left or right for the best viewing angle. Turning on the monitor IMPORTANT: Burn-in image damage may occur on monitors that display the same static image on the screen for 12 or more consecutive hours. To avoid burn-in image damage, you should always activate a screen saver application or turn off the monitor when it will not be in use for a prolonged period of time. Image retention is a condition that can occur on all LCD screens.
Off; default setting is On), the current preset screen resolution, and the recommended preset screen resolution. The monitor automatically scans the signal inputs for an active input and uses that input for the display. Installing a security cable You can secure the monitor to a fixed object with an optional security cable available from HP.
2 Using the monitor Downloading software and utilities You can download and install the following files from http://www.hp.com/support: ● INF (Information) file ● ICM (Image Color Matching) files To download the files: 1. Go to http://www.hp.com/support. 2. Select Software and Drivers. 3. Select your product type. 4. Enter your HP monitor model in the search field and follow the on-screen instructions.
Enabling G-SYNC compatibility (select products only) To enable G-SYNC® compatibility with your monitor, you must first install the G-SYNC driver: 1. Download the G-SYNC driver from https://www.geforce.com/drivers and install it. 2. After the G-SYNC driver is installed, open the NVIDIA® Control Panel, navigate to Set up G-SYNC, and select your monitor. 3.
Using the function buttons Pressing one of the three function buttons activates the buttons and displays the icons above the buttons. The factory default button icons and functions are shown in the following table: NOTE: The actions of the function buttons vary among monitor models. For information about changing the function of the buttons, see Reassigning the function buttons on page 15.
3. Select Save and Return to save your setting and close the menu. Select Cancel if you do not want to save the setting. 4. In the Main menu, select Exit. Using Auto-Sleep Mode The monitor supports an OSD menu option called Auto-Sleep Mode that allows you to enable or disable a reduced power state for the monitor. When Auto-Sleep Mode is enabled (enabled by default), the monitor enters a reduced power state when the computer signals low power mode (absence of either horizontal or vertical sync signal).
3 Support and troubleshooting Solving common issues The following table lists possible issues, the possible cause of each issue, and the recommended solutions. Table 3-1 Common issues and solutions Issue Possible Cause Solution Screen is blank or video is flashing. Power cord is disconnected. Connect the power cord. The monitor is turned off. Press the front bezel power button.
Button lockouts Holding down the power button or Menu button for 10 seconds locks out the functionality of the buttons. You can restore the functionality by holding the buttons down again for 10 seconds. This functionality is available only when the monitor is turned on, displaying an active signal, and the OSD is not open. Contacting support To resolve a hardware or software problem, go to http://www.hp.com/support.
Locating the serial number and product number Depending on the product, the serial number and product number are located on a label on the rear of the monitor or on a label under the front bezel of the monitor head. You might need these numbers when contacting HP about the monitor.
4 Maintaining the monitor Maintenance guidelines To enhance the performance and extend the life of the monitor: ● Do not open the monitor cabinet or attempt to service this product yourself. Adjust only those controls that are covered in the operating instructions. If the monitor is not operating properly or has been dropped or damaged, contact an authorized HP dealer, reseller, or service provider.
Shipping the monitor Keep the original packing box in a storage area. You may need it later if you remove or attach the stand, ship the monitor, or move.
A Technical specifications NOTE: All specifications represent the typical specifications provided by HP’s component manufacturers; actual performance may vary either higher or lower. For the latest specifications or additional specifications on this product, go to http://www.hp.com/go/ quickspecs/ and search for your specific monitor model to find the model-specific QuickSpecs. 59.94 cm (23.6 in) model specifications Table A-1 59.94 cm (23.
59.94 cm (23.6 in) model Table A-2 Preset display resolutions Preset Pixel format Horz freq (kHz) Vert freq (Hz) 1 640 × 480 31.469 59.940 2 720 × 400 31.469 70.087 3 800 × 600 37.879 60.317 4 1024 × 768 48.363 60.004 5 1024 × 768 60.023 75.029 6 1280 × 720 45.000 60.000 7 1280 × 800 49.702 59.810 8 1280 × 1024 63.981 60.020 9 1440 × 900 55.935 59.887 10 1600 × 900 60.000 60.000 11 1680 × 1050 65.290 59.954 12 1920 × 1080 67.500 60.000 13 1920 × 1080 95.
monitor is in the reduced power state, the monitor uses <0.5 W of power. There is a brief warm-up period before the monitor returns to its normal operating state. See the computer manual for instructions on setting energy saver features (sometimes called power management features). NOTE: This power saver feature works only when the monitor is connected to a computer that has energy saver features.
B Accessibility HP and accessibility Because HP works to weave diversity, inclusion, and work/life into the fabric of the company, it is reflected in everything HP does. HP strives to create an inclusive environment focused on connecting people to the power of technology throughout the world. Finding the technology tools you need Technology can unleash your human potential. Assistive technology removes barriers and helps you create independence at home, at work, and in the community.
As a founding member, HP joined to participate with other organizations to advance the field of accessibility. This commitment supports HP’s accessibility goal of designing, producing, and marketing products and services that people with disabilities can effectively use. IAAP will make the profession strong by globally connecting individuals, students, and organizations to learn from one another. If you are interested in learning more, go to http://www.accessibilityassociation.
● Assistive Technologies sorted by impairment type ● Assistive Technology Industry Association (ATIA) Standards and legislation Standards Section 508 of the Federal Acquisition Regulation (FAR) standards was created by the US Access Board to address access to information and communication technology (ICT) for people with physical, sensory, or cognitive disabilities.
Useful accessibility resources and links The following organizations might be good resources for information about disabilities and age-related limitations. NOTE: This is not an exhaustive list. These organizations are provided for informational purposes only. HP assumes no responsibility for information or contacts you encounter on the Internet. Listing on this page does not imply endorsement by HP.
Contacting support NOTE: ● Customers who are deaf or hard of hearing who have questions about technical support or accessibility of HP products: – ● Support is in English only. Use TRS/VRS/WebCapTel to call (877) 656-7058 Monday through Friday, 6 a.m. to 9 p.m. Mountain Time. Customers with other disabilities or age-related limitations who have questions about technical support or accessibility of HP products, choose one of the following options: – Call (888) 259-5707 Monday through Friday, 6 a.m.