HP 68.
© 2014 Hewlett-Packard Development Company, L.P. For DTS patents, see http:// patents.dts.com. Manufactured under license from DTS Licensing Limited. DTS, DTS-HD, the Symbol, & DTS or DTS-HD and the Symbol together are registered trademarks of DTS, Inc. © DTS, Inc. All Rights Reserved. HDMI, the HDMI Logo and High-Definition Multimedia Interface are trademarks or registered trademarks of HDMI Licensing LLC. Microsoft and Windows are U.S. registered trademarks of the Microsoft group of companies.
About This Guide This guide provides information on monitor features, setting up the monitor, using the software and technical specifications. WARNING! Text set off in this manner indicates that failure to follow directions could result in bodily harm or loss of life. CAUTION: Text set off in this manner indicates that failure to follow directions could result in damage to equipment or loss of information. NOTE: Text set off in this manner provides important supplemental information.
iv About This Guide
Table of contents 1 Product features ................................................................................................................................................ 1 2 Safety and maintenance guidelines .................................................................................................................. 2 Important safety information ................................................................................................................. 2 Maintenance guidelines .......
Downloading the software ................................................................................................. 19 Using Auto-Sleep Mode ..................................................................................................................... 19 Using the On-Screen Display (OSD) menu ........................................................................................ 20 Menu button functions ..........................................................................................
1 Product features The monitor features include: ● 68.
2 Safety and maintenance guidelines Important safety information A power cord is included with the monitor. If another cord is used, use only a power source and connection appropriate for this monitor. For information on the correct power cord set to use with the monitor, refer to the Product Notices provided on your media disc, if one is included, or in your documentation kit.
Maintenance guidelines To enhance the performance and extend the life of the monitor: ● Do not open the monitor cabinet or attempt to service this product yourself. Adjust only those controls that are covered in the operating instructions. If the monitor is not operating properly or has been dropped or damaged, contact an authorized HP dealer, reseller, or service provider. ● Use only a power source and connection appropriate for this monitor, as indicated on the label/ back plate of the monitor.
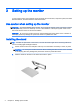
3 Setting up the monitor To set up the monitor, ensure that the power is turned off to the monitor, computer system, and other attached devices, and then follow the instructions below. Use caution when setting up the monitor CAUTION: To prevent damage to the monitor, do not touch the surface of the LCD panel. Pressure on the panel may cause non-uniformity of color or disorientation of the liquid crystals. If this occurs the screen will not recover to its normal condition.
3. Lift up the bottom of the display panel (1) and insert the stand into the slot on the back of the display panel until it clicks in place (2).
Rear and side components Component Function 1 Menu button Press to open the OSD menu, select a menu item from the OSD, or close the OSD menu. 2 Menu Plus button If the OSD menu is on, press to navigate forward through the OSD menu and increase adjustment levels. If the OSD menu is inactive, the function depends on the active video input and model (see Menu button functions on page 21 for details).
Connecting the cables NOTE: The monitor ships with select cables. Not all cables shown in this section are included with the monitor. 1. Place the monitor in a convenient, well-ventilated location near the computer. 2. Connect the video cable(s). NOTE: The monitor will automatically determine which inputs have valid video signals.
● Connect an HDMI cable to the HDMI port on the rear of the monitor and the other end to the HDMI port on the source device. ● Connect an MHL cable to the HDMI MHL port on the rear of the monitor and to the micro USB port on an MHL-enabled source device, such as a smart phone or tablet, to stream content from the mobile device to your monitor screen. NOTE: The MHL video is limited to the mobile device output resolution.
3. Connect an audio cable to the Audio-in jack on the rear of the monitor and the other end to the Audio-out jack on the source device. 4. Connect one end of the power cord to the power supply (1) and the other end to a grounded electrical outlet (2), and then connect the round end of the power supply cord to the monitor (3). WARNING! To reduce the risk of electric shock or damage to the equipment: Do not disable the power cord grounding plug. The grounding plug is an important safety feature.
Front panel controls Control Function 1 Speakers Provide premium audio sound. 2 Power LED System on = white System off = off Sleep mode = amber Sleep timer mode = blinking amber 3 10 Power Chapter 3 Setting up the monitor Turns the monitor on or off.
Adjusting the tilt Tilt the monitor panel forward or backward to set it to a comfortable eye level. Mounting the monitor (select models) A VESA mounting bracket is available for select models only. The mounting bracket can be used to attach the monitor to any standard mounting system with a standard VESA 100mm x 100mm mount pattern. NOTE: This apparatus is intended to be supported by UL or CSA Listed wall mount bracket. CAUTION: This monitor supports the VESA industry standard 100 mm mounting holes.
3. Lift up the bottom of the display panel (1), and then press the release latch (2) and slide the stand out of the slot on the display panel (3). Attaching the VESA mounting bracket (select models) 12 1. Remove the monitor stand. Refer to Removing the monitor stand on page 11. 2. Before attaching the VESA mounting bracket, connect the required cables to the rear of the monitor. Connect the other ends of the cables to the source devices after the monitor has been mounted. 3.
4. To attach the monitor to a swing arm or other mounting device, insert four mounting screws through the holes on the mounting device and into the screw holes on the VESA mounting bracket. Turning on the monitor 1. Press the power button on the computer to turn it on. 2. Press the power button on the front of the monitor to turn it on. CAUTION: Burn-in image damage may occur on monitors that display the same static image on screen for a prolonged period of time.
NOTE: You can disable the power LED in the OSD menu. Press the Menu button on the right side of the monitor, and then select Power Control > Power LED > Off. When the monitor is powered on, a Monitor Status message is displayed for five seconds. The message shows which input is the current active signal, the status of the auto-switch source setting (On or Off; factory default is On), the current preset display resolution, and the recommended preset display resolution.
Installing a cable lock You can secure the monitor to a fixed object with an optional cable lock available from HP.
4 Operating the monitor Software and utilities The disc that comes with the monitor contains files you can install on the computer: ● an .INF (Information) file ● ICM (Image Color Matching) files (one for each calibrated color space) (select models) ● My Display software (select models) ● HP Display Assistant software (select models) The Information file The .
NOTE: You may need to install the digitally signed monitor .INF and .ICM files manually from the disc in the event of an installation error. Refer to the HP Monitor Software Information file on the disc. Downloading from the Internet To download the latest version of .INF and .ICM files from the HP monitors support Web site: 1. Go to http://www.hp.com/support and select the appropriate country and language. 2.
Downloading the software If you prefer to download the My Display software, follow the instructions below. 1. Go to http://www.hp.com/support and select the appropriate country and language. 2. Select Drivers & Downloads, type your monitor model in the Find by product search field, and click Go. 3. If necessary, select your monitor from the list. 4. Select your operating system. 5. Click Utility - Tools to open the list of utilities and tools. 6. Click HP My Display. 7.
For additional information, refer to the HP Display Assistant User Guide included on the disc with your monitor. Downloading the software If you prefer to download the HP Display Assistant software, follow the instructions below. 1. Go to http://www.hp.com/support and select the appropriate country and language. 2. Select Drivers & Downloads, type your monitor model in the Find by product search field, and click Go. 3. If necessary, select your monitor from the list. 4. Select your operating system.
Using the On-Screen Display (OSD) menu Use the On-Screen Display (OSD) to adjust the screen image based on your viewing preferences. You can access and make adjustments in the OSD using the buttons on the right side of the monitor. To access the OSD and make adjustments, do the following: 20 1. If the monitor is not already on, press the power button to turn on the monitor. 2. Press one of the three buttons on the right side of the monitor to activate the buttons. 3.
Menu button functions Pressing one of the three Menu buttons on the right side of the monitor activates the buttons and displays the icons next to the buttons. The function of the buttons depends on the active video input and the model. On all models, if the active video input is an analog signal (VGA input), the buttons have the following functions. Button Function 1 Menu Opens the OSD (On-Screen Display) main menu, selects a menu item from the OSD, or closes the OSD menu.
On some models, if the active video input is a digital signal (HDMI or MHL input), the buttons have the following functions. 22 Button Function 1 Menu Opens the OSD (On-Screen Display) main menu, select a menu item from the OSD, or closes the OSD menu. 2 Brightness Opens the Brightness adjustment scale. 3 Next Active Input Switches the monitor's input source to the next active input.
A Technical specifications NOTE: All specifications represent the typical specifications provided by HP's component manufacturers; actual performance may vary either higher or lower. For the latest specifications or additional specifications on this product, go to http://www.hp.com/go/ quickspecs/ and search for your specific monitor model to find the model-specific QuickSpecs. Display 68.6 cm wide screen 27 inches wide screen Type LCD Viewable Image Size 68.
Recognizing preset display resolutions The display resolutions listed below are the most commonly used modes and are set as factory defaults. This monitor automatically recognizes these preset modes and they will appear properly sized and centered on the screen. Preset Pixel format Horz freq (kHz) Vert freq (Hz) 1 640 × 480 31.469 59.940 2 800 × 600 37.879 60.317 3 1024 × 768 48.363 60.004 4 1280 × 720 45.000 59.940 5 1280 × 1024 63.981 60.020 6 1366 × 768 47.712 59.
Power adapter Manufacturer Model number Power supply rating Delta Electronic(S) Pte Ltd ADP 65-HB HCB 65W/19V Power adapter 25
B Support and troubleshooting Solving common problems The following table lists possible problems, the possible cause of each problem, and the recommended solutions. Problem Possible Cause Solution Screen is blank or video is flashing. Power cord is disconnected. Connect the power cord. Power button is turned off. Press the front panel power button. NOTE: If pressing the power button has no effect, press and hold the power button for 10 seconds to disable the power button lockout feature.
Using the Auto-Adjustment feature (VGA analog input) When first setting up the monitor, when conducting a Factory Reset of the computer, or whenever you change the resolution of the monitor, the Auto-Adjustment feature will automatically engage, and attempt to optimize your screen for you. You may also optimize the screen performance for the VGA (analog) input at any time by using the + (Plus) button on the right side of the monitor. Do not use this procedure if the monitor is using an input other than VGA.
Optimizing image performance (VGA analog input) Two controls in the on-screen display can be adjusted to improve image performance: Clock and Phase (available in the OSD menu). NOTE: The Clock and Phase controls are adjustable only when using an analog (VGA) input. These controls are not adjustable for digital inputs. The Clock must first be set correctly since the Phase settings are dependent on the main Clock setting.
1. Press one of the three buttons on the right side of the monitor to activate the buttons. 2. Press the Menu button on the right side of the monitor to open the OSD, and then select Image Control > Image Position > Horizontal Position and/or Vertical Position. 3. Press the + (Plus) or – (Minus) buttons on the right side of the monitor to properly adjust the position of the image in the display area of the monitor.
C LCD monitor quality and pixel policy The TFT monitor uses high-precision technology, manufactured according to HP standards, to guarantee trouble-free performance. Nevertheless, the display may have cosmetic imperfections that appear as small bright or dark spots. This is common to all LCD monitors used in products supplied by all vendors and is not specific to the HP LCD. These imperfections are caused by one or more defective pixels or sub-pixels.