
Implementing Out-Of-Band PC Management with DASH on HP Business Systems with AMD Chipset


6
Using DASH functions on HP Desktop and Notebook
HP notebooks that support DASH are shipped in a predefined management mode. There is no need for the end user to
enable the DASH functionality. The expectation to this is products that are ordered through a custom configuration service
where the customer can specify various parameters supporting their infrastructure and deployment model.
Dash Support
Ensure that you have the latest system BIOS, Realtek Ethernet network firmware and associated Realtek network driver and
agent for your platforms. HP highly recommends you set the BIOS administrator password to prevent unauthorized access
to system BIOS configuration options.
Unit provisioning using Realtek ROM options settings from BIOS:
1) Press “F10” during post to boot into BIOS setup menu, select UEFI Drivers page, there is an option to launch 3rd party
option ROM on next boot.
2) Press “F3” during post to launch 3rd party (Realtek) option ROM directly.
On January 1st, 2020, California Senate Bill 327 will become effective. In compliance with this law, the default
account/password from the DASH enablement process has been removed in 2020 or later HP platforms. The change will
now require the end user to create an account/password prior to enabling DASH. In order to provide better security, a
credential check will be required for each account/password change.
Please be noted there will be two scenarios for DASH login as following:
• Default account and password are set as “Administrator” and “RealTek”.
• Default account and password has been removed and user need to set private account and password on the client units
before login by using DASH.
Follow the steps below to set private account and password:
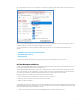
1) Boot to the SUT (DASH enabled target) into Windows and make that sure you have installed DASH Client utility
and put DASHConfigRT tool (available from Realtek website) onto a folder within the C: drive. A crab icon is
shown in the notification area of the task bar informing you that the DASH Client utility is installed.
2) Find config.xml from DASHConfigRT tool folder and use “Notepad” to modify it – change "Administrator" to your
desired account and "password" to your desired password then save.
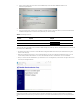
3) Run a Command Prompt window as Administrator and input the commands "DASHConfigRT.exe -xf:config.xml -
dxf"
Press the Enter key.
4) The new account and password are set successfully.