vPro Setup and Configuration for the 8100 Business PC with Intel vPro Processor Technology January 2010 Table of Contents: Introduction ........................................................................................................ 2 AMT Setup and Configuration .............................................................................. 3 AMT System Phases ........................................................................................
Introduction The HP Compaq dc8100 Business PC utilizes Intel vPro processor technology to simplify PC management and reduce IT related expenditures. Intel vPro processor technology utilizes Intel Active Management Technology (AMT), which allows for improved management of PC systems and better security. Intel vPro processor technology is no longer supporting Virtual Appliances. This is a change from previous generations of HP Compaq dx7 Business PCs with Intel vPro processor technology.
Please refer to the Intel website: www.intel.com/technology/vpro/index.htm for other whitepapers and technical information regarding Intel vProTM Technology. AMT Setup and Configuration AMT must be Setup and Configured in a system before it can be used. AMT Setup involves the necessary steps to enable AMT such as setting up the system for AMT mode and enabling network connectivity. It is generally performed only once for the lifetime of the system.
Important Note: The MEBx is an option ROM module that is provided to HP by Intel to be included in the HP system BIOS. The MEBx is not HP-specific and contains options that are not used by HP. If an option is not used by HP, ignore it and do not modify from its default state. Password Guidelines MEBx passwords must meet the minimum criteria to be accepted. These restrictions are enforced by the MEBx to reduce vulnerability of passwords to a dictionary attack.
BIOS Prerequisite This whitepaper is for the HP Compaq 8100 Business PCs. The HP Compaq 8100 Business PC uses the 786H1 BIOS family. For best performance and to take advantage of AMT 6.0 features, make sure the HP Compaq 8100 Business PCs have a BIOS revision of at least version 1.02, a ME FW of at least version 6.0.3.1195, and a MEBx of at least version 6.0.3.0019. The system BIOS and the ME FW must be updated individually. Refer to the BIOS Flash Whitepaper at www.hp.
2. Enter the default password. The default password is “admin”. Passwords are case sensitive. The user must change the default password before any changes can be made in the MEBx. 3. Change the password for the MEBx. The new password must meet the criteria defined in the Password Guideline Section, also known as a strong password. It must be entered twice for verification. Changing the password indicates that AMT ownership has been established. The system will go from Factory phase to In-Setup phase.
can be removed from the system to eliminate it from the suspect list until root cause is found. Note that if the ME is disabled, then all AMT functions are also disabled. The system will not be remotely manageable. 6. Check Password Policy. Default Setting Recommended Setting : Default Password Only : Default Password Only a. Select Default Password Only This option determines when the user is allowed to change the Intel MEBX password through the network.
Intel ME Network Name Settings a. Enter a Host Name Default Setting Recommended Setting : None : User Dependent Note that spaces are not accepted in the host name. Make sure there is not a duplicate host name on the network. Hostnames can be used in place of the system’s IP for any applications requiring the IP address. b. Domain Name Enter a domain name Default Setting Recommended Setting : None : Network Dependent The domain name is blank by default.
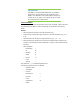
8. TCP/IP Settings. AMT 6.0 supports IPV4 and IPV6 interface. Follow steps 8a-8f to configure for IPV4 and 8g-8h for IPV6. Figure 4: Intel ME TCP/IP Settings Screen a. Wired LAN IPV4 Configuration DHCP Mode Default Setting : Enabled Recommended Setting : Enabled DHCP can be used if it is available (TCP/IP settings will be configured by a DHCP server). If DHCP is disabled, then steps 8b through 8f are required to configure the IPv4 static IP address for Intel AMT.
Figure 5: Intel ME Wired LAN IPv4 Configuration Screen b. IPV4 Address Enter a static address Default Setting Recommended Setting Example: 192.168.0.1 : 0.0.0.0 : Network Dependent Make sure all AMT systems have a unique static IP address. Multiple systems sharing the same IP address can lead to network collisions, which will cause the systems to not respond correctly. c. Subnet Mask Enter subnet mask Default Setting : 255.255.255.0 Recommended Setting : Network Dependent Example: 255.255.255.0 d.
f. Alternate DNS Address Leave as default value and hit Enter Default Setting : 0.0.0.0 Recommended Setting : Network Dependent g. Wired LAN IPV6 Configuration Select Enabled option for IPv6 Feature Selection If DHCP is disabled, then steps 8h through 8i are required to configure the IPV6 static IP address. Figure 6: Intel ME Wired LAN IPv6 Configuration Screen i. IPv6 Interface ID Type.
ii. IPv6 Address. AMT 6.0 supports IPv6 network interface. Enter a static IPv6 address Default Setting Recommended Setting : None : Network Dependent Example: 2001:db8::1428:57ab iii. IPv6 default Router. Enter the IPv6 Default Router address Default Setting Recommended Setting : None : Network Dependent Example: 2001:db8::1428:57ab iv. Preferred DNS IPv6 Address Enter the Preferred DNS IPv6 Address Default Setting Recommended Setting : None : Network Dependent Example: 2001:db8::1428:57ab v.
Figure 7: Intel ME Activate Network Access Screen 10. FW Update Settings. a. Local FW Update Qualifier.
Figure 8: Intel ME FW Update Settings Screen This option allows the BIOS to override the ME Firmware Locale Update option and to permit local updates. By default, the system BIOS allows for an unlimited number of local ME FW updates. However, the administrator can modify the local update setting with this ME FW Local Update Qualifier. “Always Open” is the default and allows for as many local updates as the system BIOS allows, which is unlimited.
b. Secure FW Update. Intel ME Firmware Local Update Qualifier Default Setting Recommended Setting : Enabled : Enabled The Secure Firmware Update function requires an administrator user name and password. If the administrator user name and password are not supplied, the firmware cannot be updated. When the Secure Firmware Update feature is enabled, the IT administrator can update the firmware using the secure method. 11. Set PRTC.
Note: The ME On in Host Sleep State mode will automatically set to Desktop: ON in S0, ME Wake in S3, S4-5 after Activating the Network Access (step 9). b. Idle Timeout Default Setting Recommended Setting : 65535 : 65535 This option sets the timeout value for Wake-On-ME. The default timeout value is 65535 from the factory and it is in units of a minute. A value of 0 means the Wake-On-ME feature is disabled and the ME will not go to sleep when not being used in a non-active system.
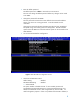
14. Go into the Intel AMT Configuration. Figure 10: Intel AMT Configuration Screen Press the Enter key when MEBx displays “Update Network settings in the General Settings menu”.
Figure 11: Intel AMT Configuration Screen a. Check the Manageability Feature Selection. Default Setting Recommended Setting : Enabled : Enabled This option allows Intel AMT to be enabled or disabled. By default, HP Compaq 8100 Business PCs are set to enable Intel AMT. Note that setting the Disabled option will disable all remote management capabilities. Setting Disabled will also unprovision any AMT settings.
Figure 12: Intel ME Features Control Screen with AMT Selected b. Check SOL/IDE-R.
a) Username & Password Default Setting Recommended Setting : Enabled : Enabled Select Enabled. This option allows users and passwords to be added from the WebGUI. If it is disabled, then only the administrator has MEBx remote access. b) SOL. Default Setting Recommended Setting : Enabled : Enabled Select Enabled. This option enables / disables Serial Over LAN (SOL) functionality. c) IDE Redirection Default Setting Recommended Setting : Enabled : Enabled Select Enabled.
Figure 14: Intel ME KVM Configuration Screen i. KVM feature Selection.
ii. User opt-in. Default Setting Recommended Setting : User Consent is required for KVM session : User Dependent iii. Opt-in Configuration from remote IT Default Setting Recommended Setting : Enabled Remote Control of KVM Opt-in Policy : User Dependent Disable Remote Control of KVM Opt-in Policy – This option disables the Remote User’s ability to select User OPT-IN Policy. In this case only the local user can control the opt-in policy.
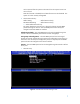
Intel AMT WebGUI The Intel AMT WebGUI is a web browsre-based interface for limited remote system management. The WebGUI is often used as a test to determine if AMT Setup and Configuration was performed properly on a system. A successful remote connection between a remote system and the host system running the WebGUI indicates proper AMT Setup and Configuration on the remote system.
Figure 16: Intel AMT WebGUI Screen 6) Review system information and/or make any necessary changes. Important Note: The MEBx password can be changed for the remote system in the WebGUI. Changing the password in the WebGUI or a remote console will result in two passwords. The new password, known as the “remote” MEBx password, will only work remotely with the WebGUI or remote console.
Setup and Configuration Server A Setup and Configuration Server (SCS) is simply an application that executes over a network performing AMT Setup and Configuration. It is required for Enterprise mode setup and configuration. In a PSK Setup and Configuration, both the AMT client system and the SCS must share a set of Provisioning ID (PID) and Provisioning Passphrase (PPS). This pair forms a Pre-Shared Key (PSK). PIDs are 8 characters long and PPS are 32 characters.
Enterprise Mode – AMT Setup and Configuration Steps: The AMT Setup portion for Enterprise mode is the same as SMB mode. Repeat Steps 1 through 15 to perform AMT Setup. This will take the system from Factory mode to In Setup Mode. Refer to Manual Mode – AMT Setup and Configuration for screen shots of MEBx menus and full text. The following are quick steps for AMT Setup. 1) Get into the MEBx by pressing Ctrl-P during POST. 2) Enter the default password “admin”.
Figure 17a: Intel ME Platform Configuration Screen Figure 17b: Intel AMT Configuration Screen Continued 27
10) Go into Network Setup & select Host Name. Enter a host name Default Setting Recommended Setting : None : User Dependent Spaces are not accepted in the host name. 11) Go into Network Setup and select TCP/IP. a. Wired LAN IPv4 Configuration DHCP Mode Default Setting Recommended Setting : DHCP Enabled : User Dependent Select Enabled. For the purpose of this whitepaper, DHCP is enabled. b.
Alternate DNS IPv6 Address Enter the Alternate DNS IPv6 Address Default Setting Recommended Setting : None : Network Dependent Example: 2001:db8::1428:57ab 12) Skip Activate Network Access. 13) Skip Un-Configure Network Access. 14) Go into Remote Setup And Configuration. Figure 18: Intel Setup and Configuration Screen This is the menu where the Enterprise mode provisioning data is entered. a. Current Provisioning Mode. Default Setting : PKI This option shows the current provisioning TLS mode.
o TLS Provisioning Mode o Provisioning IP o Date of Provisioning The provisioning record for a system with PKI provisioning will include the following information: o TLS Provisioning Mode o DNS o Host Initiated o Hash Data o Hash Algorithm o Serial Number o ISDefault Bit o Time Validity Pass o FQDN o Provisioning IP o Date of Provisioning This option is only for display, no changes can be made here. c. Provisioning Server IPV4/IPV6.
Figure 19: Intel TLS PSK Configuration Screen i. Go into Set PID and PPS. Default Setting Recommended Setting : None : System Dependent This option is for Provisioning ID (PID) and Provisioning Passphrase (PPS) entry. PIDs are 8 characters and PPS are 32 characters. There are dashes between every set of four characters so counting dashes PIDs are 9 characters and PPS are 40 characters. They must be generated by an S&CS. The Admin Password, PID, and PPS can be pre-populated by HP during manufacturing.
15) FW Update Settings. Local FW Update Qualifier. Intel ME Firmware Local Update Qualifier Default Setting Recommended Setting : Always Open : Always Open This option allows the BIOS to override the ME Firmware Locale Update option and to permit local updates. By default, the system BIOS allows for an unlimited number of local ME FW updates. However, the administrator can modify the local update setting with this ME FW Local Update Qualifier.
Default Setting Recommended Setting : Desktop: ON in S0 : Desktop: ON is S0, ME Wake in S3, S4-5 b. Idle Timeout Default Setting Recommended Setting : 65535 :65534 This option sets the timeout value for Wake-On-ME. The default timeout value is 65535 from the factory and it is in units of a minute. A value of 0 means the Wake-On-ME feature is disabled and the ME will not go to sleep when not being used in a non-active system. HP recommends a setting of 65535 for most applications. .
d. IDE Redirection Default Setting Recommended Setting : Enabled : Enabled Select Enabled. e. Legacy Redirection Mode. Default Setting Recommended Setting : Disabled : Disabled Select Disabled. This option allows the Redirection feature to work with the pre-AMT 6.0 remote consoles (need to set to Enabled). 20) Check KVM Configuration. a. KVM feature Selection. Default Setting Recommended Setting : Enabled : Enabled b. User opt-in. Default Setting Recommended Setting c.
26) When power is reapplied to the system, it will immediately look for a Setup and Configuration Server. If one is found, the AMT system will send a “Hello” message to the server. DHCP and DNS must be available for the Setup and Configuration Server search to automatically succeed. If DHCP and DNS are not available, then the Setup and Configuration Server’s IP address must be manually entered into the AMT system’s MEBx.
Provisioning Methods There are three methods of provisioning a system with Enterprise mode: • Legacy • IT TLS-PSK • OEM TLS-PSK Legacy Legacy method of AMT Setup and Configuration should be executed on an isolated network separate from the corporate network if TLS is desired. An S&CS server would have to have a secondary network connection to Certification Authority for TLS configuration. Legacy AMT Setup and Configuration is done by the customer.
OEM TLS-PSK OEM TLS-PSK AMT Setup and Configuration is done in two stages. The first stage is performed during OEM manufacturing and the second stage at the customer location. In the first stage, customers purchase systems from HP. HP will setup those systems during manufacturing bringing them to the In-Setup phase. The new Admin Password, PID, and PSS generated during HP manufacturing are transferred to the customer in a separate and secured fashion.
c. Return the information to the management console. 4) The management console writes the password, PID and PPS sets to a Setup.bin file in the USB Drive Key. 5) Technician takes the USB Drive Key to the staging area where new AMT platforms are located. a. Unpack and connect platforms if necessary. b. Insert USB Drive Key into a platform. c. Turn on that platform. 6) The system BIOS will detect for a USB Drive Key. a. If found, the BIOS will look for a Setup.bin file at the beginning of the Drive Key.
Remote Configuration Remote Configuration (RCFG) is the ability to use a single OEM image to provision systems securely without the need to manually modify AMT options. RCFG uses a Public Key Infrastructure with Certificate Hashes (PKI-CH) protocol to maintain security. A DHCP environment is required.
If no SCS responds to the Hello messages within the timeout period, then the network interface that sends out the Hello messages will be disabled. The network interface can be re-enabled to send out Hello messages again by the following methods: • Restarted by a local agent. • Partial Unprovisioning through the MEBx. Once the network interface has been re-enabled it will send out Hello messages for the next 6 hours as long as the ME is active and the system is connected to a network.
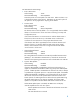
Figure 20: Intel Remote Configuration Screen 1) Remote Configuration Enable/Disable Default Setting Recommended Setting : Enabled : Enabled This option enables or disables Remote Configuration. 2) Set PKI DNS Suffix This option allows the PKI DNS Suffix of the SCS to be entered. 3) Manage Certificate Hashes This option shows the hashes in the system including the name of the hash and whether it is active or not. If no hashes are in the system, then an option to add one is available.
List of Supported CA Certificates The following are a list of supported Certificate Authorities and certificates. Not all of the certificates might be populated in certain configurations.
Return to Default Return to Default is also known as Unprovisioning. An AMT Setup and Configured system can be unprovisioned. It is done through the ME Platform Configuration Screen and the Un-Configure Network Access option. Figure 21: Intel AMT Un-configure Network Screen Depending on how the system was previously provisioned, one or both unprovisioning options may appear. 1) Go into Unconfigure Network Access menu . a. Select the needed Unprovision mode.
c. After unprovisioning is done, control is passed back to the AMT Configuration screen. Notice that the Setup and Configuration option is available again since the system is set to the default Enterprise mode. 2) Return to previous menu. 3) Exit. a. Select Y. 4) System will reboot. A partial unprovisioning will re-open the network interface for 6 hours of Hello message broadcasts. Full Return to Factory Defaults All MEBx settings can be returned to the factory default by clearing CMOS.
Appendix A: Frequently Asked Questions Q: How can the MEBx be locally accessed? A: The MEBx can be locally accessed by pressing CTRL-P during POST. Q: Why is the CTRL-P prompt not displayed during POST? A: By default the CTRL-P prompt is hidden during POST, but it can be display if set in F10 Setup. Q: What is the default username and password for the MEBx? A: The default username and password are both “admin”.
A: HP Client Configuration Manager and ISVs such as Altiris provide Setup and Configuration Servers. Check with your management console supplier to see if they offer this service. Q: Can AMT be set for static address and the OS set for DHCP or vice versa? A: No. Although it can be done, this is not a supported setting by Intel and may cause unexpected system behavior. Q: What is the default port used by the Intel WebGUI? A: The Intel WebGUI listens to port 16992.
Appendix B: Power / Sleep / Global States Explained Under Advanced Configuration and Power Interface (ACPI) specification a PC can be in one of several Power states. These power states are also known as Sleep (Sx) states or Global (Gx) states. S0 is the ON state. The PC is fully functioning. All system devices and operating system, if available, are running. S0 is also known as G0. S3 is the Standby (Microsoft terminology) or Suspend-to-RAM state.
Appendix C: Wake-On-ME Explained Wake-On-ME, also known as ME WoL, is a feature that allows the ME to go into a low power state when it is not used. There are three conditions that must be met for Wake-On-ME to function. • The system is in a sleep state: S3, S4, or S5 • ME On in Host Sleep State setting is set to allow ME WoL. • Idle Timeout setting is set to a non-zero value. The system must be in a sleep state (S3, S4, or S5) for Wake-On-ME to function.