
Building a Common Image

10
Once you have cleaned up the reference PC, open an Administrative command
prompt, change directory to %WINDIR%\system32\SYSPREP and enter:
SYSPREP.exe /audit/generalize/reboot /unattend:<name_ of_ answer_
file.xml>
The /unattend switch uses the SYSPREP answer file you created with WSIM.
The /generalize switch does its own PC clean up (Remove SIDs, clear event logs,
etc).
The /audit switch says to start the computer in audit mode after running the
configuration passes in auditSystem and audit user.
The /reboot switch forces the PC to reboot once SYSPREP is finish running.
Please note that when the reference PC reboots into audit mode this allows you do
additional customizations and test these customizations prior to deploying the
image. These could include adding device drivers, installing applications, and
installing software updates. One of the benefits in this mode is the copying of the
driver files to the driver store during the auditSystem configuration pass. Subsequent
first boot on the target PC will make the drivers available for hardware installation
after Plug and Play runs.
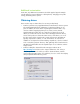
If you are satisfied with your latest customizations and test in audit mode, run
SYSPREP one more time before capturing the final image. Open an Administrative
command prompt, change directory to %WINDIR%\system32\SYSPREP and type:
SYSPREP.exe /oobe/shutdown /unattend:<name_of_answer_file.xml>
The /oobe switch says to start the computer in Windows welcome mode the next
time it is booted up.
The /shutdown switch shuts down the computer once SYSPREP has run.
One way to capture the final image on the reference PC is to use the ImageX tool.
ImageX is part of the Windows Automated Installation Kit (WAIK) for windows
Vista. Please consult the documentation for the WAIK. It includes an OPK.chm
compiled HTML help files on ImageX command-line options.
Saving/deploying a Common Image
The following procedure describes how to: a) boot to the reference PC, b) capture
the image with ImageX, and c) save the image on a server.
1. Get a USB flash drive, or CD with Windows 7 WinPE version (WinPE 3.0) on
it, and boot your reference PC.
2. Map a drive to the server you will be saving the image to.
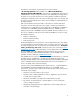
3. Now use ImageX to capture an image of the PC and save it to the server.
Imagex.exe /capture /check c: z:\CommonImage.wim “commonImage”
/capture—tells ImageX it will be capturing an image
/check—tells ImageX to check the integrity of the image file
C: —is the drive being imaged
Z:\CommonImage.wim—is the mapped drive on the server and
image file name you are creating on the server
“commonImage”—is a descriptive name for the image within the WIM