
Building a Common Image


9
The INF files of each driver are placed in these locations and the
“C:\Swsetup\Drivers”path is added to the “Microsoft-Windows-
PnpCustomizationsNonWinPE” component in a SYSPREP.XML answer file (see
SYSPREP.XML file below). Using an answer file while SYSPREPing the image allows
the drivers to be copied to the driver store of the Windows installation during the
AuditSystem configuration pass. Later when the deployed image is first booted, and
the system runs Plug and Play, these drivers will be available to install hardware on
the target computer.
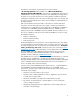
After all customizations have been made on the reference machine and drivers
have been copied to desired locations, the system is ready to be prepared for
imaging. This is accomplished by running Microsoft tool SYSPREP.exe. SYSPREP.exe
is located in the %WINDIR%\system32\SYSPREP directory. SYSPREP.exe must
always be run from the %WINDIR%\system32\SYSPREP directory and must run on
the version of Windows with which it was installed. SYSPREP.exe can be run using
three different methods:
• From the command line
• From the UI (User Interface)
• From an answer file
Running SYSPREP.exe from an answer file is chosen primarily because of the ability
to instruct Windows Vista and Windows 7 how to configure itself on first boot after
the image is applied to a PC. An answer file will automate OS setup – Computer
name, product key, time zone, and others (refer to the section titled “
Sample
SYSPREP.xml Answer file”). Most importantly, one can add settings to the answer
file in the OOBE and audit configuration passes that will be processed on the
target PC on first boot. Further detailed information on how SYSPREP works is
available on Microsoft Technet at
www.microsoft.com.
The SYSPREP.xml now needs to be created. It can be named anything you want-with
an .XML extension. SYSPREP.xml is created using the Windows System Image
Manager (WSIM). WSIM is part of the Windows Automated Installation Kit (WAIK)
which is available from the Microsoft download center. For more information on
how to use WSIM, refer to Microsoft websites.
Copy the newly created SYSPREP.xml to the reference PC (i.e., copy SYSPREP.xml to
the %WINDIR%\system32\SYSPREP folder). Before you run SYSPREP on the
reference PC, you may need to clean up the PC by removing residue of the previous
customization. For example:
• Delete any user profiles that you do not need.
• Delete any .ZIP or .EXE program/driver files you might have copied to the PC
to install, and no longer need it.
• Delete any extra folders you might have created and do not need.
• Run “Delete” in Internet Explorer > Internet Options to clear out temp files,
cookies, settings, and others.
• Uninstall any utility applications you might have used for testing and do not
need them in the final image.