Intel® vPro™ Processor Technology Setup and Configuration for the HP Compaq 8200 Elite Business PC Table of Contents: Introduction ...........................................................................................1 AMT Setup and Configuration .................................................................2 AMT System Phases ........................................................................................ 3 Manual Mode (SMB) AMT Setup and Configuration with MEBx .........................
AMT provides Out-of-Band (OOB) remote access to a system regardless of the system power state or operating system condition as long as the system is connected to a power source and a network. AMT is a hardware and firmware platform resident solution relying upon the Management Engine (ME) within the Intel Q965, Q35, Q45 Express, Q57, Q67 chipset. Below is a brief history of AMT evolution. • AMT 1.0 Introduced with the Intel 945 chipset, but was not shipped with HP Business PCs. • AMT 2.
the lifetime of the system. When AMT is enabled, it can be discovered by management software over a network. AMT Configuration is setting up all the other AMT options not covered in AMT Setup such as enabling the system for Serial-Over-LAN (SOL) or IDE-Redirect (IDE-R). Settings modified in the Configuration phase can be changed many times over the course of a system’s lifespan. Changes can be made to the system locally or through a management console.
Manual Mode (SMB) AMT Setup and Configuration with MEBx Manual mode is for customers who do not have Independent Software Vendors (ISV) management consoles, or the necessary network and security infrastructures to use encrypted Transport Layer Security (TLS). Manual mode AMT Setup and Configuration is a manual process done through the Intel ME BIOS Extension (MEBx).
The underscore ( _ ) is considered alpha-numeric. The following characters are not allowed: • Quotation mark “ • Apostrophe ‘ • Comma , • Greater than > • Less than < • Colon : • Ampersand & • Space BIOS Prerequisite This whitepaper is for the HP Compaq 8200 Elite Business PCs. The HP Compaq 8200 Elite Business PCs use the J01/J10 (AiO) BIOS family. For best performance and to take advantage of AMT 7.
Manual Mode (SMB Mode) – AMT Setup and Configuration Procedure When going through the options in the MEBx for the first time (Factory phase), the default settings are in place. This whitepaper details HP recommended settings on options, some of which may be the same as the default selection. Even though the default setting is set and used for certain options, it is good practice to double check important options. 1. Press Ctrl-P during POST to enter Management Engine BIOS Extension (MEBx) Setup (Figure 1).
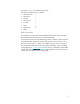
4. Go to the Intel ME General Settings (Figure 2). Figure 2. Intel ME General Settings Screen 5. Select FW Update Settings. Local FW Update (Figure 3): Default (and recommended) setting: Enabled Figure 3. Local FW Update Settings Screen By default, the system BIOS allows for local ME FW updates without password protection. However, the administrator can modify the Local FW Update setting to be password protected.
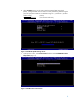
6. Select Set PRTC (Figure 4). This option sets the Protected Real Time Clock (PRTC). Setting the PRTC value is used for virtually maintaining PRTC during the power-off (G3) state. PRTC has a valid date range of 1/1/2004 to 1/4/2021. Default setting: (None) Recommended setting: (Current Date and Time) Figure 4. Intel ME FW Update Settings Screen 7. At the previous menu, select Power Control and then select Intel ME ON in Host Sleep States (Figure 5) Figure 5.
a. Intel ME ON in Host Sleep States (Figure 6). Default setting: Desktop ON in S0 Recommended setting: Desktop ON in S0, ME Wake in S3, S4-5. Note: The ME On in Host Sleep State mode will automatically set to Desktop: ON in S0, ME Wake in S3, S4-5 after Activating the Network Access (step 16). Figure 6. Intel ME Host Sleep States Screen b. Select Idle Timeout (Figure 7). Default (and recommended) setting: 65535 Figure 7.
The Idle Timeout option sets the timeout value for Wake-On-ME. The default timeout value is 65535 from the factory and it is in units of a minute. HP recommends a setting of 65535 for most applications. Certain console vendor’s product falsely detects an AMT system as disconnected if the software has to wait for the ME to wake and respond. If the console software being used does not have this issue, HP recommends a setting of 1, which allows the ME to go to sleep after approximately 1 minute of inactivity.
10. Select Manageability Feature Selection (Figure 9). This option allows Intel AMT to be enabled or disabled. By default, HP Compaq 8200 Elite Business PCs are set to enable Intel AMT. Note that selecting the Disabled option will disable all remote management capabilities and will also un-provision any AMT settings. Default (and recommended) setting: Enabled Figure 9. Intel AMT Manageability Feature Selection Screen 11. At the previous menu select SOL/IDER/KVM.
a. Username and password. This option allows users and passwords to be added from the WebGUI. If it is disabled, then only the administrator has MEBx remote access Default (and recommended) setting: Enabled. b. SOL. This option enables/disables Serial Over LAN (SOL) functionality. Enabled Default (and recommended) setting: c. IDE Redirection. This option enables / disables IDE Redirection (IDE-R) functionality. Enabled Default (and recommended) setting: d. Legacy Redirection Mode.
. Password Policy. This option determines when the user is allowed to change the Intel MEBX password through the network. The Intel MEBX password can always be changed through the Intel MEBX user interface. The options are: Default Password Only - The Intel MEBX password can be changed through the network interface if the default password has not been changed yet.
a. Host Name. Hostnames can be used in place of the system’s IP for any applications requiring the IP address. Default setting: (None) (User dependent) Recommended setting: Note that spaces are not accepted in the Host Name. Make sure there is not a duplicate host name on the network. Hostnames can be used in place of the system’s IP for any applications requiring the IP address. b. Domain Name. The domain name is blank by default.
. At the previous menu (Figure 13), select TCP/IP Settings and view the AMT TCP/IP Settings screen (Figure 14). AMT 7.1 supports IPV4 and IPV6 interface. Follow steps 15a-15f to configure for IPV4 and 15g-15h for IPV6. Figure 14. Intel AMT TCP/IP Settings Screen a. Wired LAN IPV4 Configuration: DHCP Mode Default (and recommended) setting: Enabled If DHCP is disabled, then steps 15b through 15f are required to configure the IPv4 static IP address for Intel AMT. Figure 15.
b. IPV4 Address. Enter a specific address, making sure all AMT systems have a unique static IP address. Multiple systems sharing the same IP address can lead to network collisions, which will cause the systems to not respond correctly Default setting: 0.0.0.0 Recommended setting: (Network dependent) Example: 192.168.0.1 c. Subnet Mask. Enter the subnet mask. Default setting: 255.255.255.0 Recommended setting: (Network dependent) d. Default Gateway Address.
i. IPv6 Interface ID Type: RANDOM ID (default) - The IPv6 Interface ID is automatically generated using a random number as described in RFC 3041. Intel ID - The IPv6 Interface ID is automatically generated using the MAC address. Manual ID - The IPv6 Interface ID is configured manually. Selecting this type requires that the Manual Interface ID is set with a valid value. ii. IPv6 Address. Enter a static Default setting: Recommended setting: Example: IP address.
Select Enabled option for IPv6 Feature Selection Default setting: Disabled Recommended setting: (Network dependent) IPv6 interface type: RANDOM ID (default) - The IPv6 Interface ID is automatically generated using a random number as described in RFC 3041. Intel ID - The IPv6 Interface ID is automatically generated using the MAC address. Manual ID - The IPv6 Interface ID is configured manually. Selecting this type requires that the Manual Interface ID is set with a valid value.
iii. In the Profiles field box (Figure 19), click New to create a new wireless profile. Figure 19. Intel AMT Wireless Settings, Profiles screen iv. Enter the following data for the New Wireless Profile (Figure 20): -- Profile name: AMT (can be any name) -- Network name (SSID): WIRELESS (the wireless network SSID name) -- Network authentication: WPA-PSK -- Encryption: CCMP (recommended setting) -- Pass phrase: wireless network pass phrase When done, click Submit. Figure 20.
v. Select System Status to display the Wireless IP address (Figure 21). ME wireless only supports IPv6 address. Figure 21. Intel AMT Wireless Settings, System Status screen vi. Connect to the AMT wireless using the wireless IPv6 address. 16. Activate Network Access. From the Intel ME Platform Configuration menu Figure 22), select Activate Network Access. This function causes the Intel ME to transition to the POST provisioning state if all required settings are configured.
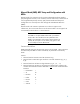
When MEBx displays “Update Network settings” in the General Settings menu press Enter. At the MEBx CAUTION prompt (Figure 23), press Y. Figure 23. Intel AMT MEBx Cauton prompt screen. 17. Select Previous Menu to get back MEBx Main Menu and select Exit to exit MEBx Setup and save settings. The system will reboot. Once the system reboots, it will go from In-Setup phase to Operational phase. AMT is fully operational.
Connecting with the Intel AMT WebGUI - SMB Example 1. Power on an AMT system that has completed AMT Setup and Configuration. 2. Execute a web browser from a separate system, such as a Management PC that is also on the same subnet as the AMT PC. 3. Connect to the IP address specified in the MEBx and port of the AMT system. -- By default the port is 16992 -- If DHCP was used, then use the Fully Qualified Domain Name (FQDN) for the ME. The FQDN is the combination of the hostname and domain.
6. Review system information and make any necessary changes. Note: The MEBx password can be changed for the remote system in the WebGUI. Changing the password in the WebGUI or a remote console will result in two passwords. The new password, known as the “remote” MEBx password, will only work remotely with the WebGUI or remote console.
Enterprise Mode AMT Setup and Configuration Enterprise mode is for large corporate customers. A Setup and Configuration Server (SCS) is required for Enterprise Mode Setup and Configuration. The SCS is also known as a Provisioning Server as seen in the MEBx. Setup and Configuration Server A Setup and Configuration Server (SCS) is simply an application that executes over a network performing AMT Setup and Configuration. It is required for Enterprise mode setup and configuration.
Enterprise Mode AMT Setup and Configuration The AMT Setup portion for Enterprise mode is the same as SMB mode. Repeat Steps 1 through 15 to perform AMT Setup. This will take the system from Factory mode to In Setup Mode. Refer to Manual Mode AMT Setup and Configuration for screen shots of MEBx menus and full text. The following are quick steps for AMT Setup. 1. Get into the MEBx by pressing Ctrl-P during POST. 2. Enter the default password “admin.” 3.
8. Go into Intel AMT Configuration (Figure 25). Figure 25. Intel AMT Configuration screen. 9. Select Manageability Feature Selection. Default (and recommended) setting: Enabled 10. Select SOL/IDE-R/KVM. a. Username and password. This option allows users and passwords to be added from the WebGUI. If it is disabled, then only the administrator has MEBx remote access. Enabled Default (and recommended) setting: b. Serial Over LAN (SOL). Default (and recommended) setting: c. IDE Redirection.
12. Select Password policy. This option will determine if the local MEBx password can be modified from a remote console. Default (and recommended) setting: Default Password Only Option Default Password Only During Setup and Configuration Anytime Effect This option will allow the MEBx password to be remotely modified only if it is the default “admin” password. This option will allow the MEBx password to be remotely modified only during Setup and Configuration of the AMT platform.
iv. Preferred DNS IPv6 Address. Enter the preferred DNS IPv6 address. Default setting: (None) Recommended setting: (Network dependent) Example: (2001:db8::1428:57ab) v. Alternate DNS IPv6 Address. Enter the alternate DNS IPv6 address. Default setting: (None) Recommended setting: (Network dependent) 2001:db8::1428:57ab Example: 15. Skip Activate Network Access. 16. Skip Un-Configure Network Access 17. Select Remote Setup and Configuration.
b. Provisioning Record. This menu displays provision record data of the system. No changes can be made at this menu.
f. Select TLS PSK. The Intel TLS PSK Configuration Screen appears (Figure 27). Figure 27. Intel TLS PSK Configuration Screen i. Select Set PID and PPS. Default setting: Recommended setting: (None) (System dependent) This option is for Provisioning ID (PID) and Provisioning Passphrase (PPS) entry. PIDs are 8 characters and PPS are 32 characters. There are dashes between every set of four characters so counting dashes PIDs are 9 characters and PPS are 40 characters. They must be generated by an SCS.
23. User plugs system into a power source and connects to the network. Only the integrated Intel NIC should be used. Intel AMT does not work with any other NIC solution. 24. When power is reapplied to the system, it will immediately look for a Setup and Configuration Server. If one is found, the AMT system will send a “Hello” message to the server. DHCP and DNS must be available for the Setup and Configuration Server search to automatically succeed.
Provisioning Methods There are three methods of provisioning a system with Enterprise mode: • Legacy • IT TLS-PSK • OEM TLS-PSK Legacy Legacy method of AMT Setup and Configuration should be executed on an isolated network separate from the corporate network if TLS is desired. An S&CS server would need to have a secondary network connection to Certification Authority for TLS configuration. Legacy AMT Setup and Configuration is performed by the customer.
OEM TLS-PSK OEM TLS-PSK AMT Setup and Configuration is done in two stages. The first stage is performed during OEM manufacturing and the second stage at the customer location. In the first stage, customers purchase systems from HP. HP will setup those systems during manufacturing bringing them to the In-Setup phase. The new Admin Password, PID, and PSS generated during HP manufacturing are transferred to the customer in a separate and secure fashion.
4. The management console writes the password, PID and PPS sets to a Setup.bin file in the USB Drive Key. 5. The IT technician takes the USB Drive Key to the staging area where new AMT platforms are located and performs the following: a. Unpack and connect platforms if necessary. b. Insert USB Drive Key into a platform. c. Turn on that platform. 6. The system BIOS will check for the presence of a USB Drive Key. -- If a USB drive key is detected, the BIOS will look for a Setup.
Remote Configuration (RCFG) Remote Configuration (RCFG) is the ability to use a single OEM image to provision systems securely without the need to manually modify AMT options. RCFG uses a Public Key Infrastructure with Certificate Hashes (PKI-CH) protocol to maintain security. A DHCP environment is required.
The network interface can be re-enabled to send out Hello messages again by the following methods: • Restarted by a local agent. • Partial Unprovisioning through the MEBx. Once the network interface has been re-enabled it will send out Hello messages for the next 6 hours as long as the ME is active and the system is connected to a network. Remote Configuration (RCFG) Prerequisites RCFG requires certain prerequisites before it can be used. 1. Both the AMT system and the SCS must be on a DHCP server.
Figure 28. Intel Remote Configuration screen 5. Remote Configuration. This option enables or disables Remote Configuration. Default (and recommended) setting: Enabled 6. PKI DNS Suffix. This option allows the PKI DNS Suffix of the SCS to be entered. 7. Manage Hashes. This option shows the hashes in the system including the name of the hash and whether it is active or not. If no hashes are in the system, then an option to add one is available.
Host-Based Configuration (Client control configuration mode) Host-Based configuration uses the Intel Activator local agent to enable vPro functionality while disabling the more security-sensitive features. Host-based configuration mode has the following requirements and characteristics: • The host OS must be present on the AMT client. • The System defense feature will be disabled. • User consent will be required for all redirection operations. • Auditor consent to un-configuration is not supported.
Return to Default Return to Default is also known as Unprovisioning. An AMT Setup and Configured system can be unprovisioned through the ME Platform Configuration Screen and the “Un-Configure Network Access” option (Figure 29). Figure 29. Intel AMT Un-configure Network Screen Depending on how the system was previously provisioned, one or both unprovisioning options may appear. 1. Select Unconfigure Network Access. a. Select the needed Unprovision mode.
Full Return to Factory Defaults All MEBx settings can be returned to the factory default by clearing CMOS. This includes resetting the password to the “admin” default. The system will need to be Setup and Configured again before remote management is possible. Any nondefault certificate hashes will have to be re-applied. Appendix A: Frequently Asked Questions Q: How can the MEBx be locally accessed? A: The MEBx can be locally accessed by pressing CTRL-P during POST.
Q: Is TLS required? A: No. TLS is optional. Q: If TLS is not used, then what is used? A: HTTP Digest will be used for mutual authentication if TLS is not used. Q: Who provides Setup and Configuration Servers? A: HP Client Configuration Manager and ISVs such as Altiris provide Setup and Configuration Servers. Check with your management console supplier to see if they offer this service. Q: Can AMT be set for static address and the OS set for DHCP or vice versa? A: No.
Appendix B: Power / Sleep / Global States Explained Under Advanced Configuration and Power Interface (ACPI) specification a PC can be in one of several Power states. These power states are also known as Sleep (Sx) states or Global (Gx) states. S0 is the ON state. The PC is fully functioning. All system devices and operating system, if available, are running. S0 is also known as G0. S3 is the Standby (Microsoft terminology) or Suspend-to-RAM state.
Appendix C: Wake-On-ME Explained Wake-On-ME, also known as ME WoL, is a feature that allows the ME to go into a low power state when it is not used. There are three conditions that must be met for Wake-On-ME to function. • The system is in a sleep state: S3, S4, or S5 • ME On in Host Sleep State setting is set to allow ME WoL. • If the system is running (S5), then the ME is also running.