
User Guide - Windows 7
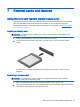
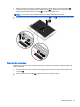
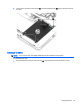

1. With the computer turned over, slide the service door release latch to the unlock position (1),
remove the screw (if the optional screw is being used) (2), or, if the screw is not being used,
simply slide the release latch to the right (3) to release the service door.
NOTE: If you want to use the optional screw, it is stored inside the service door.
2. Slide the service door toward the front of the computer (4) and lift (5) to remove the service door.
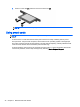
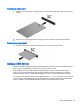
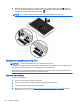
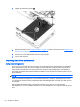
Replacing the service door
Replace the service door after accessing the memory module slot, hard drive, regulatory label, and
other components.
1. Tilt down the service door to align the front edge of the service door near the front edge of the
computer (1).
2. Slide the service door forward (2) until the service door snaps into place.
Using hard drives 47