
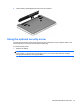
Getting Started HP Notebook - Windows 7


Removing the service door
Remove the service door to access the memory module slot, hard drive, regulatory label, and other
components.
To remove the service door:
1. Remove the battery (see
Inserting or removing the battery on page 26).
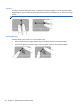
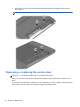
2. With the battery bay toward you, remove the optional security screw (1), (if the optional security
screw is being used, see
Using the optional security screw on page 27), and then slide the
service door release latches (2) to release the service door
NOTE: If you do not want to use the optional security screw, you can store it inside the battery
bay.
NOTE: You can slide the service door release latches simultaneously or you can slide them
one at a time.
3. Slide the service door towards the front of the computer (3) and lift (4) to remove the service
door.
Replacing the service door
Replace the service door after accessing the memory module slot, hard drive, regulatory label, and
other components.
To replace the service door:
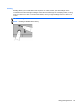
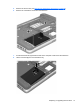
1. Tilt the service door down to align the tabs on the service door with the latches on the computer
(1).
2. Insert the alignment tabs (2) on the rear edge of the service door with the notches on the
computer.
NOTE: The release latches automatically lock the service door into place (3).
Removing or replacing the service door 29