
Getting Started HP Notebook - Windows 7

CAUTION: To prevent information loss or an unresponsive system:
Shut down the computer before adding or replacing memory modules. Do not remove a memory
module while the computer is on, in the Sleep state, or in Hibernation.
If you are not sure whether the computer is off or in Hibernation, turn the computer on by pressing the
power button. Then shut down the computer through the operating system.
1. Save your work and shut down the computer.
2. Disconnect AC power and external devices connected to the computer.
3. Turn the computer upside down on a flat surface.
4. Remove the battery (see
Inserting or removing the battery on page 26).
5. Remove the service door (see
Removing or replacing the service door on page 28).
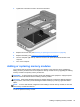
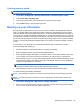
6. If you are replacing a memory module, remove the existing memory module:
a. Pull away the retention clips (1) on each side of the memory module.
The memory module tilts up.
b. Grasp the edge of the memory module (2), and then gently pull the memory module out of
the memory module slot.
CAUTION: To prevent damage to the memory module, hold the memory module by the
edges only. Do not touch the components on the memory module.
To protect a memory module after removal, place it in an electrostatic-safe container.
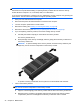
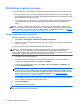
7. Insert a new memory module:
CAUTION: To prevent damage to the memory module, hold the memory module by the edges
only. Do not touch the components on the memory module.
a. Align the notched edge (1) of the memory module with the tab in the memory module slot.
b. With the memory module at a 45-degree angle from the surface of the memory module
compartment, press the module (2) into the memory module slot until it is seated.
34 Chapter 5 Maintenance