
User Guide


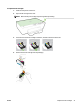
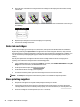

5. Using the color-coded letters for help, slide the ink cartridge into the empty slot until it clicks securely
into the slot.
Make sure that you insert the ink cartridge into the slot that has the same colored letter as the color you
are installing.
6. Repeat steps 3 through 5 for each ink cartridge you are replacing.
7. Close the ink cartridge access door.
Order ink cartridges
To order ink cartridges, go to www.hp.com . (At this time, some portions of the HP website are available in
English only.) Ordering cartridges online is not supported in all countries/regions. However, many countries
have information on ordering by telephone, locating a local store and printing a shopping list. In addition, you
can visit the www.hp.com/buy/supplies page to obtain information about purchasing HP products in your
country.
Use only the replacement cartridges that have the same cartridge number as the ink cartridge you are
replacing. You can nd the cartridge number in the following places:
●
In the embedded web server, by clicking the Tools tab, and then, under Product Information clicking Ink
Gauge. For more information, see Embedded web server.
●
On the printer status report (see Printer status report).
●
On the label of the ink cartridge you are replacing.
●
On a sticker inside the printer. Open the ink cartridge access door to locate the sticker.
NOTE: The Setup ink cartridge that comes with the printer is not available for separate purchase.
Store printing supplies
●
Keep all ink cartridges in the original sealed packages until they are needed.
●
Ink cartridges can be left in the printer for extended periods of time. However, to assure optimal ink
cartridge health, be sure to turn o the printer properly. For more information, see Turn the printer o.
●
Store ink cartridges at room temperature (15-35° C or 59-95° F).
42 Chapter 5 Work with ink cartridges ENWW