HP EliteDisplay S230tm Touch Monitor User Guide
© 2013 Hewlett-Packard Development Company, L.P. Microsoft and Windows are either trademarks or registered trademarks of Microsoft Corporation in the United States and/or other countries. The only warranties for HP products and services are set forth in the express warranty statements accompanying such products and services. Nothing herein should be construed as constituting an additional warranty. HP shall not be liable for technical or editorial errors or omissions contained herein.
About this guide This guide provides information on setting up the monitor, operating the touch screen, and technical specifications. WARNING! Text set off in this manner indicates that failure to follow directions could result in bodily harm or loss of life. CAUTION: Text set off in this manner indicates that failure to follow directions could result in damage to equipment or loss of information. NOTE: Text set off in this manner provides important supplemental information.
iv About this guide
Table of contents 1 Product features ............................................................................................................................................. 1 HP Touch Monitor ................................................................................................................................ 1 2 Setting up and using the monitor .................................................................................................................. 3 Rear components ..............
4 Finding more information ............................................................................................................................ 19 Reference guides ............................................................................................................................... 19 Product support .................................................................................................................................. 19 Appendix A Technical specifications .......................
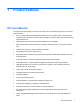
1 Product features HP Touch Monitor The LCD (liquid crystal display) monitor has an active matrix, wide viewing angle panel. The monitor features include: ● 58.
2 ● Software and documentation disc that includes monitor drivers and product documentation ● Energy saver feature to meet requirements for reduced power consumption ● Safety guidelines, certifications, and regulatory notices for these products are available in the HP LCD Monitors Reference Guide on the disc included with this monitor Chapter 1 Product features
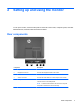
2 Setting up and using the monitor To set up the monitor, ensure that the power is turned off to the monitor, computer system, and other attached devices, and then follow the instructions below. Rear components Component Description 1 DC power connector Connects the DC power cable to the monitor. 2 DisplayPort connector Connects the DisplayPort cable to the monitor. 3 DVI-D connector Connects the DVI-D cable to the monitor.
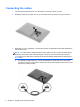
Connecting the cables 1. Lay the monitor panel face down on a flat surface covered by a clean, dry cloth. 2. Rotate the bottom of the cable cover up (1) then slide out the top of the cover (2) to remove it. 3. Depending on your configuration, connect either the DVI or DisplayPort video cable between the PC and the monitor. NOTE: The video mode is determined by the video cable used. The monitor will automatically determine which inputs have valid video signals.
● 4. For DVI digital operation, connect the DVI-D signal cable to the DVI connector on the rear of the monitor and the other end to the DVI connector on your input device (cable provided). Connect one end of the provided USB cable to a USB connector on the rear panel of the computer, and the other end to the USB connector on the monitor. NOTE: You must connect the USB cable between the computer and monitor for webcam and touch functionality.
5. Connect the provided audio cable to the audio input jack on the rear of the monitor and the other end to the audio output jack on your input device. 6. Plug the round end of the power supply cord into the power supply connector on the rear of the monitor (1). Plug the power cord into the power supply brick (2) and connect the other end of the power cord to an electrical outlet (3). WARNING! To reduce the risk of electric shock or damage to the equipment: Do not disable the power cord grounding plug.
7. Replace the cable cover on the rear of the monitor by sliding the tabs on the top of the cover into the slots on the top of the cable connection recess (1) then rotate the cover down and snap into the recess (2) so that it is securely fastened to the rear of the monitor. 8. Place the monitor upright and pull the easel stand out to support the monitor.
Adjusting the monitor tilt Adjust the tilt to the desired position. To adjust the tilt upward, hold the top of the monitor with two hands and rotate the monitor upward and forward. To adjust the tilt downward, hold the top of the monitor with two hands and rotate the monitor back and down. The monitor tilt range is 15 to 70 degrees.
Front and side components Component Description 1 Dual microphone array Integrated into the top of the monitor's bezel. 2 Webcam Integrated into the top of the monitor's bezel. 3 Headphone jack Connects headphones. NOTE: Connecting headphones will mute the internal speakers. 4 OK button If the OSD menu is on, press to select the highlighted menu item. 5 Plus/input button If the OSD menu is on, press to navigate forward through the OSD menu and increase adjustment levels.
Turning on the monitor 1. Press the power button on the computer to turn it on. 2. Press the power button on the side of the monitor to turn it on. CAUTION: Burn-in image damage may occur on monitors that display the same static image onscreen for 12 or more consecutive hours of non-use. To avoid burn-in image damage on the monitor screen, you should always activate a screen saver application or turn off the monitor when it is not in use for a prolonged period of time.
HP watermark and image retention policy The wide viewing angle monitor models are designed with wide viewing angle display technology which provides ultra-wide viewing angles and advanced image quality. Wide viewing angle monitors are suitable for a wide variety of advanced image quality applications. This panel technology, however, is not suitable for applications that exhibit static, stationary or fixed images for long periods of time without the use of screen savers.
Scrolling Scrolling is useful for moving up, down, left, or right on a page or image. Place two fingers on the screen and then drag them in an up, down, left, or right motion. Pinching/stretching Pinching and stretching allows you to zoom out or in on images or text. ● Zoom in by placing two fingers together on the display and then move your fingers apart. ● Zoom out by placing two fingers apart on the display and then move your fingers together.
Right-edge swipe The right-edge swipe reveals the charms, letting you search, share, start apps, access devices, or change settings. ● To open the Charms bar, start at the right edge and swipe across the screen. ● To search for an app, setting, or file, swipe from the right edge across the screen to open the Charms bar, tap the Search charm, and then tap the category, such as Files. Then tap the Search box to use the on-screen keyboard.
Cleaning the monitor For optimal performance you should regularly clean the touch screen and the touch screen reflectors around the inside of the front bezel. 1. Turn off the monitor and unplug the power cord from the back of the unit. 2. Dust the monitor by wiping the screen and the cabinet with a soft, clean antistatic cloth. 3. For more difficult cleaning situations, use a 50/50 mix of water and Isopropyl alcohol.
Mounting the monitor The monitor panel can be attached to a wall, swing arm, or other mounting fixture. NOTE: 1. This apparatus is intended to be supported by a UL or CSA listed wall mount bracket. Remove the monitor panel from the easel stand. Refer to Removing the monitor stand on page 14. CAUTION: This monitor supports the VESA industry standard 100 mm mounting holes. To attach a third-party mounting solution to the monitor, four 4 mm, 0.7 pitch, and 10 mm long screws are required.
Locating the rating label The rating label on the monitor provides the spare part number, product number, and serial number. You may need these numbers when contacting HP about the monitor model. The rating label is located on the rear panel of the monitor behind the cable cover. Installing a cable lock You can secure the monitor to a fixed object with an optional cable lock available from HP.
3 Using the webcam Install CyberLink YouCam software and driver from the disc that came with your monitor. NOTE: USB connectivity between the monitor and PC is required for the webcam to operate. Use your webcam to: ● Create videos from files on your computer. ● Create snapshots to view, organize, edit, send, and print. ● Create video notes for an enhanced visual calendar and to share. ● Initiate live video chats with Windows Live Messenger or other compatible software program.
The optimal distance for recording sound with the array microphone is about .5 meters (2 feet) away from the microphone. Before you can set up a video chat: 18 1. Download an Internet messenger or video phone call program. Make sure the person you are calling has compatible video-calling software. 2. Enable your webcam as the default video input. This is usually done through the video setup in the Tools menu in the software program you are using. 3.
4 Finding more information Reference guides Refer to the HP LCD Monitors Reference Guide included on the disc with your monitor for additional information on: ● Optimizing monitor performance ● Safety and maintenance guidelines ● Installing software from the disc ● Using the OSD menu ● Downloading software from the Web ● Agency regulatory information ● Troubleshooting and recommended solutions to common problems Product support For additional information on using your all-in-one, go to http:
A Technical specifications NOTE: All specifications represent the typical specifications provided by HP's component manufacturers; actual performance may vary either higher or lower. HP S230tm Display 58.4 cm touch screen 23 inches touch screen Type Wide viewing angle LCD Viewable Image Size 58.4 cm diagonal 23-inch diagonal Maximum Weight (Unpacked) 6.5 kg 14.3 lbs Height 40.92 cm 16.1 inches Depth 6.95 cm 2.7 inches Width 59.93 cm 23.
Recognizing preset display resolutions The display resolutions listed below are the most commonly used modes and are set as factory defaults. This monitor automatically recognizes these preset modes and they will appear properly sized and centered on the screen. HP S230tm Table A-1 Factory preset modes Preset Pixel format Horz freq (kHz) Vert freq (Hz) 1 640 × 480 31.469 59.940 2 720 × 400 31.469 70.087 3 800 × 600 37.879 60.317 4 1024 × 768 48.363 60.004 5 1280 × 720 45.00 60.
Entering user modes The video controller signal may occasionally call for a mode that is not preset if: ● You are not using a standard graphics adapter. ● You are not using a preset mode. It this occurs, you may need to readjust the parameters of the monitor screen by using the on-screen display. Your changes can be made to any or all of these modes and saved in memory. The monitor automatically stores the new setting, then recognizes the new mode just as it does a preset mode.