
Administrator's Guide
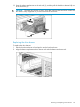


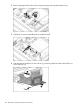


3. Extend the hard drive drawer (3).
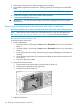
13. Replace all hard drives.
IMPORTANT: Install the hard drives in the same slots from which you removed them or the
system might fail. Use the drive labels to ensure they are replaced in the correct order.
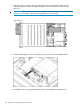
14. Push the drive drawer back into the messaging system enclosure.
15. Plug in all cables to the back of the messaging system enclosure and ensure that all cables
are returned to their original locations.
16. Power on the messaging system.
17. Verify and confirm that the replacement component is working properly by checking the
component LED status.
Removing and replacing the drive drawer hard drive
CAUTION: Do not replace the hard drive with an SATA drive. Be sure to replace the hard drive
only with an approved SAS drive.
CAUTION: Do not replace the drive drawer hard drive during peak data transfer times. Make
sure the hard drive LED is off before you remove the hard drive.
IMPORTANT: Be sure to unpack the replacement part before you remove the existing component.
This section describes how to remove and replace the hard drive in the messaging system. After
replacing the hard drives, the approximate wait times for viewable disk LED activity vary.
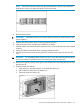
Removing the drive drawer hard drive
To remove the drive drawer hard drive:
1. Use System Manager to identify the failed component.
2. Verify the failed component by checking for a blinking amber LED on the failed component.
3. Extend the hard drive drawer:
1. Press upward on the release button on the hard drive drawer (1).
2. Pull the drawer handle down 90 degrees (2).
124 Removing and replacing hardware components