
Administrator's Guide


3. To make SNMP visible externally:
1. Select Start→Administrative Tools→Services.
2. Select SNMP Service.
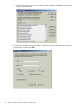
3. Right click and select Properties to display the SNMP Service properties.
4. Select the Security tab and specify the following items:
• The external hosts that may use the SNMP protocol.
• The SNMP Community string. HP recommends that you use something other than the
typical ‘Public’ string.
IMPORTANT: Configure HP SIM security to prevent the SIM management server from
gaining access to SNMP.
The SNMP trap function in the messaging system is enabled by default. Any SNMP client (on
localhost) listening on default port number 171 can receive traps. You can configure the
destination IP address using the snmp.xml configuration file in the directory \Program Files\
HPWBEM\Tools\snmp.xml.
Using the E5000 System Manager
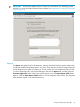
To use the E5000 System Manager, which has been preinstalled a configured, you must Remote
Desktop into the server blade. Next, you may access the E5000 System Manager by clicking the
icon located in the tray immediately to the right of the Start button. You may also access the
E5000 System Manager by clicking Start→Administrative Tools→Server Manager. Use the System
Summary tab in the E5000 System Manager to monitor the system health status of each server
blade.
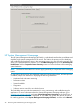
The System Summary tab shows the overall, high-level status of the messaging system hardware,
Exchange, and firmware.
To troubleshoot using the E5000 System Manager:
1. Open the HP E5000 System Manager.
2. Open the System Summary tab to review the overall health of the messaging system hardware,
Exchange, and firmware.
If the status icon is green, the system is running properly. A yellow icon is a warning that there
are conditions that might cause a problem. If the icon is red, a problem exists in the messaging
system.
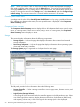
3. Open each tab in the HP E5000 System Manager to assess the status of the messaging system.
4. Follow the instructions provided on the System Manager tabs for any reported issue.
NOTE: The E5000 System Manager provides the status of each server blade that is configured
in the messaging system. Be sure to note the server blade that is being assessed when you open
the E5000 System Manager. Log into each server blade to evaluate its status.
IMPORTANT: The System Manager identifies the server blade and bay location. You must run
the System Manager beginning with server blade 1, although server blade 1 might not be the
active server blade. A message appears informing you that the System Manager is evaluating
server blade 1.
Table 2 (page 44) shows the description for the messaging system status tray check mark color.
Using the E5000 System Manager 43