
Administrator's Guide
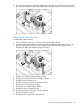


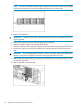


1. Insert the replacement SAS I/O module (1), and then push up on the SAS I/O module lever
(2) until it locks into place.
NOTE: You may need to use significant force to accomplish this task.
2. Plug in all cables to the SAS I/O module.
IMPORTANT: You must install the SAS I/O cables in the same slots from which they are
removed or the system might fail.
3. Verify that the replacement SAS I/O module is working properly by checking the associated
LED status.
4. Confirm the firmware version.
5. Confirm the system has resumed normal operations.
NOTE: The green LED should turn on within 5 seconds after the new module is inserted in
the system, which reflects the necessary time to boot the firmware.
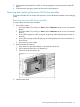
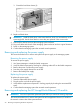
Removing and replacing the drive fan module
IMPORTANT: Be sure to unpack the replacement part before you remove the existing component.
CAUTION: You must replace the server fan module within 3 minutes or you might lose data. The
total time allowance is 3 minutes for replacing the driver module, which includes the removal of
the original server fan module and installation of the replacement fan.
CAUTION: Removing a fan module significantly changes the air flow within the enclosure. Both
fan modules must be installed for the enclosure to cool properly. The fan modules are not redundant
to each other, and each module cools a different half of the enclosure. If a single fan module fails,
leave it in place in the enclosure until a new fan is available to install. The fan modules have some
built-in redundancy to keep operating until a replacement can be made. The remaining fan module
speeds up and allows operation for a limited time, based on operating and environmental
conditions. If a temperature threshold is exceeded, the enclosure automatically shuts down.
NOTE: There are two fan modules in the messaging system: one server fan module and one hard
drive fan module.
This section describes how to remove and replace the drive fan module in the messaging system.
84 Removing and replacing hardware components