HP E5000 Messaging System for Microsoft Exchange Installation Checklist Abstract Use this document to plan your HP E5000 Messaging System for Microsoft Exchange deployment.
© Copyright 2012 Hewlett-Packard Development Company, L.P.
Before you begin Moving to Exchange 2010 entails the following: • Use a Database Availability Group (DAG) to establish high availability for the Exchange 2010 environment. The E5000 software tools will guide you through the setup. Be prepared with inputs for the Exchange Deployment Tool wizard as outlined in “Using the Exchange Deployment Tool (EDT)” (page 9). • Deploy all roles on each server, per HP's best practice.
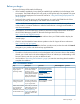
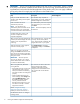
Table 1 Pre-installation checklist (continued) Step Description Resources Determine the database prefix naming. Consider whether there are naming conventions in your organization. The tool suggest a default name of DB1. Determine the location (server and directory) for the witness file share for the Exchange 2010 DAG. This can be a file server in your domain. HP recommends that you let the Exchange Deployment Tool create the file share and set permissions.
Table 1 Pre-installation checklist (continued) Step Description Resources Ensure that you have two legally licensed copies of Exchange 2010 (either Standard or Enterprise Edition). Standard Edition is limited to five databases. As a result, it is not compatible with some E5000 models. During installation, you will enter the license key for each server in the E5000. For more information about Microsoft Exchange licensing requirements, see: http://www.microsoft.
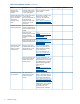
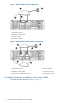
Figure 1 Typical E5300 network configuration 1. Client/MAPI network 2. Replication network cable 3. Domain controller 4. Connection to EMU Figure 2 Typical E5500/E5700 network configuration 1. Client/MAPI network 4. Domain controller 2. Replication network cable 5. Connection to EMU 3. Connection to management network 6. Management network Complete hardware installation (rack and cable) Complete the steps described in Table 2 (page 7).
Table 2 Hardware installation Step Description Acknowledgment Record the serial number of the E5000 Once the E5000 components are installed in a rack, it is and expansion disk enclosures, if any. difficult to read serial numbers. If you are deploying multiple messaging systems, confirm that any expansion disk enclosures are matched to the appropriate messaging system as noted on the rear label before you install them in the rack.
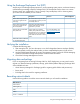
IMPORTANT: Prior to running the ECW, disable local User Access Control (UAC). If UAC is enabled as a policy on the domain controller for the domain you will be joining, put the E5000 servers in an organizational unit that has blocked the application of the domain policy. You can apply a different group policy that will not apply any UAC policies on the E5000 server. Step Description Enter your locale information in the Windows setup dialog and accept the license terms.
Using the Exchange Deployment Tool (EDT) Verify that you have the appropriate permissions, correct operating system version, and Active Directory schema before proceeding to deploy Exchange 2010. The Prerequisite Checks screen runs a series of tests to verify your configuration is set up correctly. If any test displays a Fail or Warning status, you must fix the issue before you can continue. Step Description Resource Review and accept the end user license agreement for Exchange.
Server 2 IP address: DAG IP address: Replication Network (if changing from defaults) Subnet mask: Server 1 IP address: Server 2 IP address: Management Network Subnet mask: Default gateway: DNS: DNS2: Server 1 IP address: Server 2 IP address: Database Information Existing or new DAG? DAG name: Database naming prefix: 10 Recording network details