User Guide 10/100 Secure Network Interface Card 3CR990B-97 3CR990B-FX-97 10/100 Mbps PCI Secure Copper NIC 100 Mbps Secure Fiber NIC http://www.3com.com/ http://esupport.3com.
3Com Corporation • 350 Campus Drive • Marlborough, Massachusetts • 01752-3064 • U.S.A. Copyright © 2003 3Com Corporation. All rights reserved. No part of this documentation may be reproduced in any form or by any means or used to make any derivative work (such as translation, transformation, or adaptation) without written permission from 3Com Corporation. 3Com is a registered trademark and the 3Com logo is a trademark of 3Com Corporation.
Contents 1 Installing and Connecting the NIC 1 Minimum Installation Requirements 1 Installation Overview 1 Safety Precautions 2 Preparing the NIC and the Computer 2 Installing and Connecting the NIC 3 2 Windows 2003 Server Driver Installation Installing the Network Driver 5 Verifying the Network Driver Installation 5 3 Windows XP Driver Installation 7 Installing the Network Driver 7 Verifying the Network Driver Installation 5 7 4 Windows 2000 Driver Installation 9 Installing the Network Driver 9 Ve
Contents 9 10 Installing and Configuring Data Encryption Offloads 23 Overview 23 Offloading Encryption Processing 23 Selecting Basic or Strong Encryption Processing 23 Configuring IPSec in Windows 2003, Windows XP, and Windows 2000 Creating a Security Policy 24 Defining the Console 25 Creating the Policy 25 Creating a Filter 26 Binding the Filter 26 Creating the Filter Action 26 Binding the Filter Action 27 Enabling Encryption 27 Disabling Encryption 27 24 Installing 3Com Advanced Server Features for W
Contents 11 Configuring the NIC 43 Default NIC Settings 43 Configuration Methods 45 Changing General NIC Configuration Settings 46 Installing the 3Com NIC Diagnostics Program 46 Starting the 3Com NIC Diagnostics Program 47 Using the 3Com NIC Diagnostics Program 47 Using the 3Com DOS Configuration Program 48 Configuring the Managed PC Boot Agent (MBA) 49 Enabling or Disabling the Boot ROM Setting 49 Booting From the Network 49 BBS BIOS-Compatible PCs 49 Non-BBS BIOS-Compatible PCs 50 Disabling the 3Com Log
Contents 13 Running NIC Diagnostics 61 Running the 3Com DOS Diagnostics Program 61 Running the NIC Diagnostics Tests 62 Running the Network Test 63 Running the NIC Test 63 Viewing the NIC LEDs in the 3Com Diagnostics Program Viewing Network Statistics 64 Using the 3Com Icon in the Windows System Tray 64 Enabling the Icon 65 Displaying Network Statistics 65 Removing the 3Com NIC Diagnostics Program 65 A Specifications and Cabling Requirements 3CR990B-97 NIC Specifications 67 3CR990B-FX-97 NIC Specificati
1 Installing and Connecting the NIC This user guide explains how to install the 3Com 10/100 Secure NIC (3CR990B NIC family) in a computer running any of the following operating systems: • Windows 2003 Server • Windows XP • Windows 2000 • Windows NT 4.0 • Windows 98 SE • NetWare 5.x and 6.x • Linux 2.4 Your Windows operating system should have the latest service pack installed.
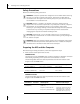
1 Installing and Connecting the NIC Safety Precautions Observe the following safety precautions. WARNING: Computers operate with voltages that can be lethal. Before removing the cover, turn off the computer and unplug it. Disconnect all cables that are connected to the main system unit. Remove jewelry from your hands and wrists. Use insulated or nonconductive tools. CAUTION: The NIC is packed in an antistatic container to protect it during shipment.
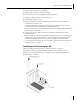
Installing and Connecting the NIC 2 Unpack and inspect the NIC for damage. 3 Exit all open applications and user processes. 4 Turn off the power to the computer and attached devices. 5 Unplug the power cables from the power source. 6 Remove the computer cover. 7 Locate an empty, non-shared bus-mastering PCI slot and remove its slot cover. Save the screw, if there is one. Do not install the NIC in a shared PCI slot. Avoid any PCI slot next to an ISA slot.
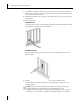
1 Installing and Connecting the NIC 1 Carefully insert the NIC in the empty PCI slot, as shown in the previous illustration. Press firmly to ensure that the NIC is fully seated in the slot. Secure the NIC with the screw if you removed one earlier. 2 Replace the computer cover and plug in the power cord. Do not turn on the power to the computer. 3 Connect the cable.
2 Windows 2003 Server Driver Installation This chapter explains the following tasks on a computer running Windows 2003 Server: • Install the network driver and NIC software using the 3Com installation CD. • Verify the network driver installation. To obtain the latest version of a driver, go to: http://www.3com.com/ Search for “3CR990B” and “drivers.” The network driver can be used in both Microsoft and NetWare network environments.
2 6 Windows 2003 Server Driver Installation
3 Windows XP Driver Installation This chapter explains the following tasks on a computer running Windows XP: • Install the network driver and NIC software using the 3Com Installation CD. • Verify the network driver installation. To obtain the latest version of a driver, go to: http://www.3com.com/ Search for “3CR990B” and “drivers.” The network driver can be used in both Microsoft and NetWare network environments.
3 8 Windows XP Driver Installation
4 Windows 2000 Driver Installation This chapter explains the following tasks on a computer running Windows 2000: • Install the network driver and NIC software using the 3Com Installation CD. • Verify the network driver installation. To obtain the latest version of a driver, go to: http://www.3com.com/ Search for “3CR990B” and “drivers.” The network driver can be used in both Microsoft and NetWare network environments.
4 10 Windows 2000 Driver Installation
5 Windows NT 4.0 Driver Installation This chapter explains the following tasks on a computer running Windows NT 4.0: • Install the network driver and NIC software using the 3Com Installation CD. • Verify the network driver installation. To obtain the latest version of a driver, go to: http://www.3com.com/ Search for “3CR990B” and “drivers.” The network driver can be used in both Microsoft and NetWare network environments.
5 Windows NT 4.0 Driver Installation 10 When the installation is complete, Windows prompts for a reboot. After the reboot, make sure to reapply the service pack. NOTE: Verify that the Windows operating system has been upgraded to the latest version and latest service pack. Also, make sure the correct BIOS and firmware are installed to ensure the system works correctly. NOTE: If networking has not been installed on your PC, Windows NT asks if you want to install networking.
6 Windows 98 SE Driver Installation This chapter explains the following tasks on a computer running Windows 98 SE: • Install the network driver and NIC software using the 3Com Installation CD. • Verify the network driver installation. To obtain the latest version of a driver, go to: http://www.3com.com/ Search for “3CR990B” and “drivers.” The network driver can be used in both Microsoft and NetWare network environments.
6 14 Windows 98 SE Driver Installation
7 Novell NetWare Driver Installation This chapter explains the following tasks on a computer running Novell NetWare 5.0, 6.0, and 6.5: • Install the network driver and NIC software using the 3Com Installation CD. • Verify the network driver installation. To obtain the latest version of a driver, go to: http://www.3com.com/ Search for “3CR990B” and “drivers.” The network driver can be used in both Microsoft and NetWare network environments. Installing the Driver in Novell NetWare Server 5.1 and 6.
7 Novell NetWare Driver Installation Installation with Novell Already Installed Be sure that the server has the latest support pack available installed. The latest support pack can be found at: http://support.novell.com/misc/patlst.htm 1 Insert the NIC into a PCI slot. 2 Go to system console on the server. 3 Run nwconfig. 4 Go to driver options, configure network drivers. 5 Choose Select a driver.
Verifying or Modifying NIC Parameters Verifying or Modifying NIC Parameters When a NIC configuration is saved, the NetWare install program adds load and bind statements to the autoexec.ncf file. By accessing this file, you can verify the parameters configured for each NIC, modify them, or enter additional parameters. A valid autoexec.ncf file is shown below. One set of load and bind commands is shown for each frame type the NIC is configured to support.
7 Novell NetWare Driver Installation Removing Drivers from Autoexec.ncf To remove the drivers from the autoexec.ncf file, locate the load and bind command lines and remark them out by inserting the # symbol at the beginning of each command line. Example: # # # # # # # # # 18 LOAD BIND LOAD BIND LOAD BIND LOAD BIND BIND 3c99x SLOT=2 FRAME=Ethernet_802.2 NAME=3c99x_1_E82 IPX 3c99x_1_E82 NET=FAFD3D25 3c99x SLOT=2 FRAME=Ethernet_802.
Installation During Novell OS Installation Installing the Driver in Novell NetWare Server 6.5 Before you begin, make sure that: • The NIC is installed in the server. • The latest support pack files are installed. The latest support packs can be found at: http://support.novell.com/misc/patlst.htm. To obtain the latest support pack files, go to the Novell support Web site and select the Minimum Patch List option in the navigation bar.
7 Novell NetWare Driver Installation 7 Press the delete key to remove the built-in driver. 8 Press Insert to specify an unlisted NIC. 9 Press Enter if the drivers are contained on a floppy disk, or press F3 and enter a different path. 10 Press Enter to select the NIC. 11 Select Modify Driver Properties to configure NIC options, or choose Return to Driver Summary.
8 Linux 2.4 Driver Installation This chapter explains how to install the network driver on a computer running Linux 2.4. To obtain the latest version of a driver, go to: http://www.3com.com/ Search for “3CR990B” and “drivers.” The network driver can be used in both Microsoft and NetWare network environments. Installing the Network Driver To install the driver: NOTE: Before installing the driver, make sure you are logged in as root (SuperUser).
8 22 Linux 2.
9 Installing and Configuring Data Encryption Offloads The 3CR990B NIC performs data encryption processing offloads in Windows 2003, Windows XP, and Windows 2000. The 3CR990B NIC does not encrypt the data itself: the operating system performs that function. Encryption processing is handled entirely by the NIC. The NIC enables true end-to-end network security at the data capacity of the connected network cable, without sacrificing performance.
9 Installing and Configuring Data Encryption Offloads Configuring IPSec in Windows 2003, Windows XP, and Windows 2000 The 3CR990B NIC accelerates IP security (IPSec) data encryption from supported operating systems that provide this offload capability. This feature is currently available in the Windows 2003, Windows XP, and Windows 2000 operating systems.
Creating a Security Policy Defining the Console This sequence establishes the Console and defines its parameters. To define the Console: 1 In the Windows taskbar, click Start, Programs, Accessories, and then Command Prompt. 2 At the DOS prompt, enter: MMC The Console1 screen appears. 3 In the menu click Console, and then Add/Remove Snap-in. The Add/Remove Snap-in screen appears. 4 Click Add. The Add Standalone Snap-in screen appears. 5 Select IP Security Policy Management, and then click Add.
9 Installing and Configuring Data Encryption Offloads 12 Enable the default option All network connections, and then click Next. The Authentication Methods screen appears. 13 Enable the Use this string to protect the key exchange (preshared key): option, type the appropriate string text in the entry field, and then click Next. Creating a Filter This sequence creates a filter for the policy. The IP Filter List screen appears. 1 Click Add. A new IP Filter List screen appears.
Creating a Security Policy 5 Accept the default value, and then click Next. The IP Traffic Security screen appears. 6 Select Custom, and then click Settings. The Custom Security Method Settings screen appears. 7 Enable the Data integrity and encryption (ESP): check box, and then make the appropriate selections in the Integrity and algorithms list boxes. 8 Click OK, Next, and then Finish. Binding the Filter Action This sequence attaches the new filter action to the filter and policy.
9 28 Installing and Configuring Data Encryption Offloads
10 Installing 3Com Advanced Server Features for Windows This chapter explains the following tasks for a computer running Windows 2003, Windows XP, Windows 2000, or Windows NT 4.0 with the 3Com 10/100 Secure (3CR990B) NIC installed. NOTE: Windows 98 does not support the advanced server features.
10 Installing 3Com Advanced Server Features for Windows Load Balancing Load balancing maximizes bandwidth at the server through the use of multiple parallel resilient server links (RSLs) that share the network load as shown in the next figure. An RSL consists of two or more NICs that form a virtual NIC. Each virtual NIC has multiple physical NICs bound to it, forming a group. Each NIC in a group uses the same protocols and frame types. One NIC is designated the primary NIC and the others secondary NICs.
Server Features Using Other NICs VLANs A virtual LAN (VLAN) is a group of location-independent and topology-independent devices that communicate as if they were on the same physical LAN. Network devices on different LAN segments and of different media types can be members of the same VLAN. Membership in a VLAN is determined by a VLAN tag that is transmitted with the Ethernet frame for use by a switch.
10 Installing 3Com Advanced Server Features for Windows Installing 3Com Advanced Server Software Follow these steps to install 3Com Advanced Server (DynamicAccess) software: 1 Make sure that the NIC and the network driver are properly installed in your computer. 2 Start Windows. 3 Insert the 3Com Installation CD in the CD-ROM drive. The Welcome screen appears. 4 Click NIC Software. 5 Click DynamicAccess technologies. 6 Click Install DynamicAccess software.
Planning the Configuration Configuring Groups and VLANs 3Com Advanced Server technology features allow you to configure load balancing groups and virtual LANs (VLANs). The following 3Com Advanced Server technology features are available for NIC groups in Windows: • Load balancing • RSL failover • Multiple VLANs The examples in this section illustrate typical actions you might take in the course of maintaining a 3Com Advanced Server configuration in Windows.
10 Installing 3Com Advanced Server Features for Windows • The following guidelines apply to groups under Windows 2003, Windows XP, and Windows 2000: 802.1p Support Property—The value of the Windows 802.1p support property must be the same for all NICs in a group. For example, if this property is enabled for the primary NIC, it must also be enabled for all other NICs in the group.
Creating a Group Windows 2003, Windows XP, and Windows 2000 Access 3Com Advanced Server server features through the Windows Network and Dial-up Connections window as follows: 1 Log in to Windows with administrator privileges. 2 Launch the Windows Network and Dial-up Connections window. 3 Select a Local Area Connection icon. 4 Click the right mouse button and select Properties. The Local Area Connections Properties window appears. 5 Click the General tab.
10 Installing 3Com Advanced Server Features for Windows To disable all load balancing—Clear the Receive Load Balance Enabled and the Transmit Load Balance Enabled check boxes. 5 Click OK. The name of the new NIC group appears in the Load Balancing/RSL Groups list box. Adding NICs to a Group 1 Click the Load Balance/RSL tab. 2 In the Load Balance/RSL window: • Select a group from the Load Balancing/RSL Groups list. • Select a NIC from the Network Interface Cards list. 3 Click Add NIC.
Changing an IP Address Changing an IP Address If another device is using a bidirectional load balancing group's dedicated IP address, you must change either the other device’s IP address or that of the load balancing group. Use the appropriate procedure below: Changing the Other Device’s IP Address After you change the other device's address, restart receive load balancing as follows: 1 In the Load Balancing/RSL window, select the group that had the duplicate address. 2 Click Properties.
10 Installing 3Com Advanced Server Features for Windows Saving the Configuration To save and exit, click OK. To exit without saving the configuration, click Cancel. Disabling Load Balancing for a Group Follow these steps to disable load balancing for a group: 1 Click the Load Balance/RSL tab. 2 In the Load Balance/RSL window: • Select a group from the Load Balancing/RSL Groups list. • Click Properties.
Displaying NIC Properties Displaying NIC Properties Follow these steps to display NIC properties: 1 Click the Load Balance/RSL tab. 2 In the Load Balance/RSL window, select a NIC. 3 Click Properties. The NIC Properties window appears, showing the properties of the selected NIC. Displaying Group Properties Follow these steps to display group properties: 1 Click the Load Balance/RSL tab. 2 In the Load Balance/RSL window, select a group in the Load Balancing/RSL Groups list box. 3 Click Properties.
10 Installing 3Com Advanced Server Features for Windows Changing Windows 2003, Windows XP, and Windows 2000 Property Settings If you receive warnings about inconsistent property settings (for example, the 802.1p Support property) while creating a group, use the following procedure to change a NIC property: 1 Right-click the My Computer icon and select Properties from the menu. 2 Click the Hardware tab, then click Device Manager. 3 Double-click Network Adapters.
Enabling Offloads • IP and TCP Checksum Offload—reduced CPU utilization by allowing the NIC to perform the checksum calculation of TCP/IP and UDP/IP packets. • 802.1p Packet Priority Offload—reduces CPU utilization by allowing the NIC to perform the insertion of the 802.1Q tag header into the packet. Enabling Offloads Windows 2003 and Windows 2000 provide the capability to individually enable or disable each of the four offload features. (The default setting for these features is enabled.
10 Installing 3Com Advanced Server Features for Windows Configuring Offloads for a Group of Different NICs Your computer may contain a combination of installed NICs (including one or more 3CR990Bs with varying offload capabilities). If you have a mix of dissimilar NICs configured in a group, then 3Com DynamicAccess Advanced Server software supports only those offload functions that are supported by all the NICs in the group.
11 Configuring the NIC This chapter describes how to configure the 3Com 10/100 Secure (3CR990B) NIC. NOTE: Before you change the NIC configuration settings, contact your system administrator. Default NIC Settings The table below lists the configuration settings for the NIC. The default setting is shown in bold in the Settings column. Option Description Settings NetBoot ROM Provides the ability to boot a computer over the network.
11 Configuring the NIC Option Description Settings Media Type Determines the type of media your network is using. • Auto Select allows the NIC to automatically select the Media Type for you. • If you set the NIC Duplex setting to Auto Select, the Media Type is automatically set to Auto Select. • If you set the NIC Duplex setting manually, you must set the Media Type setting manually.
Configuration Methods Configuration Methods The NIC can be configured using any of the methods listed in the table below. NOTE: This section describes how to configure the NIC using the 3Com NIC Diagnostics program for Windows. For instructions on using the other two methods, see the file or section mentioned in the table.
11 Configuring the NIC Changing General NIC Configuration Settings This section describes two NIC configuration methods. Depending on your computer operating system, you can use one of the following configuration programs: • 3Com NIC Diagnostics Program—for computers running Windows 2003, Windows XP, Windows 2000, Windows NT 4.0, or Windows 98 SE. • 3Com Configuration and Diagnostics Program for DOS—for computers running DOS or NetWare.
Changing General NIC Configuration Settings Starting the 3Com NIC Diagnostics Program To start the 3Com NIC Diagnostics program: 1 Open the Windows Start menu. 2 Select Programs, and then 3Com NIC Utilities. 3 Click 3Com NIC Doctor. The 3Com NIC Diagnostic screen appears. Alternatively, you can also start the 3Com NIC Diagnostics program using the following procedure if the 3Com NIC Diagnostics icon is displayed on the right side of the Windows task bar: • Double-click the 3Com NIC Diagnostics icon.
11 Configuring the NIC Using the 3Com DOS Configuration Program This section describes NIC configuration for computers running DOS or NetWare. To run the DOS diagnostic program: 1 Copy 3c99xcfg.exe from the 3Com Installation CD to the root directory of a DOSbootable diskette. 2 Boot to DOS using the DOS-bootable diskette. 3 Enter the following at the DOS prompt: a:\3c99xcfg.exe where a:\ is the drive containing the DOS-bootable diskette.
Configuring the Managed PC Boot Agent (MBA) Configuring the Managed PC Boot Agent (MBA) This section explains how to configure the Managed PC Boot Agent (MBA) boot ROM to boot from the network. NOTE: For detailed information on using, configuring, and troubleshooting the MBA boot ROM, refer to the Managed PC Boot Agent User Guide, located with the MBA software on the 3Com Installation CD. Enabling or Disabling the Boot ROM Setting The default NIC boot ROM setting is Disabled.
11 Configuring the NIC 3 Reboot the computer. The MBA attempts to boot from the network using the default boot method PXE. To change the default boot method or any other MBA configurations, press Ctrl+Alt+B when the following message appears: Initializing MBA. Press Ctrl+Alt+B to configure... If the network boot fails, the following message appears: Network boot aborted, press any key to continue The BIOS continues to the next device in the boot order (for example, the local hard drive).
12 Troubleshooting the NIC This chapter describes procedures for locating problems you might have with the 3Com 10/100 Secure (3CR990B) NIC. It explains how to: • Interpret the NIC LEDs. • Access 3Com support databases. • Troubleshoot NIC installation problems. • Troubleshoot NIC and network connection problems. • Troubleshoot Remote Wake-Up. • Remove the network driver.
12 Troubleshooting the NIC 3CR990B-FX-97 NIC LED State Meaning 100 LNK Green If drivers are installed, the 100BASE-FX connection is active; there is a good connection between the NIC and the hub or switch. Blinking N/A Off Something is preventing the connection between the NIC and the hub or switch. Yellow Heavy network traffic is present. Blinking Network traffic is present. Off No network traffic is present.
Accessing the 3Com Knowledgebase Accessing 3Com Support Databases In addition to the 3Com support databases listed in this section, check the README.TXT files in the ENGLISH, INSTALLS, and NWSERVER subdirectories and check the Help text files located in the HELP directory on the 3Com Installation CD. Accessing the 3Com Knowledgebase To access a database of technical information that can help you diagnose and solve NIC installation, configuration, and upgrade problems, go to: http://knowledgebase.3com.
12 Troubleshooting the NIC Troubleshooting the NIC Installation If you encounter any of the following problems or error messages, follow the steps in “Cleaning Up A Failed Installation” later in this chapter to resolve the problem. Problems or Error Messages • A red X or a A yellow exclamation point (!) appears by the name of the NIC in the Windows Device Manager. • The Network Neighborhood icon does not appear on the Windows desktop.
Cleaning Up A Failed Installation 10 Install the network driver. If you are prompted for 3Com files when Windows restarts, open the drop-down box and select the following path: \options\cabs See the appropriate chapter for your operating system for information about confirming that the NIC and driver are properly installed. After the driver has been reinstalled, reinstall the 3Com NIC Diagnostics program. See “Installing the 3Com NIC Diagnostics Program” on page 46 for instructions.
12 Troubleshooting the NIC Troubleshooting Remote Wake-Up If your computer does not boot in response to a Remote Wake-Up event, perform these troubleshooting steps: NOTE: Wake-On-Error is enabled by default. 1 Make sure that you are using the latest driver for the NIC. This driver is shipped with the NIC on the 3Com Installation CD. It can also be downloaded from the 3Com Software Library. Point your Web browser to the 3Com home page: http://www.3com.
RJ-45 Cabling Pinouts (Copper NIC Only) Troubleshooting Hubs A crossover cable can be used to identify the type of failure when hub performance or connectivity is in question. To use a crossover cable: 1 Connect a file server and a client PC back-to-back with a crossover cable to verify that the NIC and network operating system are properly configured. 2 To make a crossover cable, connect TD+ to RD+ and TD– to RD–. The cable performs the crossover that is usually performed by the hub.
12 Troubleshooting the NIC Removing the Network Driver To remove the network driver from your computer, follow the steps for your operating system. NOTE: Removing the network driver does not result in the removal of the diagnostics software. See “Removing the 3Com NIC Diagnostics Program” on page 65. Windows 2003, Windows XP, and Windows 2000 The Windows 2003, Windows XP, and Windows 2000 systems do not allow you to uninstall the network driver from the Network and Dial-up Connections window.
Windows 98 SE 6 Depending on whether you are removing the NIC or reinstalling NIC software, do the following: • If you are physically removing the NIC from the computer, click No. Do not restart the computer until you shut down the system, turn the power off, and remove the NIC from the computer. • If you are reinstalling the NIC software, click Yes to restart the computer.
12 Troubleshooting the NIC Removing 3Com DynamicAccess Advanced Server Features Follow the steps in this section to remove 3Com DynamicAccess Advanced Server features from your operating system. Windows 2003, Windows XP, and Windows 2000 The Windows 2003, Windows XP, and Windows 2000 systems do not allow you to uninstall the 3Com Advanced Server technology miniport using the Device Manager. To remove 3Com DynamicAccess Advanced Server features: 1 Launch the Network and Dial-up Connections window.
13 Running NIC Diagnostics The 3Com 10/100 Secure (3CR990B) NIC uses two types of NIC diagnostics programs: a Windows-based diagnostics program and a DOS-based diagnostics program. NOTE: Before starting any diagnostics program, close all running applications. Use the Windows-based 3Com NIC Diagnostics program if your computer is running any of the following operating systems: • Windows 2003 • Windows XP • Windows 2000 • Windows NT 4.
13 Running NIC Diagnostics 3 Enter the following at the DOS prompt: a:\3c99xcfg.exe where a:\ is the drive containing the DOS-bootable diskette. For more information about the 3Com DOS Diagnostics program to configure the NIC, see “Using the 3Com DOS Configuration Program” on page 48.
Running the Network Test Running the Network Test Run the Network Test to check the NIC connectivity to the network. To successfully pass the Network Connectivity test, at least one of the following conditions must be met: • A Windows client running on the same network. This client must have a successfully installed Windows diagnostics program that is currently not running. • A NetWare server running on the same network. • A DHCP server running on the same network.
13 Running NIC Diagnostics Viewing the NIC LEDs in the 3Com Diagnostics Program To view the LEDs in the 3Com NIC Diagnostics program: 1 Make sure that the NIC, the network driver, and the 3Com NIC Diagnostics program are installed. 2 Open the Windows Start menu. 3 Select Programs, and then 3Com NIC Utilities. 4 Click 3Com NIC Doctor. The 3Com NIC Diagnostics General screen appears and displays the following LEDs: • Link—lights if there is a valid connection between the NIC and the network.
Enabling the Icon Enabling the Icon To display the 3Com icon in the Windows system tray: 1 Make sure that the NIC, the network driver, and the 3Com NIC Diagnostics program are installed. 2 Open the Windows Start menu. 3 Select Programs, and then 3Com NIC Utilities. 4 Click 3Com NIC Doctor. The 3Com NIC Diagnostics General screen appears. 5 On the General screen, select the check box next to Show Icon in System Tray. 6 Close the 3Com NIC Diagnostic program. The NIC icon appears in the Windows system tray.
13 66 Running NIC Diagnostics
A Specifications and Cabling Requirements This appendix lists the specifications, standards conformance, cable requirements, and connector pin assignments for the 3Com 10/100 Secure (3CR990B) NIC. 3CR990B-97 NIC Specifications The following table provides environmental, interface, and standards information for the 3CR990B-97 NIC. Hardware Memory 128 KB external RAM Bus interface PCI Local Bus Specification, Revision 2.2 PCI master Supports bus master scatter-gather DMAs. Dimensions Length: 13.
A Specifications and Cabling Requirements 3CR990B-FX-97 NIC Specifications The following table provides environmental, interface, and standards information for the 3CR990B-FX-97 NIC. Hardware Memory 128 KB external RAM Bus interface PCI Local Bus Specification, Revision 2.2 PCI master Supports bus master scatter-gather DMAs. Dimensions Length: 13.65 cm (5.375 in) Height: 8.41 cm (3.31 in) Power requirement +5 V ±5% operating 1.
Cabling Requirements Cabling Requirements The cable, quality, distance, and connectors must comply with the Electronic Industries Association/Telecommunications Industries Association (EIA/TIA) 568 Commercial Building Wiring Standard and the Technical Services Bulletin TSB38 standards.
A Specifications and Cabling Requirements RJ-45 Connector Pin Assignments The following illustration shows the RJ-45 connector pin assignments for the 3CR990B-97 NIC.
B Installing the 3Com DMI Agent This appendix explains how to install the 3Com Desktop Management Interface (DMI) Agent on your PC. The 3Com DMI Agent allows any DMI-compatible browser or network management application that supports DMI 2.0 to remotely manage and configure advanced features of a 3CR990B NIC. NOTE: For detailed information about the 3Com DMI Agent, refer to the 3Com DMI Agent User Guide included with the 3Com DMI Agent software on the 3Com Installation CD.
B Installing the 3Com DMI Agent System Requirements This section lists the client PC and network management requirements for installing and using the 3Com DMI Agent. Client PC Requirements Your PC requires the following items to use the 3Com DMI Agent: • DMI Service Provider 2.0 or greater (such as Smart Technologies Service Provider 2.0) • NDIS 3, 4, or 5 driver • Windows 2003, Windows XP, Windows 2000, Windows NT 4.0, or Windows 98 SE using the latest Service Pack.
Installing the 3Com DMI Agent NOTE: The 3Com DMI Agent User Guide is in Microsoft Word format. If you do not currently have access to Microsoft Word, you can download a free version of the Microsoft Word reader from the Microsoft Web site. • Install the 3Com DMI Agent software 6 Follow the prompts on the screen. To verify successful installation, use a DMI-compatible browser or a network management application that supports DMI 2.0 or 2.0s to verify that the 3Com NIC is present.
B 74 Installing the 3Com DMI Agent
C Obtaining Support for your Product Register Your Product to Gain Service Benefits To take advantage of warranty and other service benefits, you must first register your product at http://eSupport.3com.com/. 3Com eSupport services are based on accounts that you create or have authorization to access. First time users must apply for a user name and password that provides access to a number of eSupport features including Product Registration, Repair Services, and Service Request.
C Obtaining Support for your Product Contact Us 3Com offers telephone, e-mail and internet access to technical support and repair services. To access these services for your region, use the appropriate telephone number, URL or e-mail address from the list below. You will find a current directory of support telephone numbers posted on the 3Com web site at: http://csoweb4.3com.
Telephone Technical Support and Repair Country Telephone Number P.R. of China 10800 61 00137 or 021 6350 1590 or 00800 0638 3266 Singapore 800 6161 463 S. Korea 080 333 3308 Taiwan 00801 611 261 Thailand 001 800 611 2000 Europe, Middle East, and Africa From anywhere in these regions, call: +44 (0)1442 435529 You can also obtain support in this region using the following URL: http://emea.3com.com/support/email.
C Obtaining Support for your Product Country Telephone Number Aruba 1 800 998 2112 Bahamas 1 800 998 2112 Barbados 1 800 998 2112 Belize 52 5 201 0010 Bermuda 1 800 998 2112 Bonaire 1 800 998 2112 Brazil 0800 13 3COM Cayman 1 800 998 2112 Chile AT&T +800 998 2112 Colombia AT&T +800 998 2112 Costa Rica AT&T +800 998 2112 Curacao 1 800 998 2112 Ecuador AT&T +800 998 2112 Dominican Republic AT&T +800 998 2112 Guatemala AT&T +800 998 2112 Haiti 57 1 657 0888 Honduras AT&T +8
D Regulatory Compliance Information FCC Class B Statement This device complies with Part 15 of the FCC Rules. Operation is subject to the following two conditions: 1 This device may not cause harmful interference, and 2 This device must accept any interference received, including interference that may cause undesired operation.
D Regulatory Compliance Information FCC Declaration of Conformity We declare under our sole responsibility that the Model: Description: 3CR990B-97 3CR990B-FX-97 3Com 10/100 Secure Copper NIC 3Com 100 Secure Fiber NIC to which this declaration relates, is in conformity with the following standards or other normative documents: • ANSI C63.