
Operation Manual
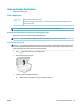


Cartridge issues
If an error occurs after a cartridge is installed, or if a message indicates a cartridge problem, try removing the
cartridges, verifying the protective piece of plastic tape has been removed from each cartridge, and then
reinserting the cartridges. If this does not work, clean the cartridge contacts (see the following for details). If
the problem is still not resolved, replace the cartridges. For information about replacing cartridges, see
Replace the cartridges .
To clean cartridge contacts
CAUTION: The cleaning procedure should take only a few minutes. Make sure that the cartridges are
reinstalled in the product as soon as possible. It is not recommended to leave the cartridges outside of the
product longer than 30 minutes. This could result in damage to the cartridges.
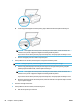
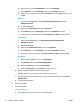
1. Check that power is on.
2. Open the cartridge access door.
3. Remove the cartridge indicated in the error message.
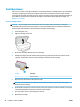
4. Hold the cartridge by its sides with the bottom pointing up and locate the electrical contacts on the
cartridge. The electrical contacts are the small gold-colored dots on the cartridge.
Feature Description
1 Electrical contacts
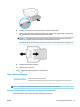
5. Wipe only the contacts with a damp lint-free cloth.
CAUTION: Be careful to touch only the contacts, and do not smear any of the ink or other debris
elsewhere on the cartridge.
6. On the inside of the printer, locate the contacts in the print carriage. The contacts look like a set of gold-
colored bumps positioned to meet the contacts on the cartridge.
7. Use a dry swab or lint-free cloth to wipe the contacts.
8. Reinstall the cartridge.
90 Chapter 9 Solve a problem ENWW