HP4402.book : title.fm i Wed Apr 23 15:29:05 1997 User’s Guide HP EPM E4419A EPM-442A Power Meter HP Part no.
HP4402.book : title.fm ii Wed Apr 23 15:29:05 1997 © Copyright Hewlett-Packard Company All rights reserved. Reproduction, adaptation, or translation without prior written permission is prohibited, except as allowed under the copyright laws. Printed in the UK.
HP4402.book : title.fm iii Wed Apr 23 15:29:05 1997 Legal Information Legal Information Notice Information contained in this document is subject to change without notice. Hewlett-Packard makes no warranty of any kind with regard to this material, including, but not limited to, the implied warranties of merchantability and fitness for a particular purpose.
HP4402.book : title.fm iv Wed Apr 23 15:29:05 1997 Legal Information Limitation of Warranty The foregoing warranty shall not apply to defects resulting from improper or inadequate maintenance by Buyer, Buyer-supplied software or interfacing, unauthorized modification or misuse, operation outside of the environmental specifications for the product, or improper site preparation or maintenance. NO OTHER WARRANTY IS EXPRESSED OR IMPLIED.
HP4402.book : title.fm v Wed Apr 23 15:29:05 1997 Equipment Operation Equipment Operation Warnings and Cautions This guide uses warnings and cautions to denote hazards. WARNING A warning calls attention to a procedure, practice or the like, which, if not correctly performed or adhered to, could result in injury or the loss of life. Do not proceed beyond a warning until the indicated conditions are fully understood and met.
HP4402.book : title.fm vi Wed Apr 23 15:29:05 1997 General Safety Considerations General Safety Considerations WARNING Before this instrument is switched on, make sure it has been properly grounded through the protective conductor of the ac power cable to a socket outlet provided with protective earth contact. Any interruption of the protective (grounding) conductor, inside or outside the instrument, or disconnection of the protective earth terminal can result in personal injury.
HP4402.book : title.fm vii Wed Apr 23 15:29:05 1997 General Safety Considerations IEC 1010-1 Compliance This instrument has been designed and tested in accordance with IEC Publication 1010-1 +A1:1992 Safety Requirements for Electrical Equipment for Measurement, Control and Laboratory Use and has been supplied in a safe condition. The instruction documentation contains information and warnings which must be followed by the user to ensure safe operation and to maintain the instrument in a safe condition.
HP4402.book : title.fm viii Wed Apr 23 15:29:05 1997 Regulatory Information Regulatory Information Sound Emission Herstellerbescheinigung Diese Information steht im Zusammenhang mit den Anforderungen der Maschinenlarminformationsverordnung vom 18 Januar 1991. • • • • Sound Pressure LpA < 70 dB. Am Arbeitsplatz. Normaler Betrieb. Nach DIN 45635 T. 19 (Typprufung). Manufacturers Declaration This statement is provided to comply with the requirements of the German Sound DIN 45635 T. 19 (Typprufung).
HP4402.book : title.fm ix Wed Apr 23 15:29:05 1997 Declaration of Conformity Declaration of Conformity DECLARATION OF CONFORMITY according to ISO/IEC Guide 22 and EN45014 Manufacturer’s Name: Hewlett-Packard Limited. Manufacturer’s Address: Queensferry Microwave Division South Queensferry, West Lothian, EH30 9TG. Scotland, United Kingdom.
HP4402.book : title.
HP4402.book : title.fm xi Wed Apr 23 15:29:05 1997 HP EPM-442A Options HP EPM-442A Options The HP EPM-442A power meters have the following options available: • • • • • • • • • • Option 002, supplies parallel rear panel sensor input(s). The power reference oscillator output is on the front panel. Option 003, supplies parallel rear panel sensor input(s). The power reference oscillator output is also on the rear panel. Option 004, deletes the HP 11730A sensor cable(s) provided.
HP4402.book : title.fm xii Wed Apr 23 15:29:05 1997 About this Guide About this Guide Chapter 1: Getting Started This chapter prepares the power meter for use and helps you to get familiar with a few of the front panel features. Chapter 2: Power Meter Operation This chapter gives a detailed description of the capabilities and operation of the power meter. You will find this chapter useful when you are operating the power meter from the front panel.
HP4402.book : HP4402TOC.doc 1 Wed Apr 23 15:29:05 1997 Table of Contents Page Legal Information ........................................................................ iii Equipment Operation ................................................................... v Personal Safety Considerations............................................. v General Safety Considerations.................................................... vi Markings ...........................................................................
HP4402.book : HP4402TOC.doc 2 Wed Apr 23 15:29:05 1997 Power Meter Operation ..................................................................... 2-1 Introduction................................................................................... 2-2 Zeroing the Power Meter .............................................................. 2-3 Calibrating the Power Meter........................................................ 2-4 Calibration Procedure Using HP E-Series Power Sensors...........................
HP4402.book : HP4402TOC.doc 3 Wed Apr 23 15:29:05 1997 Self Test......................................................................................... 2-50 Power On Self Test ................................................................. 2-50 Front Panel Selection of Self Tests........................................ 2-51 HP-IB Testing......................................................................... 2-53 Test Descriptions ....................................................................
HP4402.book : HP4402TOC.doc 4 Wed Apr 23 15:29:05 1997 Power Sensor Specifications .................................................. 5-12 General Characteristics................................................................ 5-13 Rear Panel Connectors........................................................... 5-13 Environmental Characteristics .................................................... 5-14 General Conditions.................................................................
HP4402.book : HP4402LOF.doc 5 Wed Apr 23 15:29:05 1997 List of Figures Page 2-1 2-2 2-3 2-4 2-5 2-6 2-7 2-8 2-9 2-10 2-11 2-12 2-13 2-14 2-15 2-16 4-1 “Sensor Tbls” Screen.................................................................. 2-14 “Edit Cal” Screen ....................................................................... 2-16 Effect of Offsets on a Channel Measurement........................... 2-27 Effect of Offsets on a Maths Measurement .............................. 2-27 Averaged Readings .
HP4402.book : HP4402LOF.
HP4402.book : HP4402LOT.doc 7 Wed Apr 23 15:29:05 1997 List of Tables Page 2-1 2-2 3-1 5-1 5-2 5-3 5-4 5-5 Connecting the HP 8480 Series Power Sensors During Calibration ................................................................................. 2-7 Measurement Units ................................................................... 2-22 .................................................................................................... 3-11 Zero Set Specifications ................................
HP4402.book : HP4402LOT.
HP4402.book : chapter1.
HP4402.book : chapter1.fm 2 Wed Apr 23 15:29:05 1997 Getting Started Introduction Introduction One of the first things you will want to do with your power meter is to switch it on and become acquainted with its front panel. The sections in this chapter prepare the power meter for use and help you get familiar with some of the front panel operations. The front panel consists of both hardkeys and softkeys which allow you to select various functions and operations.
HP4402.book : chapter1.fm 3 Wed Apr 23 15:29:05 1997 Getting Started Turning On the Power Meter Turning On the Power Meter The following steps show you how to turn on the power meter and verify that it is operating correctly. 1. Connect the power cord and turn on the power meter. The front panel display and the green power LED light up when the power meter is switched on. The power meter performs it’s power on self test. If the self test is not successful the error annunciator turns on.
HP4402.book : chapter1.fm 4 Wed Apr 23 15:29:05 1997 Getting Started The Front Panel at a Glance The Front Panel at a Glance 12 11 10 9 7 8 1 2 3 4 1. 5 6 Preset Local This hardkey allows you to preset the power meter if you are currently working in local mode (that is, front panel operation). In local mode a confirmation pop up window is displayed prior to a preset being carried out.
HP4402.book : chapter1.fm 5 Wed Apr 23 15:29:05 1997 Getting Started The Front Panel at a Glance 3. This hardkey switches the power meter between on and standby. When the power meter is switched to standby (that is, when this hardkey has not been selected but the line power is connected to the instrument) the red LED is lit. When the power meter is switched on the green LED is lit. 4. “System/Inputs” hardkey with softkey menu.
HP4402.book : chapter1.fm 6 Wed Apr 23 15:29:05 1997 Getting Started The Front Panel at a Glance 9. POWER REF Output. The power reference output is a 50 Ω type N connector. The output signal of 1 mW at 50 MHz is used for calibrating the sensor and meter combination. Power meters configured with option 003 have the power reference on the rear panel. 10. Arrow hardkeys. , , and hardkeys allow you to move the position of the cursor, select fields for editing, and edit alphanumeric characters.
HP4402.book : chapter1.fm 7 Wed Apr 23 15:29:05 1997 Getting Started The Display Layout The Display Layout The following figure details the display layout when two measurement windows are displayed, one analog and one digital. However it is possible using the key to display just one measurement window. 15 1 14 13 12 1110 9 2 3 4 5 8 6 7 1. The status reporting line displays five fields, three associated with the HP-IB status and two associated with error and warning conditions.
HP4402.book : chapter1.fm 8 Wed Apr 23 15:29:05 1997 Getting Started The Display Layout 5. This field displays the units of measurement, either dBm, dB, Watts or %. 6. This window is configured to show an analog meter which displays the measurement result and the meter scaling. 7. This field displays the number of pages in the current softkey menu. For example, “1 of 2” indicates that there are two pages of softkeys and you are on the first page. Pressing More moves you to page “2 of 2”. 8.
HP4402.book : chapter1.fm 9 Wed Apr 23 15:29:05 1997 Getting Started The Display Layout Selecting Your Display Layout Your power meter display is extremely flexible. It can be used to display a variety of different measurements and windows depending on your needs. The following diagram details the various options available to you.
HP4402.book : chapter1.fm 10 Wed Apr 23 15:29:05 1997 Getting Started The Display Layout Display Tutorial If you wish to experiment with the display layout before you move on to make measurements, the following procedure guides you through a few of the display setups you can choose. 1.Press Preset Local , Confirm . Notice that the upper window is the one which is highlighted by the dark box. 2.Press .
HP4402.book : chapter1.fm 11 Wed Apr 23 15:29:05 1997 Getting Started The Display Layout 6. Press . The display now shows both an analog and digital window. Meas 7. Press Setup , Input Select , B/A . Notice that the upper window is now set up to make a channel B over channel A ratio measurement. 8. Press to select the lower window. Press A/B . Notice that the lower window is now set up to make a channel A over channel B ratio measurement.
HP4402.book : chapter1.fm 12 Wed Apr 23 15:29:05 1997 Getting Started Window Symbols Window Symbols There are a number of different graphic symbols and pop up windows that can occur on the power meter display. These can occur for a variety of reasons such as when: • • • • • an error or warning occurs. a confirmation is required. you are required to wait while the power meter carries out a procedure. you are required to select an entry from a list. you are required to enter an alphanumeric value.
HP4402.book : chapter1.fm 13 Wed Apr 23 15:29:05 1997 Getting Started Window Symbols 1 of N Entry Window This pop up window is displayed when you are required to select an entry using and from the list. Numeric or Alphanumeric Entry Window This pop up window is displayed when you are required to modify numeric or alphanumeric data. The and keys move the position of the cursor. The and keys increment and decrement the alphanumeric digit on which the cursor is currently positioned.
HP4402.book : chapter1.fm 14 Wed Apr 23 15:29:05 1997 Getting Started The Rear Panel at a Glance The Rear Panel at a Glance 1 2 3 4 5 8 7 6 1. Channel A (Option 002 or 003 only) 2. Channel B (Option 002 or 003 only) 3. Power Ref (Option 003 only) The power reference output is a 50 Ω type N connector. The output signal is used for calibrating the sensor meter combination. 4. Recorder Output This output produces a dc voltage that corresponds to the power level of the selected channel input.
HP4402.book : chapter1.fm 15 Wed Apr 23 15:29:05 1997 Getting Started The Rear Panel at a Glance 8. Serial Label Each power meter has it’s own individual identification number. Refer to “Instrument serial numbers”, on page 2-58 for further information.
HP4402.book : chapter1.fm 16 Wed Apr 23 15:29:05 1997 Getting Started Adjusting the Carrying Handle Adjusting the Carrying Handle To adjust the position, grasp the handle by the sides and pull outward. Rotate the handle to the desired position.
HP4402.book : chapter1.fm 17 Wed Apr 23 15:29:05 1997 Getting Started Rack Mounting the Power Meter Rack Mounting the Power Meter You can mount the power meter in a standard 19 inch rack cabinet using one of three optional kits. Instructions and mounting hardware are included with each rack mounting kit. Any HP System II instrument can be rack mounted beside the HP EPM-442A power meter. To rack mount the power meter: 1.
HP4402.book : chapter1.fm 18 Wed Apr 23 15:29:05 1997 Getting Started Rack Mounting the Power Meter To rack mount a single instrument, order option 908, or adapter kit 5063-9239. To rack mount two instruments side by side, order option 909, or lock-link kit 5061-9694 and flange kit 5063-9212. To install one or two instruments in a sliding support shelf, order shelf 5063-9255, and slide kit 1494-0015 (for a single instrument, also order filler panel 5002-3999).
HP4402.book : chapter2.
HP4402.book : chapter2.fm 2 Wed Apr 23 15:29:05 1997 Power Meter Operation Introduction Introduction This chapter describes the parameters which configure the power meter to make measurements and help you determine settings to optimize performance. This chapter contains the following sections: • • • • • • • • • • • • • • • • • • • • • • • • • • 2-2 “Zeroing the Power Meter”, on page 2-3. “Calibrating the Power Meter”, on page 2-4. “Making Measurements with the HP E-Series Power Sensors”, on page 2-8.
HP4402.book : chapter2.fm 3 Wed Apr 23 15:29:05 1997 Power Meter Operation Zeroing the Power Meter Zeroing the Power Meter This section describes how to zero the power meter. Zeroing adjusts the power meter for a zero power reading with no power applied to the power sensor. During zeroing, which takes approximately 10 seconds, the wait symbol is displayed. To zero the power meter: 1. Press Zero Cal . 2. To zero channel A or channel B use Zero A or Zero B respectively.
HP4402.book : chapter2.fm 4 Wed Apr 23 15:29:05 1997 Power Meter Operation Calibrating the Power Meter Calibrating the Power Meter This section describes how to calibrate the power meter. You should always zero the power meter prior to calibrating it. Calibration sets the gain of the power meter using a 50 MHz 1 mW calibrator as a traceable power reference. The power meter’s POWER REF output or a suitable external reference is used as the signal source for calibration.
HP4402.book : chapter2.fm 5 Wed Apr 23 15:29:05 1997 Power Meter Operation Calibrating the Power Meter Calibration Procedure Using HP E-Series Power Sensors The following procedure describes how you calibrate the power meter with an HP E-series power sensor. Since the power meter automatically downloads the HP E-series power sensor’s calibration table there is no requirement to enter the reference calibration factor.
HP4402.book : chapter2.fm 6 Wed Apr 23 15:29:05 1997 Power Meter Operation Calibrating the Power Meter The following procedure details the calibration for channel A. To calibrate channel B use the same procedure using the equivalent channel B softkeys. To calibrate both channels sequentially follow this procedure for channel A then repeat step “2” through to step “5” using the equivalent channel B softkeys. Note 1. Press Zero Cal , Cal . 2.
HP4402.book : chapter2.fm 7 Wed Apr 23 15:29:05 1997 Power Meter Operation Calibrating the Power Meter Table 2-1: Connecting the HP 8480 Series Power Sensors During Calibration Sensor Model Connection Requirements HP 8481A HP 8481H HP 8482A HP 8482H These power sensors connect directly to the reference calibrator. HP 8481D HP 8484A Prior to the power meter being calibrated an HP 11708A 30 dB reference attenuator should be connected between the power sensor and the reference calibrator.
HP4402.book : chapter2.fm 8 Wed Apr 23 15:29:05 1997 Power Meter Operation Making Measurements with the HP E-Series Power Sensors Making Measurements with the HP E-Series Power Sensors This section describes how to make continuous wave measurements using the HP E-series power sensors. The HP E-series power sensors have their sensor calibration tables stored in EEPROM. This allows the frequency and calibration data to be downloaded to the power meter automatically.
HP4402.book : chapter2.fm 9 Wed Apr 23 15:29:05 1997 Power Meter Operation Making Measurements with the HP E-Series Power Sensors measurement of both channels, or a difference measurement between both channels. Use the following key presses: Meas Press Setup , Input Select . Select the appropriate softkey for the measurement you require, either A , B , A/B , B/A , or More , then A-B , or B-A . 11. The measurement result is now displayed.
HP4402.book : chapter2.fm 10 Wed Apr 23 15:29:05 1997 Power Meter Operation Making Measurements with the HP 8480 Series Power Sensors Making Measurements with the HP 8480 Series Power Sensors This section applies to all HP 8480 series power sensors. It does not apply to the HP E-series power sensors.
HP4402.book : chapter2.fm 11 Wed Apr 23 15:29:05 1997 Power Meter Operation Making Measurements with the HP 8480 Series Power Sensors 6. The current setting of the reference calibration factor is displayed under the A Ref CF softkey. To change this setting press A Ref CF . The power meter displays the reference calibration factor in a pop up window. Modify this reference calibration factor (see below) as desired. ■ Use or to modify the digit on which the cursor is currently positioned.
HP4402.book : chapter2.fm 12 Wed Apr 23 15:29:05 1997 Power Meter Operation Making Measurements with the HP 8480 Series Power Sensors • • • • • • 2-12 Press A Ref CF . Use the , , and hardkeys to enter 99.8. Press % . Connect the power sensor to the POWER REF output. Press Cal A . Press Frequency , A Cal Fac . Use the , , and Cal Fac hardkeys to enter 97.8. Press % . Connect the power sensor to the signal to be measured. The measurement result is now displayed.
HP4402.book : chapter2.fm 13 Wed Apr 23 15:29:05 1997 Power Meter Operation Making Measurements using Sensor Calibration Tables Making Measurements using Sensor Calibration Tables This section applies to all HP 8480 series power sensors. It does not apply to the HP E-series power sensors.
HP4402.book : chapter2.fm 14 Wed Apr 23 15:29:05 1997 Power Meter Operation Making Measurements using Sensor Calibration Tables “State” field indicates if any sensor calibration tables are currently selected. The “Sensor Tbls” screen is displayed as shown in Figure 2-1. Figure 2-1: “Sensor Tbls” Screen Making the Measurement To make the power measurement, you zero and calibrate the power meter, then set it for the frequency of the signal you want to measure.
HP4402.book : chapter2.fm 15 Wed Apr 23 15:29:05 1997 Power Meter Operation Making Measurements using Sensor Calibration Tables 6. Press Frequency . The current setting of the frequency is displayed Cal Fac under the A Freq softkey. 7. To change this setting press A Freq . The power meter displays the frequency in a pop up window. Modify this frequency (see below) as desired. ■ Use or to modify the digit on which the cursor is currently positioned. ■ Use or to move to other digits. 8.
HP4402.book : chapter2.
HP4402.book : chapter2.fm 17 Wed Apr 23 15:29:05 1997 Power Meter Operation Making Measurements using Sensor Calibration Tables The power meter is shipped with a set of predefined sensor calibration tables. The data in these tables is based on statistical averages for a range of Hewlett-Packard power sensors.
HP4402.book : chapter2.fm 18 Wed Apr 23 15:29:05 1997 Power Meter Operation Making Measurements using Sensor Calibration Tables 2. 3. 4. 5. Note A calibration factor in the range of 1% to 150% can be entered. The following rules apply to naming sensor calibration tables: ■ The name must consist of no more than 12 characters. ■ All characters must be upper or lower case alphabetic characters, or numeric (0-9), or an underscore (_). ■ No other characters are allowed.
HP4402.book : chapter2.fm 19 Wed Apr 23 15:29:05 1997 Power Meter Operation Making Measurements using Sensor Calibration Tables The following lists detail the contents of the predefined sensor calibration tables. DEFAULT RCF 100 0.1 MHz 100 110 GHz 100 HP 8481A RCF 100 50 MHz 100 100 MHz 99.8 2 GHz 99 3 GHz 98.6 4 GHz 98 5 GHz 97.7 6 GHz 97.4 7 GHz 97.1 8 GHz 96.6 9 GHz 96.2 10 GHz 95.4 11 GHz 94.9 12.4 GHz 94.3 13 GHz 94.3 14 GHz 93.2 15 GHz 93 16 GHz 93 17 GHz 92.7 18 GHz 91.
HP4402.book : chapter2.fm 20 Wed Apr 23 15:29:05 1997 Power Meter Operation Making Measurements using Sensor Calibration Tables HP 8481D RCF 99 50 MHz 99 500 MHz 99.5 1 GHz 99.4 2 GHz 99.5 3 GHz 98.6 4 GHz 98.6 5 GHz 98.5 6 GHz 98.5 7 GHz 98.6 8 GHz 98.7 9 GHz 99.5 10 GHz 98.6 11 GHz 98.7 12 GHz 99 12.4 GHz 99.1 13 GHz 98.9 14 GHz 99.4 15 GHz 98.9 16 GHz 99.1 17 GHz 98.4 18 GHz 100.1 R8486A RCF 100 50 MHz 100 26.5 GHz 94.9 27 GHz 94.9 28 GHz 95.4 29 GHz 94.3 30 GHz 94.1 31 GHz 93.5 32 GHz 93.7 33 GHz 93.
HP4402.book : chapter2.fm 21 Wed Apr 23 15:29:05 1997 Power Meter Operation Making Measurements using Sensor Calibration Tables HP 8487A RCF 100 50 MHz 100 100 MHz 99.9 500 MHz 98.6 1 GHz 99.8 2 GHz 99.5 3 GHz 98.9 4 GHz 98.8 5 GHz 98.6 6 GHz 98.5 7 GHz 98.4 8 GHz 98.3 9 GHz 98.3 10 GHz 98.3 11 GHz 98.1 12 GHz 97.9 13 GHz 98 14 GHz 98.2 15 GHz 97.7 16 GHz 96.8 17 GHz 97 18 GHz 96.3 19 GHz 95.9 20 GHz 95.2 21 GHz 95.6 22 GHz 95.5 23 GHz 95.4 24 GHz 95 25 GHz 95.4 26 GHz 95.2 27 GHz 95.
HP4402.book : chapter2.fm 22 Wed Apr 23 15:29:05 1997 Power Meter Operation Setting the Units of Measurement Setting the Units of Measurement The “dBm/W” menu is used to select the measurement units on the currently selected window. These can either be logarithmic (dBm or dB) or linear (Watt or %) units. Preset sets the measurement units to dBm Local (logarithmic units). Table 2-2 shows which units are applicable to the individual measurement modes.
HP4402.book : chapter2.fm 23 Wed Apr 23 15:29:05 1997 Power Meter Operation Selecting Units of Measurement from the Softkeys Selecting Units of Measurement from the Softkeys In various softkey menu structures you are required to enter the units of measurement for power.
HP4402.book : chapter2.fm 24 Wed Apr 23 15:29:05 1997 Power Meter Operation Making Relative Measurements Making Relative Measurements Relative mode allows you to compare any measurement result to a reference value. The relative reading can be displayed in either dB or % by pressing dBm/W and selecting either dB or % . When the measurement result is displayed in % a prefix multiplier may be shown. Relative mode is window dependent and when enabled displays “Rel” in the window to which it’s applied.
HP4402.book : chapter2.fm 25 Wed Apr 23 15:29:05 1997 Power Meter Operation Setting the Resolution Setting the Resolution The resolution of each of the power meter’s windows can be set to four different levels (1, 2, 3 or 4). These four levels represent: • • 1, 0.1, 0.01, 0.001 dB respectively if the measurement suffix is dBm or dB. 1, 2, 3 or 4 significant digits respectively if the measurement suffix is W or %. The default value is 0.01 dB (3 digits).
HP4402.book : chapter2.fm 26 Wed Apr 23 15:29:05 1997 Power Meter Operation Setting Offsets Setting Offsets Setting Channel Offsets The power meter can be configured to compensate for a signal loss or gain in your test setup (for example, to compensate for the loss of a 10 dB attenuator). This gain or loss, referred to as a channel offset, is added to the measured power before the result is displayed. Offsets are entered in dB. The allowable range of values is -100 dB to +100 dB.
HP4402.book : chapter2.fm 27 Wed Apr 23 15:29:05 1997 Power Meter Operation Setting Offsets 2. The power meter displays the offset value in a pop up window. Modify this offset (see below) as desired. ■ Use or to modify the digit on which the cursor is currently positioned. ■ Use or to move to other digits. 3. To confirm your choice press dB . 4. Offset Off On is automatically set to “On” when a value is entered using Offset.
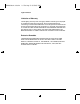
HP4402.book : chapter2.fm 28 Wed Apr 23 15:29:05 1997 Power Meter Operation Setting Averaging Setting Averaging The power meter uses a digital filter to average power readings. The number of readings averaged can range from 1 to 1024 in binary progression. This filter is used to reduce noise, obtain the desired resolution and to reduce the jitter in the measurement results. Increasing the value of the filter length reduces measurement noise. However, the time to take the measurement is increased.
HP4402.book : chapter2.fm 29 Wed Apr 23 15:29:05 1997 Power Meter Operation Setting Averaging Figure 2-5: Averaged Readings 1 Resolution Setting 2 3 4 10 dB 1 8 128 128 10 dB 1 1 16 256 10 dB 1 1 2 32 10 dB 1 1 1 16 1 1 1 8 Number of Averages Power Sensor Dynamic Range Minimum Sensor Power Maximum Sensor Power These four resolution levels represent: • • Note 1, 0.1, 0.01, 0.001 dB respectively if the measurement suffix is dBm or dB.
HP4402.book : chapter2.fm 30 Wed Apr 23 15:29:05 1997 Power Meter Operation Measuring Pulsed Signals Measuring Pulsed Signals The power meter can be used to measure the power of a pulsed signal. The measurement result is a mathematical representation of the pulse power rather than an actual measurement. The power meter measures the average power of the pulsed input signal and then divides the measurement result by the duty cycle value to obtain the pulse power reading. The allowable range of values is 0.
HP4402.book : chapter2.fm 31 Wed Apr 23 15:29:05 1997 Power Meter Operation Measuring Pulsed Signals To set the duty cycle: 1. Press System , A Input Settings. The current setting of the Inputs duty cycle is displayed under the Duty Cycle softkey. 2. To change this setting press Duty Cycle . The power meter displays the duty cycle in a pop up window. Modify this value (see below) until the desired duty cycle is displayed. ■ Use or to modify the digit on which the cursor is currently positioned.
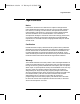
HP4402.book : chapter2.fm 32 Wed Apr 23 15:29:05 1997 Power Meter Operation Setting Measurement Limits Setting Measurement Limits The power meter can be configured to verify the power being measured against an upper and/or lower limit value. The range of values that can be set for upper and lower limits is -150 dBm to 230 dBm. The default upper limit is 90.00 dBm and the default lower limit is -90.00 dBm. To set the limits: 1. Press System , A Input Settings , More , Limits .
HP4402.book : chapter2.fm 33 Wed Apr 23 15:29:05 1997 Power Meter Operation Setting Measurement Limits Figure 2-8: Limits Checking Results Amplitude Fail o +10 dBm o o o o o +4 dBm o Fail Frequency In this application a swept frequency signal is applied to the input of the Device Under Test. The power meter measures the output power. The limits have been set at +4 dBm and +10 dBm. A fail occurs each time the output power is outside these limits as shown in Figure 2-8.
HP4402.book : chapter2.fm 34 Wed Apr 23 15:29:05 1997 Power Meter Operation Setting Measurement Limits Figure 2-9: Pass/Fail Limit Indicators This measurement has passed which is indicated by the limit field being empty. This measurement has failed as the result is less than the minimum limit level set of -50 dBm. This is indicated with the text “Undr Lmt”. This measurement has failed as the result is more than the maximum limit level set of -60 dBm. This is indicated with the text “Over Lmt”.
HP4402.book : chapter2.fm 35 Wed Apr 23 15:29:05 1997 Power Meter Operation Channel Measurements Channel Measurements Single channel measurements can be made on the currently selected Meas window by pressing Setup , Input Select and selecting A or B . Absolute power is displayed for the selected channel in either dBm or Watts. The filter, range (where applicable), offset, duty cycle, calibration factor and limits can be set for the selected channel.
HP4402.book : chapter2.fm 36 Wed Apr 23 15:29:05 1997 Power Meter Operation Making Difference Measurements Making Difference Measurements Dual channel difference measurements can be made on the currently Meas selected window by pressing Setup , Input Select , More and selecting A-B or B-A . The power meter always carries out “Maths” calculations in Watts. The power meter displays the numerical difference of the power values of both channels in dBm or Watts.
HP4402.book : chapter2.fm 37 Wed Apr 23 15:29:05 1997 Power Meter Operation Making Ratio Measurements Making Ratio Measurements Dual channel ratio measurements can be made on the currently selected Meas window by pressing Setup , Input Select and selecting A/B or B/A . The power meter always carries out “Maths” calculations in Watts. The power meter displays the ratio of the channels power values in either dB or %. When the measurement result is displayed in % a prefix multiplier may be shown.
HP4402.book : chapter2.fm 38 Wed Apr 23 15:29:05 1997 Power Meter Operation Selecting a Digital or Analog Display Selecting a Digital or Analog Display The measurement windows can display the result in either a digital or analog format or both as shown in the following figures.
HP4402.book : chapter2.fm 39 Wed Apr 23 15:29:05 1997 Power Meter Operation Selecting a Digital or Analog Display To select the format of the display in the currently selected window: Meas 1. Press Setup , Display Format . 2. Press Meter Dgtl Anlg to highlight the type of format you require. Pressing this key toggles between a digital and analog display. To select the range of the analog display in the currently selected window: Meas 1. Press Setup , Display Format , Anlg Mtr Scaling . 2.
HP4402.book : chapter2.fm 40 Wed Apr 23 15:29:05 1997 Power Meter Operation Selecting a Digital or Analog Display To select both an analog and digital display press until two windows are displayed. Select the format of one window to analog and the other to digital as previously described. To indicate if the measurement reading is outwith the minimum or maximum values set for the analog meter, a warning message is displayed. The analog meter also displays a digital reading.
HP4402.book : chapter2.fm 41 Wed Apr 23 15:29:05 1997 Power Meter Operation Setting the Range Setting the Range The power meter has no internal ranges which can be set. The only ranges that can be set are those of the HP E-series power sensors. With an HP E-series power sensor the range can be set either automatically or manually. Use autoranging when you are not sure of the power level you will be measuring. There are two manual settings either “LOWER” or “UPPER”.
HP4402.book : chapter2.fm 42 Wed Apr 23 15:29:05 1997 Power Meter Operation Configuring the Remote Interface Configuring the Remote Interface This section gives a brief description on configuring the remote interface. For further information on using the power meter remotely, refer to the HP EPM-441A/442A Programming Guide. HP-IB Address Each device on the HP-IB (IEEE-488) interface must have a unique address. You can set the power meter’s address to any value between 0 and 30.
HP4402.book : chapter2.fm 43 Wed Apr 23 15:29:05 1997 Power Meter Operation Recorder Output Recorder Output The rear panel Recorder Output connector produces a dc voltage that corresponds to the power level in Watts of the selected channel, depending on the measurement mode. The Recorder Output is disabled (0 V) during ratio, difference and relative measurements. This dc voltage ranges from 0 to +1 Vdc. The output impedance is typically 1 kΩ .
HP4402.book : chapter2.fm 44 Wed Apr 23 15:29:05 1997 Power Meter Operation Recorder Output Leveling a Source Output The Recorder output can be used to level an output from a source using external leveling. The following procedure explains how to do this: 1. Select the channel to be represented on the Recorder Output by pressing System , More , Recorder Output , Output A B . Inputs 2.
HP4402.book : chapter2.fm 45 Wed Apr 23 15:29:05 1997 Power Meter Operation Saving and Recalling Power Meter Configurations Saving and Recalling Power Meter Configurations To reduce repeated setup sequences, up to ten power meter configurations can be stored in the power meter’s non-volatile memory. The HP-IB address, the data stored in the sensor calibration tables and the zeroing and calibration data are not stored by a preset. The calibration table selected is not affected.
HP4402.book : chapter2.
HP4402.book : chapter2.fm 47 Wed Apr 23 15:29:05 1997 Power Meter Operation How Measurements are Calculated How Measurements are Calculated Figure 2-15 details how measurements are calculated. It shows the position in which the various power meter functions are implemented in the measurement calculation.
HP4402.book : chapter2.fm 48 Wed Apr 23 15:29:05 1997 Power Meter Operation Presetting the Power Meter Presetting the Power Meter This section details the power meter’s preset conditions. The HP-IB address, the data stored in the sensor calibration tables and the zeroing and calibration data are not affected by a preset. The calibration table selected is not affected. Preset Conditions The number of windows displayed is two. dBm/W Measurement units used is set to dBm.
HP4402.book : chapter2.fm 49 Wed Apr 23 15:29:05 1997 Power Meter Operation Presetting the Power Meter System Inputs • • • • • • • • • • • • • • • A Table Off/On is not affected. B Table Off/On is not affected. Filter Off/On is set to “On”. Filter is set to “AUTO”. Duty Cycle Off/On is set to “Off”. Duty Cycle is set to 1.000%. Offset Off/On is set to “Off”. Offset is set to 0 dB. Range is set to “AUTO”. Limits is set to 20.000 dBm ( Max ) and -70.000 dBm ( Min ). Limits Off/On is set to “Off”.
HP4402.book : chapter2.fm 50 Wed Apr 23 15:29:05 1997 Power Meter Operation Self Test Self Test The power meter has three distinct self test modes: • • • power on self test, which occurs automatically when you turn on the power meter. confidence check, which is accessed via the front panel and requires your assistance in order to verify the POWER REF and measurement path accuracy. troubleshooting mode, which is accessed via the front panel or remotely over the HP-IB.
HP4402.book : chapter2.
HP4402.book : chapter2.fm 52 Wed Apr 23 15:29:05 1997 Power Meter Operation Self Test Instrument Self Test If Instrument Self Test is selected, the following tests are run, these are the same tests which are run using the *TST? command. • • • • • • ROM checksum RAM Battery Display Assembly Calibrator Measurement Assemblies As each test takes place, the name of the test is listed on the screen. While a test is running, the message “Testing...” appears next to the name of the test.
HP4402.book : chapter2.fm 53 Wed Apr 23 15:29:05 1997 Power Meter Operation Self Test HP-IB Testing To invoke the HP-IB self test, the IEEE 488.1 compliant standard command, *TST? is used.
HP4402.book : chapter2.fm 54 Wed Apr 23 15:29:05 1997 Power Meter Operation Self Test Test Descriptions This section specifies what is actually checked by each of the tests. Some of the tests may only be applicable to one method of invocation (for example, from the front panel). If this is the case, it is specified in the test description. Most of the tests have an associated error message which is added to the HP-IB error queue if the test fails. The exception to this is the bitmap display test.
HP4402.book : chapter2.fm 55 Wed Apr 23 15:29:05 1997 Power Meter Operation Self Test Calibrator The reference calibrator is turned on (indicated by the POWER REF LED) and measured internally. A pass or fail result is returned. Keyboard (Front Panel only) The power meter enters a mode where you are invited to press any key. When a key is pressed, its name appears on the screen. You can check that the power meter is displaying the expected name when the relevant key is pressed.
HP4402.book : chapter2.fm 56 Wed Apr 23 15:29:05 1997 Power Meter Operation Operator Maintenance Operator Maintenance This section describes how to replace the power line fuse and clean the power meter. If you need additional information about replacing parts or repairing the power meter, refer to the HP EPM-441A/442A Service Guide. To clean the power meter, disconnect it’s supply power and wipe with a damp cloth only.
HP4402.book : chapter2.fm 57 Wed Apr 23 15:29:05 1997 Power Meter Operation Contacting Hewlett-Packard Contacting Hewlett-Packard This section details what to do if you have a problem with your power meter. If you have a problem with your power meter, first refer to the section “Before calling Hewlett-Packard”, on page 2-57. This chapter contains a checklist that will help identify some of the most common problems.
HP4402.book : chapter2.fm 58 Wed Apr 23 15:29:05 1997 Power Meter Operation Contacting Hewlett-Packard Check the Basics Problems can be solved by repeating what was being performed when the problem occurred. A few minutes spent in performing these simple checks may eliminate time spent waiting for instrument repair. Before calling Hewlett-Packard or returning the power meter for service, please make the following checks: • • • • • • • • • • Check that the line socket has power.
HP4402.book : chapter2.fm 59 Wed Apr 23 15:29:05 1997 Power Meter Operation Contacting Hewlett-Packard Whenever you contact Hewlett-Packard about your power meter have a complete serial number available. This will ensure that you obtain the most complete and accurate service information. The serial number can be obtained by: • • • interrogating the power meter over the HP-IB using the *IDN? command. from the front panel by selecting System , More , Service , Inputs Version .
HP4402.book : chapter2.fm 60 Wed Apr 23 15:29:05 1997 Power Meter Operation Contacting Hewlett-Packard Sales and Service Offices If you need technical assistance with a Hewlett-Packard test and measurement product or application please contact the Hewlett-Packard office or distributor in your country. Asia Pacific: Hong Kong: (852) 2599 7889 India: (91-11) 647 2311 Japan: Hewlett-Packard Japan Ltd.
HP4402.book : chapter2.fm 61 Wed Apr 23 15:29:05 1997 Power Meter Operation Contacting Hewlett-Packard Australia/New Zealand: Hewlett-Packard Australia Ltd. 31-41 Joseph Street Blackburn, Victoria 3130 Australia 1 800 629 485 Canada: Hewlett-Packard Canada Ltd.
HP4402.book : chapter2.
HP4402.book : chapter2.fm 63 Wed Apr 23 15:29:05 1997 Power Meter Operation Contacting Hewlett-Packard Returning Your Power Meter for Service Use the information in this section if you need to return your power meter to Hewlett-Packard. Package the Power Meter For Shipment Use the following steps to package the power meter for shipment to Hewlett-Packard for service: 1. Fill in a blue service tag (available at the end of this guide) and attach it to the power meter.
HP4402.book : chapter2.
HP4402.book : chapter3.
HP4402.book : chapter3.fm 2 Wed Apr 23 15:29:05 1997 Menu Reference Introduction Introduction This chapter is a reference to the softkey menu structure of the power meter. “The Front Panel Menu Maps” starting on page 3-3 details the menus diagrammatically. “Front Panel Menu Reference” starting on page 3-10 details the menus descriptively.
HP4402.book : chapter3.fm 3 Wed Apr 23 15:29:05 1997 Menu Reference The Front Panel Menu Maps The Front Panel Menu Maps The following diagrams detail the structure of the softkey menus which are accessed through the following seven hardkeys: Note • dBm/W • Frequency Cal Fac • Meas Setup • Rel Offset • Save Recall • System Inputs • Zero Cal On your power meter some softkey labels have numeric values displayed under them. These values show the current setting of that softkey.
HP4402.book : chapter3.fm 4 Wed Apr 23 15:29:05 1997 Menu Reference The Front Panel Menu Maps Frequency/Cal Fac Menu A Freq 50 .00MHz Frequency Cal Fac A Cal Fac 100.0% B Freq 50 .00MHz B Cal Fac 100.0% Depending on the power meter’s setup you will be unable to select certain softkeys. The text on these softkey labels appears grayed out. Refer to the appropriate softkey descriptions for further information.
HP4402.book : chapter3.fm 5 Wed Apr 23 15:29:05 1997 Menu Reference The Front Panel Menu Maps Meas Setup Menu A B A/B B/A A-B Input Select Meas Setup Display Format B-A More Resolution 1234 Meter Dgtl Anlg Anlg Mtr Scaling HP EPM-442A User’s Guide Max 20.000 dBm Min -70.
HP4402.book : chapter3.fm 6 Wed Apr 23 15:29:05 1997 Menu Reference The Front Panel Menu Maps Rel/Offset Menu Rel Off On Rel Offset Rel Offset Off On Offset 0.000dB Save/Recall Menu Save Enter Save Recall Recall Edit Name Done Insert Char Delete Char Cancel Depending on the power meter’s setup you will be unable to select certain softkeys. The text on these softkey labels appears grayed out. Refer to the appropriate softkey descriptions for further information.
HP4402.book : chapter3.fm 7 Wed Apr 23 15:29:05 1997 Menu Reference The Front Panel Menu Maps System Inputs Menu HP-IB Addr 13 Edit Cal Table A Table Off On Change B Table Off On Delete Done Done Insert HP-IB System Inputs Filter Off On Filter AUTO Sensor Cal Tables A Input Settings Duty Cycle Off On B Input Settings Duty Cycle 1.000% More Offset Off On Offset 0.000 dB Range† AUTO Limits Limits Off On Max 100 mW Min 0.
HP4402.book : chapter3.fm 8 Wed Apr 23 15:29:05 1997 Menu Reference The Front Panel Menu Maps System Inputs Menu Continued Clear Errors Next Done Power Ref Off On System Inputs More Output Off On Error List Max Power 20.000 dBm Recorder Output Min Power -70.
HP4402.book : chapter3.fm 9 Wed Apr 23 15:29:05 1997 Menu Reference The Front Panel Menu Maps Zero/Cal Menu Zero A Zero Cal Zero B Cal A Zero Both A Ref CF 100.0% Cal Cal B B Ref CF 100.0% Power Ref On Off More Note Depending on the power meter’s setup you will be unable to select certain softkeys. The text on these softkey labels appears grayed out. Refer to the appropriate softkey descriptions for further information.
HP4402.book : chapter3.fm 10 Wed Apr 23 15:29:05 1997 Menu Reference Front Panel Menu Reference "dBm/W" Menu Front Panel Menu Reference This section describes all the hardkeys and softkeys on your power meter. The hardkey descriptions are in alphabetical order. The softkey descriptions are in the order they appear in the menus. Diagrammatical hardkeys are described at the end of this section.
HP4402.book : chapter3.fm 11 Wed Apr 23 15:29:05 1997 Menu Reference Front Panel Menu Reference "Frequency/Cal Fac" Menu Frequency Cal Fac The softkey menu structured to this hardkey affects the channel setup. Press this hardkey to access the “Frequency/Cal Fac” menu which allows you to enter the frequency of the signal to be measured or the calibration factor.
HP4402.book : chapter3.fm 12 Wed Apr 23 15:29:05 1997 Menu Reference Front Panel Menu Reference "Frequency/Cal Fac" Menu • A Cal Fac • Press this softkey to enter the measurement calibration factor for channel A in the range of 1% to 150%. The default value is 100%. Use the , , and hardkeys to change the calibration factor. To confirm your choice press % . Entering a calibration factor using this softkey is only possible when you are using an HP 8480 series power sensor.
HP4402.book : chapter3.fm 13 Wed Apr 23 15:29:05 1997 Menu Reference Front Panel Menu Reference "Meas/Setup" Menu Meas Setup The softkey menu structured to this hardkey affects the currently selected window. Press to select the upper or lower measurement window on the power meter’s display. The window which is selected is highlighted by a shadowed box, and the set up you create is implemented in this window. Press this hardkey to access the “Meas Setup” menu.
HP4402.book : chapter3.fm 14 Wed Apr 23 15:29:05 1997 Menu Reference Front Panel Menu Reference "Meas/Setup" Menu • Display Format Press this softkey to access a menu which allows you to select digital or analog displays, set the resolution and set the limits for the analog display. Meter Dgtl Anlg ■ Press this softkey to toggle between an analog and digital display. Refer to “Selecting a Digital or Analog Display”, on page 2-38 for further information.
HP4402.book : chapter3.fm 15 Wed Apr 23 15:29:05 1997 Menu Reference Front Panel Menu Reference "More", "Preset/Local", "Prev" Keys More Press this hardkey to move through all the softkeys available on a particular level of a menu. The bottom right of the power meter display indicates the number of pages in the menu. For example, if “1 of 2” is displayed, pressing More moves you to “2 of 2”. Pressing More again moves you back to “1 of 2”.
HP4402.book : chapter3.fm 16 Wed Apr 23 15:29:05 1997 Menu Reference Front Panel Menu Reference "Rel/Offset" Menu Rel Offset The softkey menu structured to this hardkey affects the currently selected window. Press this hardkey to access the “Rel/Offset” menu which allows you to; compare any measurement result in dB or percentage (%) to a reference value and set display offsets. • Rel Off On • Press this softkey to toggle the reference value on or off. The default is “Off”.
HP4402.book : chapter3.fm 17 Wed Apr 23 15:29:05 1997 Menu Reference Front Panel Menu Reference "Save/Recall" Menu Save Recall The softkey menu structured to this hardkey affects the system setup. Press this hardkey to access the “Save/Recall” menu and screen which allows you to save and recall setups which you use frequently. • Save • Press this softkey to save the current setup of the power meter to the highlighted file. First, use the and hardkeys to scroll through the displayed files.
HP4402.book : chapter3.fm 18 Wed Apr 23 15:29:05 1997 Menu Reference Front Panel Menu Reference "System/Inputs" Menu System Inputs The softkey menu structured to this hardkey affects the system setup and the channel setup. Press this hardkey to access the “System/Inputs” menu. This menu allows you to set up a variety of conditions for your power meter, for example: HP-IB address, sensor calibration tables, averaging, duty cycle, range, offset, service. It also allows you to review errors.
HP4402.book : chapter3.fm 19 Wed Apr 23 15:29:05 1997 Menu Reference Front Panel Menu Reference "System/Inputs" Menu ◆ • Insert ◆ Press this softkey to insert a new sensor calibration table entry. You are prompted to enter the frequency and calibration factor. The entry is inserted in ascending frequency order. Delete ◆ Press this softkey to delete a sensor calibration table entry. If you delete the frequency the corresponding calibration factor is also removed and vice versa.
HP4402.book : chapter3.fm 20 Wed Apr 23 15:29:05 1997 Menu Reference Front Panel Menu Reference "System/Inputs" Menu ■ entered using Filter . Refer to “Setting Averaging”, on page 2-28 for further information. Duty Cycle Off On ■ Press this softkey to toggle the duty cycle value on or off. The default is “Off”. The duty cycle value is set using Duty Cycle . Duty Cycle ■ Press this softkey to set the duty cycle for the pulse power measurement feature of the power meter. A value in the range of 0.
HP4402.book : chapter3.fm 21 Wed Apr 23 15:29:05 1997 Menu Reference Front Panel Menu Reference "System/Inputs" Menu ◆ • Limits Off On ◆ Press this softkey to toggle between the test limits being on or off. The default is “Off ”. Max ◆ Press this softkey to enter the upper measurement limit in the range -150 dBm to 230 dBm. The default value is 90.00 dBm. Use the , , and hardkeys to change the value. To confirm your choice press the appropriate measurement units. Max must be greater than Min .
HP4402.book : chapter3.fm 22 Wed Apr 23 15:29:05 1997 Menu Reference Front Panel Menu Reference "System/Inputs" Menu Done ■ • Press this softkey to return to the “System/Inputs” menu. Recorder Output Press this softkey to access a menu which allows you to modify the setup of the recorder output. Refer to “Recorder Output”, on page 2-43 for further information. Output Off On ■ • ■ Press this softkey to switch the rear panel Recorder Output on or off.
HP4402.book : chapter3.fm 23 Wed Apr 23 15:29:05 1997 Menu Reference Front Panel Menu Reference "System/Inputs" Menu ROM Checksum ❖ ❖ Press this softkey to perform a ROM checksum verification test. RAM ❖ Press this softkey to verify the memory and the correct amount of RAM is present. Battery ❖ Press this softkey to verify that the firmware checksum is still resident in a battery-backed memory location. Measure Assemblies ❖ Press this softkey to run a self test on the measurement assemblies.
HP4402.book : chapter3.fm 24 Wed Apr 23 15:29:05 1997 Menu Reference Front Panel Menu Reference "System/Inputs" Menu ◆ Press this softkey to increase the display contrast. ◆ ■ ◆ Press this softkey to decrease the display contrast. Set Contrast ◆ Press this softkey to set the default contrast to that currently displayed. Note, this key changes the factory default setting. Set Brightness Press this softkey to set the brightness. Note, this key changes the factory default setting.
HP4402.book : chapter3.fm 25 Wed Apr 23 15:29:05 1997 Menu Reference Front Panel Menu Reference "Zero/Cal" Menu Zero Cal The softkey menu structured to this hardkey affects the channel setup. Press this hardkey to access the “Zero/Cal” menu which allows you to zero and calibrate the power meter. Refer to “Calibrating the Power Meter”, on page 2-4 for further information. • Zero A • Press this softkey to adjust channel A for a zero power reading with no power applied to the power sensor.
HP4402.book : chapter3.fm 26 Wed Apr 23 15:29:05 1997 Menu Reference Front Panel Menu Reference "Zero/Cal" Menu • ■ Cal B ■ Press this softkey to calibrate channel B with the connected power sensor. The POWER REF output is used as the signal source for calibration and is automatically switched on during this procedure. B Ref CF Press this softkey to enter a reference calibration factor for channel B. A value in the range of 1% to 150% can be entered.
HP4402.book : chapter3.fm 27 Wed Apr 23 15:29:05 1997 Menu Reference Front Panel Menu Reference Diagramatical Keys Diagrammatical Hardkeys Press this hardkey to: • • assist in modifying alphanumeric data that is to be entered into the power meter. This hardkey moves the position of the cursor to the left on the currently selected parameter. select fields for editing on the “Edit Table” screen.
HP4402.book : chapter3.fm 28 Wed Apr 23 15:29:05 1997 Menu Reference Front Panel Menu Reference Diagramatical Keys Press this hardkey to: • • • • increment the alphanumeric digit on which the cursor is currently positioned. That is, digits scroll 0 through 9, and characters lowercase a through z, uppercase A through Z, then underscore. select fields for editing on the “Edit Table” screen. select a table in the “Sensor Cal Tables” screen. select a file in the “Save” and “Recall” screens.
HP4402.book : chapter4.
HP4402.book : chapter4.fm 2 Wed Apr 23 15:29:05 1997 Error Messages Introduction Introduction This chapter contains information about the power meter’s error messages. It explains how to read the power meter’s error queue and lists all of the power meter’s error messages and their probable causes. When there is a hardware related problem, for example, a power sensor overload, the error message is displayed on the status line at the top of the display.
HP4402.book : chapter4.fm 3 Wed Apr 23 15:29:05 1997 Error Messages Introduction Errors are retrieved in a first in first out (FIFO) order. If more than 30 errors occur, the error queue overflows and the last error in the queue is replaced with error -350, “Queue Overflow”. Any time the queue overflows the most recent error is discarded. Once the errors are read they are removed from the error queue. This opens a position at the end of the queue for a new error message, if one is subsequently detected.
HP4402.book : chapter4.fm 4 Wed Apr 23 15:29:05 1997 Error Messages Error Messages Error Messages -101 Invalid character An invalid character was found in the command string. You may have inserted a character such as #, $, or % in the command header or within a parameter. For example, LIM:LOW O#. -102 Syntax error Invalid syntax was found in the command string. For example, LIM:CLE:AUTO, 1 or LIM:CLE: AUTO 1. -103 Invalid separator An invalid separator was found in the command string.
HP4402.book : chapter4.fm 5 Wed Apr 23 15:29:05 1997 Error Messages Error Messages -113 Undefined header A command was received that is not valid for this power meter. You may have misspelled the command or it may not be valid command. If you are using the short form of the command, remember that it may contain up to four letters. For example, TRIGG:SOUR IMM. -121 Invalid character in number An invalid character was found in the number specified for a parameter value.
HP4402.book : chapter4.fm 6 Wed Apr 23 15:29:05 1997 Error Messages Error Messages -148 Character data not allowed A discrete parameter was received but a character string or a numeric parameter was expected. Check the list of parameters to verify that you have used a valid parameter type. For example, MEM:CLE CUSTOM_1. -151 Invalid string data An invalid string was received. Check to see if you have enclosed the character string in single or double quotes. For example, MEM:CLE “CUSTOM_1.
HP4402.book : chapter4.fm 7 Wed Apr 23 15:29:05 1997 Error Messages Error Messages -214 Trigger deadlock TRIG:SOUR was set to HOLD or BUS and a READ? or MEASure? was attempted, expecting TRIG:SOUR to be set to IMMediate. -220 Parameter error;Frequency list must be in ascending order. Indicates that the frequencies entered using the MEMory:TABLe:FREQuency command are not in ascending order. -221 Settings conflict This command occurs under a variety of conflicting conditions.
HP4402.book : chapter4.fm 8 Wed Apr 23 15:29:05 1997 Error Messages Error Messages -231 Data questionable;CAL ERROR ChB Power meter calibration failed on channel B. The most likely cause is attempting to calibrate without applying a 1 mW power to the power sensor. -231 Data questionable;Input Overload ChA The power input to Channel A exceeds the power sensor’s maximum range. -231 Data questionable;Input Overload ChB The power input to Channel B exceeds the power sensor’s maximum range.
HP4402.book : chapter4.fm 9 Wed Apr 23 15:29:05 1997 Error Messages Error Messages -310 System error;Ch B Dty Cyc may impair accuracy with ECP sensor This indicates that the sensor connected to channel B is for use with CW signals only. -310 System error;Detector EEPROM Read Failed - critical data not found or unreadable This indicates a failure with your HP E-series power sensor. Refer to your power sensor manual for details on returning it for repair.
HP4402.book : chapter4.fm 10 Wed Apr 23 15:29:05 1997 Error Messages Error Messages -330 Self-test Failed;Measurement Channel A Fault Refer to “Measurement Assemblies”, on page 2-54 if you require a description of the Measurement Assembly test. -330 Self-test Failed;Measurement Channel B Fault Refer to “Measurement Assemblies”, on page 2-54 if you require a description of the Measurement Assembly test.
HP4402.book : chapter4.fm 11 Wed Apr 23 15:29:05 1997 Error Messages Error Messages -410 Query INTERRUPTED A command was received which sends data to the output buffer, but the output buffer contained data from a previous command (the previous data is not overwritten). The output buffer is cleared when power has been off, or after *RST (reset) command has been executed.
HP4402.book : chapter4.
HP4402.book : chapt5_2.
HP4402.book : chapt5_2.fm 2 Wed Apr 23 15:29:05 1997 Specifications Introduction Introduction This chapter details the power meter’s specifications and supplemental characteristics. Specifications describe the warranted performance and apply after a 30 minute warm-up. These specifications are valid over the power meter’s operating and environmental range unless otherwise stated and after performing a zero and calibration.
HP4402.book : chapt5_2.fm 3 Wed Apr 23 15:29:05 1997 Specifications Power Meter Specifications Power Meter Specifications Meter Frequency Range 100 kHz to 50 GHz and 75 GHz to 110 GHz, power sensor dependent Power Range -70 dBm to +44 dBm (100 pW to 25 W), power sensor dependent Power Sensors Compatible with all HP 8480 series power sensors and HP ECP-series power sensors.
HP4402.book : chapt5_2.fm 4 Wed Apr 23 15:29:05 1997 Specifications Power Meter Specifications Accuracy Instrumentation Absolute: ±0.02 dB (Logarithmic) or ±0.5% (Linear). (Refer to the power sensor linearity specification in your power sensor manual to assess overall system accuracy.) Relative: ±0.04 dB (Logarithmic) or ±1.0% (Linear). (Refer to the power sensor linearity specification in your power sensor manual to assess overall system accuracy.
HP4402.book : chapt5_2.fm 5 Wed Apr 23 15:29:05 1997 Specifications Power Meter Specifications Power Reference Power Output 1.00 mW (0.0 dBm). Factory set to ±0.7% traceable to the US National Institute of Standards and Technology. Accuracy ±1.2% worst case (±0.9% rss) for one year.
HP4402.book : chapt5_2.fm 6 Wed Apr 23 15:29:05 1997 Specifications Power Meter Supplemental Characteristics Power Meter Supplemental Characteristics Power Reference Frequency 50 MHz nominal SWR 1.
HP4402.book : chapt5_2.fm 7 Wed Apr 23 15:29:05 1997 Specifications Power Meter Supplemental Characteristics Zero Drift of Sensors Power sensor dependent (refer to Table 5-3). Measurement Noise Power sensor dependent (refer to Table 5-2 and Table 5-3). Averaging effects on measurement noise. Averaging over 1 to 1024 readings is available for reducing noise. Table 5-3 provides the measurement noise for a particular power sensor with the number of averages set to 16 for normal mode and 32 for x2 mode.
HP4402.book : chapt5_2.
HP4402.book : chapt5_2.fm 9 Wed Apr 23 15:29:05 1997 Specifications Power Meter Supplemental Characteristics Settling Time 0 to 99% settled readings over the HP-IB. For HP 8480 series power sensors Manual filter, 10 dB decreasing power step: Table 5-4: Settling Time Number of Averages 1 2 4 8 16 32 64 128 256 512 1024 Settling Time (s) (Normal Mode) 0.15 0.2 0.3 0.5 1.1 1.9 3.4 6.6 13 27 57 Response Time (s) (x2 mode) 0.15 0.18 0.22 0.35 0.55 1.1 1.9 3.5 6.9 14.
HP4402.book : chapt5_2.fm 10 Wed Apr 23 15:29:05 1997 Specifications Power Meter Supplemental Characteristics For HP ECP-series power sensors In FAST mode, within the range -50 dBm to +17 dBm, for a 10 dB decreasing power step, the settling time is 20 ms1. 1 When a decreasing power step crosses the power sensor’s auto-range switch point, add 25 ms. Refer to the relevant power sensor manual for further information.
HP4402.book : chapt5_2.fm 11 Wed Apr 23 15:29:05 1997 Specifications Power Meter Supplemental Characteristics Auto filter, default resolution, 10 dB decreasing power step, normal and x2 speed modes: Normal Mode x2 Mode Maximum dBm Maximum dBm 70 ms 40 ms 60 dB Power Sensor Dynamic Range Typical Settling Times 60 dB Power Sensor Dynamic Range Typical Settling Times 120 ms 10 dB 70 ms 10 dB 400 ms 10 dB 210 ms 10 dB 6.5 s 10 dB 3.
HP4402.book : chapt5_2.fm 12 Wed Apr 23 15:29:05 1997 Specifications Power Meter Supplemental Characteristics Power Sensor Specifications Definitions Zero Set In any power measurement, the power meter must initially be set to zero with no power applied to the power sensor. Zero setting is accomplished within the power meter by digitally correcting for residual offsets.
HP4402.book : chapt5_2.fm 13 Wed Apr 23 15:29:05 1997 Specifications General Characteristics General Characteristics Rear Panel Connectors Recorder Output Analog 0-1 Volt, 1 kΩ output impedance, BNC connector HP-IB Allows communication with an external controller.
HP4402.book : chapt5_2.fm 14 Wed Apr 23 15:29:05 1997 Specifications Environmental Characteristics Environmental Characteristics General Conditions Complies with the requirements of the EMC Directive 89/336/EEC. This includes Generic Immunity Standard EN 50082-1: 1992 and Radiated Interference Standard EN 55011:1991/CISPR11:1990, Group 1 - Class A.
HP4402.book : chapt5_2.fm 15 Wed Apr 23 15:29:05 1997 Specifications General General Dimensions The following dimensions exclude front and rear panel protrusions: 212.6 mm W x 88.5 mm H x 348.3 mm D (8.5 in x 3.5 in x 13.7 in) Weight Net 4.1 Kg (9.0 lb) Shipping 8.0 Kg (17.6 lb) Safety Conforms to the following Product Specifications: • • • EN61010-1: 1993/IEC 1010-1:1990+A1/CSA C22.2 No.
HP4402.book : chapt5_2.fm 16 Wed Apr 23 15:29:05 1997 Specifications General Lithium Polycarbon Monoflouride, approximate lifetime 5 years at 25ºC.
HP4402.book : HP4402IX.
HP4402.book : HP4402IX.
HP4402.book : HP4402IX.
HP4402.book : HP4402IX.
HP4402.book : HP4402IX.
HP4402.book : HP4402IX.