
HP StorageWorks fixed universal load pack upgrade instructions (August 2002)
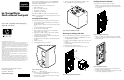
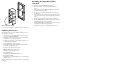

Figure 6: Securing the load pack
5. Repeat steps 2 through 4 to install the second fixed load pack.
Calibrating the Load Port
Now that the fixed load packs are installed, turn library power on
and calibrate the load port:
1. Open the rear access door (ESL9198SL) or the left tape drive
access door (ESL9326SL/ESL9595).
2. Set the CB-1 switch on the top of the AC power distribution
assembly to the on position (see Figure 2).
3. On the front of the library, open the sliding panel that covers
the On/Off switch (see Figure 1).
4. Set the On/Off switch to the on position.
The library initializes and the GUI displays System On-line.
5. On the GUI, press the Operator tab.
6. If prompted, enter the Operator password.
NOTE: The default Operator password is 1234.
The GUI displays the Operator screen.
7. Press Calibrate Library.
The GUI displays the Calibrate Library screen.
8. Press Calibrate Imp/Exp.
The GUI displays a “Command In Progress” screen during the
calibration process.
When the calibration process finishes, the fixed load pack upgrade
is complete.
1
Reinstalling the Removable DLT/SDLT
Load Packs
To reinstall the removable DLT/SDLT load packs:
1. Power off the library. (See “Powering Off the Library” on
Page 1.)
2. Open the right front door (ESL9326SL/ESL9595) or the front
door (ESL9198SL) of the library.
3. Remove the screws securing the upper and lower load packs.
(See Figure 6.)
4. Release the load pack catch for the upper and lower load packs
on the right of the load port. Lift the catches. Pull out the load
packs.
5. Remove the upper and lower load port keys. (See Figure 4.)
6. Install a DLT/SDLT load pack into the upper portion of the load
port, making sure that the load pack latches.
7. Install a DLT/SDLT load pack into the lower portion of the load
port, making sure that the load pack latches.
8. Calibrate the load port. (See “Calibrating the Load Port.”)