
HP LaserJet Enterprise MFP M527 and M506 - Formatter Install Guide

4
14
15
12
13
17
16
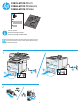
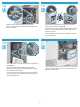
IMPORTANT: Some connectors might be empty if other items—
for example a fax PCA—will be installed later.
Position the formatter on the chassis, install four screws
(callout 1), and then connect all of the connectors and FFCs.
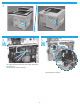
IMPORTANT: Take note of all empty connectors on the formatter
before disconnecting any wire harnesses or flat-flexible cables
(FFCs). Some empty connectors might not be visible until other
items—like the hard-disk drive—are removed, so pay close
attention while removing the formatter and accessories items.
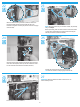
Disconnect all of the connectors and FFCs, remove four screws
(callout 1), and then remove the formatter.
NOTE: Some connectors might already be disconnected if other
items—for example a fax PCA—have been removed.
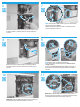
M527 only: Pull the DIMM down and away from the holder to
remove it.
M506 only: Push the DIMM straight on the connector to install it.
Go to step 18.
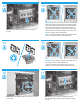
M527 only: Insert the top edge of the DIMM in the holder.
TIP: The DIMM is keyed and can only be inserted in the holder
one way.