A6795A Fibre Channel Mass Storage Adapter Installation Guide HP-UX Networking Manufacturing Part Number: A6795-90007 February 2007 Printed in the US © Copyright 2004-2007 Hewlett-Packard Development Company, L.P.
Legal Notices The information in this document is subject to change without notice. Hewlett-Packard makes no warranty of any kind with regard to this manual, including, but not limited to, the implied warranties of merchantability and fitness for a particular purpose. Hewlett-Packard shall not be held liable for errors contained herein or direct, indirect, special, incidental or consequential damages in connection with the furnishing, performance, or use of this material.
1 Fibre Channel Adapter Installation for HP-UX This chapter contains installation prerequisites, guidelines, and procedures for the A6795A host bus adapter.
Prerequisites Before installing the adapter, follow these steps: Step 1. Verify compliance with supported configurations using the HP Fibre Channel Host Bus Adapter Support Matrix at: http://docs.hp.com/en/netcom.html#Fibre%20Channel Step 2. Determine if the adapter is a Customer Replaceable Unit (CRU) using the HP Fibre Channel Host Bus Adapter Support Matrix. If the adapter is not a CRU, contact your HP representative for installation assistance.
Important Patches and Updates Review the FibrChanl-00 (td) Fibre Channel PCI Tachyon XL2 Driver for HP-UX Release Notes located at docs.hp.com for the latest patch and dependency requirements. Install all driver software and dependency patches before you install the adapter. NOTE HP recommends that you sign-up for Subscriber’s Choice so you can automatically receive email notices for the latest firmware updates. Make sure you register all your products to receive the appropriate firmware update notices.
Installing Driver Software NOTE Use the following instructions if the driver is provided on a CD-ROM. If the driver software is downloaded, follow the instructions provided with that file. The driver software, FibrChanl-00, may be downloaded from http://software.hp.com. The FibrChanl-00 bundle is also provided on the Operating Environment media or Application Release media for HP-UX 11i v3 and HP-UX 11i v2. Install all driver software and dependency patches before you install the adapter.
/var/adm/sw/swinstall.log Step 15. Install OnlineDiag, which is available at http://www.software.hp.com. OnlineDiag is also available from the HP Support PLUS CD. Installation instructions are available at: http://docs.hp.com/hpux/ onlinedocs/diag/st/st_inst.
Installing Adapter Hardware The Online Addition and Replacement feature, OLAR for HP-UX 11i v1, or OL* for HP-UX 11i v2 and later HP-UX releases, enables PCI host bus adapters to be added or replaced without shutting down and rebooting the system, and without adversely affecting other system components. The system hardware uses slot-specific power control, combined with HP-UX operating system support, to enable these features.
To install the Fibre Channel adapter, follow these steps: Step 1. Install all driver software and dependent patches. Step 2. Shut down the system. Step 3. Install the adapter in an available PCI-X slot. Step 4. Attach fiber cabling to the adapter. All Fibre Channel host bus adapters that use the TD driver use a cable terminated with an LC connector. Installing the Host Bus Adapter Step 1.
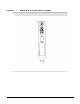
Figure 1-1 A6795A Dual Port Fibre Channel Adapter 10
Attaching the Adapter to Other Fibre Channel Devices To attach the adapter to other Fibre Channel devices, follow these steps: 1. Remove the Fibre Channel host bus adapter’s optical port protector (if included). 2. Attach a connector cable to the Fibre Channel host bus adapter. a. Align the slotted plug with the keyed connector. b. Push the connector in until you hear it click. 3. Attach the free end of the cable to a compatible Fibre Channel device. 4.
The ioscan output might look like the following. The third column represents the hardware path of the slot in which the adapter is installed. This path will be different for each installed adapter port. Table 1-2 ioscan -f Output Class I fc 0 H/W Path 1/1/0/0 Driver td S/W State H/W Type CLAIMED INTERFACE Description HP Tachyon XL2 Fibre Channel Mass Storage Adapter 3.
Interpreting Legacy Hardware Paths (HP-UX 11i v1 and 11i v2) Example 1-1, Example 1-2 and Example 1-3 illustrate the Fibre Channel hardware path format: Example 1-1 Hardware Path for a Public Loop Device Adapter Domain Area Port Bus Target LUN 0/1/2/0.1.19.255.15.4.0 Example 1-2 Hardware Path for a Direct Fabric Attach Device Adapter Domain Area Port Bus Target LUN 0/1/2/0.1.19.255.0.0.0 Example 1-3 Hardware Path for a Private Loop Device Adapter Domain Area Port Bus Target LUN 0/1/2/0.8.0.255.
Table 1-3 Hardware Path Field Descriptions (Continued) Fibre Channel Topology of HBA Field Area Value Depends on the Fibre Channel topology of the HBA. Fabric Topologies Private Loop Taken from the second byte of the N_Port ID of the target device. 0 On some switches, the second byte of the N_Port ID encodes the switch port to which the device is connected. The encoding method depends on the switch. See your switch manual to interpret this field.
LUN Addressing Method Value of LUN field in Fibre Channel hardwarePath. Peripheral Device Addressing The Target or LUN field of the Logical Unit Number. Logical Unit Addressing The LUN field of the Logical Unit Number. Volume Set Addressing (Flat Space Addressing) Bits 0 - 2 of the Logical Unit Number. For more information about the fields in the Logical Unit Number, please see the SCSI Architecture Model - 3 (SAM-3) standards document.
Interpreting Lunpath Hardware Paths (HP-UX 11i v3) Lunpath hardware paths are a new representation of hardware paths introduced on HP-UX 11i v3, as part of the new agile representation of mass storage devices. For more details, see the Next Generation Mass Storage Stack HP-UX 11i v3 white paper at http://docs.hp.com/en/netsys.html#Storage%20Area%20Management . This section describes how to interpret address elements in lunpath hardware paths.
The LUN address for a Fibre Channel device is a 64-bit LUNid.
The controller, target, and lun values are extracted from the LUN id as shown in the table: Table 1-7 Controller Target LUN (7 bits) (4 bits) (3 bits) 0-63 0-15 0-7 To convert a lunpath hardware path to a legacy hardware path, use the scsimgr get_info command on the target’s hardware path to display the port_id, which contains the domain, area, and port values. Extract the controller, target, and lun values from the LUN id. The following example uses lunpath hardware path 0/2/1/0.
A Regulatory Information FCC Statement (For U.S.A.) Federal Communications Commission Radio Frequency Interference Statement WARNING This device complies with Part 15 of the FCC rules. Operation is subject to the following two conditions: (1) This device may not cause harmful interference and (2) this device must accept any interference received, including interference that might cause undesired operation.
EMI (Australia and New Zealand) This product meets the applicable requirements of the Australia and New Zealand EMC Framework. VCCI (Japan) (PCI Card Only) This equipment complies with the Class A category for information technology equipment based on the rules of Voluntary Control Council for Interference by Information Technology Equipment. When used in a residential area, radio interference may be caused. In this case, the user may be required to take appropriate corrective actions.
CAUTION The optical transceiver provided on the network interface card contains a laser system and is classified as a “Class-I Laser Product” under a U.S. Department of Health and Human Services (DHHS) Radiation Performance standard according to the Radiation Control for Health and Safety Act of 1968. The Class I label and compliance statement are located on the optical transceiver. To ensure proper use of this product, please read this instruction manual carefully and retain for future reference.
A6795A Declaration of Conformity 22