
User's Manual


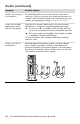

Table Of Contents
- Table of Contents
- Setting Up Your HP Firebird
- Turning On Your HP Firebird for the First Time
- Finding More Information
- Turning On the HP Firebird
- Turning Off the HP Firebird
- Restarting the HP Firebird
- Using Lock
- Using Sleep Mode
- Connecting to the Internet
- Using the HP Firebird with Safety and Comfort
- Setting Up User Accounts
- Protecting the HP Firebird
- Guidelines for Installing Software and Hardware Devices
- Transferring Files and Settings from an Old Computer to Your HP Firebird
- Using the Norton Internet Security Antivirus Software
- Using DVD Media Drives
- Caring for Your HP Firebird
- Maintenance
- Troubleshooting Computer Problems
- Updating Drivers
- System Recovery
- Index
38 HP Firebird Desktop Essentials (Features may vary by model)
3 Remove the front cover; see “Opening the HP Firebird.”
4 Remove any debris that has accumulated in and around the computer ports (for
example, the Ethernet and USB ports).
Cleaning fans, heat sink, and inside the HP Firebird
If your computer is air-cooled, critical components inside your system are cooled by fans. The
heat sink absorbs and dissipates heat. When dust builds up on the fans and heat sink, it
creates a blanket effect, causing components to overheat, leading to poor system
performance, automatic shutdown, or early part failure.
1 Ensure the HP Firebird is off and unplugged.
2 Remove the left side cover; see “Opening the HP Firebird.”
3 Open the door to the optical drive and the hard drives by pressing the two latches at the
same time.
4 Blow compressed air to remove dust from the fan on the left of the disk drive area
(the fan is visible only when the drives are removed).
5 Remove the fan tray by pressing the two latches and blow the dust through the radiators,
from the inside out.
6 Blow off the dust from all other fans.
7 Vacuum all bottom surfaces on the computer inside.
8 Close the door to the ODD/HDD.
9 Replace the fan tray.
10 Replace the left side cover on its hinges and close the cover.
Cleaning the keyboard and mouse
When cleaning the keyboard keys, use a low setting on the battery-operated vacuum cleaner,
to avoid removing key caps and springs.
1 Vacuum between the keys of the keyboard and along the grooves.
2 Use a clean, dry cloth and isopropyl alcohol to clean buildup on the keyboard keys and
along the keyboard edges.
3 Wipe the body of the mouse and the mouse cord with cleaning wipes or a cloth and
cleanser.