HP Firebird with VoodooDNA Desktop Essentials
The only warranties for Hewlett-Packard products and services are set forth in the express statements accompanying such products and services. Nothing herein should be construed as constituting an additional warranty. HP shall not be liable for technical or editorial errors or omissions contained herein. HP assumes no responsibility for the use or reliability of its software on equipment that is not furnished by HP. This document contains proprietary information that is protected by copyright.
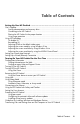
Table of Contents Setting Up Your HP Firebird ........................................................................ 1 Get It Together ......................................................................................................... 1 Storing documentation and recovery discs .............................................................. 1 Connecting to the HP Firebird ............................................................................... 2 Placing the HP Firebird in the proper location ..
Using the Norton Internet Security Antivirus Software .................................................. 21 Configuring and registering Norton Internet Security software ................................ 21 Manually running a scan ................................................................................... 22 Setting a Full System Scan time ........................................................................... 22 Setting up a Custom Scan time ......................................................
Setting Up Your HP Firebird WARNING: The power supply is preset for the country/region in which you purchased your computer. If you move, please check the voltage requirements for your new location before plugging the computer into an AC power outlet. WARNING: Please read “Safety Information” in the Limited Warranty and Support Guide before installing and connecting the computer to the electrical power system.
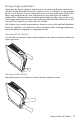
Connecting to the HP Firebird Connect the main hardware devices, such as the monitor, keyboard, and mouse to the back of the HP Firebird. Other peripheral devices, such as a printer, scanner, or camera, also plug into connectors on the back of the HP Firebird. The following table shows some, but not all, connectors: A B C D E M F G H I J K N L NOTE: The location, availability, and number of connectors on the system may vary.
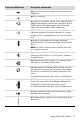
Connector/LED/Button Description and function (A) Audio Out connector for audio to powered speakers or headphones. (B) Mic In connector. (C) Optical Out connector. Optical S/PDIF output provides a digital audio signal to connect to the Optical In on a set of digital speakers. The digital speakers split up the audio signal to the correct speaker (select models only). (D) IEEE 1394 connector.
Connector/LED/Button Description and function (continued) (L) Computer locking slot for use with a computer lock mechanism. When in use the left panel will not open. (M) A 5-in-1 media reader slot with a sliding cover located on the top of the computer. Supported formats: SD, MMC, MS, MS Pro, XD. (N) Power button, located on the front of the computer. To start your HP Firebird, press the On (left) side of the badge.
Using surge protection Help protect the monitor, computer, and accessories by connecting all power cords for the computer and peripheral devices (such as a monitor, printer, or scanner) to a surge protection device, such as a power strip with surge protection or an uninterruptible power supply (UPS). Many surge protection devices have surge protection inputs and outputs for modem or telephone lines. Telephone lines are a common path for lightning spikes to get into the system.
Using SLI Technology The HP Firebird configurations that include dual graphics cards come configured with Scalable Link Interface (SLI) enabled. Dual graphics cards with SLI technology work together to render 3D applications to create a better performance experience. NOTE: Disabling SLI results in significant graphical performance loss, which means that games and other 3D applications may no longer run at full potential.
Selecting HDMI as the default video output If DVI is the default video output for your HP Firebird computer and you want to use HDMI, you will need to change the default. To identify and change the installed optical drive: 1 Select Start > Computer > Control Panel > System > Hardware > Device Manager. 2 Then click the plus (+) sign next to DVD/CD-ROM drives. The default optical drive will be displayed. 3 Change the default to HDMI if you are using HDMI as your video output.
Adjusting the screen resolution by using Windows Vista To change the screen resolution by using Windows Vista: 1 Right-click an empty area of the desktop, and then click Personalize. 2 Click Display Settings. 3 If necessary, select the monitor, and then adjust the screen resolution by using the slider under Resolution. 4 Click Apply. 5 Click Yes, if it is present. 6 Click OK.
Setting Up a Wired (Ethernet) Connection The Ethernet connection, which may be called network interface adapter, Network Interface Card, or NIC, provides a high-speed or broadband connection to an Ethernet network. After you connect this interface to a network, such as a LAN, you can connect to the Internet through the network. 1 2 Connect an Ethernet cable to the Ethernet connector (A) on the back of the computer, and to the network router or LAN device.
10 HP Firebird Desktop Essentials (Features may vary by model)
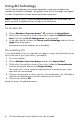
Turning On Your HP Firebird for the First Time Finding More Information Finding information on the Web You can find guides and information for your HP Firebird by using the Internet to access the Support Web site. To access support, go to http://www.hp.com/support in your Web browser. Finding onscreen Help and Support Center Information about your computer is in the onscreen Help and Support Center.
Turning Off the HP Firebird For best results, when using Microsoft Windows Vista, do not shut down the system, except when you must turn off the power for safety reasons, such as to make repairs, install new hardware or cards, or change a battery. As an alternative to shutting down the system, you can lock it or put it into either Sleep or Hibernate mode, if it is available. You can set the power management timers to put the computer automatically into Sleep or Hibernate mode.
Using the Power button to restart your HP Firebird During normal operation, if you cannot restart the operating system using the software, press and hold for five seconds (A) the Power button on the left side of the badge to shut the system down. Press the Power button again to restart. A Using Lock If you lock the system, only you or the administrator can log on to it. For more information, see “Setting Up User Accounts.” 1 2 Click the Windows Vista start button on the taskbar. Click the Lock button.
To put the HP Firebird into Sleep mode manually: Press the Sleep button on the keyboard, if it is present. Or 1 Click the Windows Vista start button on the taskbar. 2 Click the Arrow button next to the Lock button. 3 Click Sleep. To wake from Sleep mode: Press the Sleep button on the keyboard. Or Quickly press the Power button on the left side of the badge on the front of the HP Firebird. If the system does not work properly when you wake it from Sleep mode, restart the computer.
Automatic Sleep, Hibernate, or Away mode You can set the HP Firebird to go into Sleep, Hibernate, or Away modes automatically when it is idle for a specified number of minutes. To put the system into a mode automatically, modify the power management settings. 1 Click the Windows Vista start button on the taskbar. 2 Click Control Panel. 3 Click System and Maintenance. 4 Click Power Options. 5 Click Change when the computer sleeps.
Using the HP Firebird with Safety and Comfort WARNING: To reduce the risk of serious injury, read the Safety & Comfort Guide. It describes proper workstation setup, posture, and health and work habits for computer users. It also provides important electrical and mechanical safety information. Before you begin using the HP Firebird, arrange the system and your work area to maintain your comfort and productivity.
Creating multiple user accounts on the same system has certain advantages, as well as some drawbacks.
Using passwords A password is a group of characters that you choose to secure the computer information. Several types of passwords can be set, depending on how you want to control access to your information. Passwords can be set in the Microsoft Windows Vista operating system on the computer. CAUTION: To avoid being locked out of the computer, record each password you set.
The following table lists the Windows Vista passwords and describes their functions. For information on how to set passwords, see “Using passwords.” For additional information on Windows Vista passwords, such as screen saver passwords, type passwords into the Search Help box in the Help and Support Center. Password Function Windows Vista Administrator password Protects administrator-level access to computer contents.
Installing critical security updates CAUTION: To reduce the risk of information damage or loss from security breaches and computer viruses, install all critical updates from Microsoft as soon as you receive an alert. Additional updates to the operating system and other software may have become available after the computer was shipped. Download all available updates and install them onto the computer.
Transferring Files and Settings from an Old Computer to Your HP Firebird You can copy files from the old computer to your new HP Firebird by using media such as CDs or DVDs, memory sticks, or personal media drives. You can also copy certain settings such as Web browser Favorites and address books by using Windows Easy Transfer software, which is included with Microsoft Windows Vista. To transfer your files and settings: 1 Click the Windows Vista start button on the taskbar. 2 Click Help and Support.
Manually running a scan To select and run a scan: 1 Double-click the Norton Internet Security icon on the desktop. 2 Click the Norton Internet Security tab. 3 Click the Tasks & Scans bar. 4 Click Run a Scan. 5 Select Run Full System Scan to scan your entire hard disk drives for viruses and security risks. Depending on the number of files on your computer, this may take several minutes. 6 When the scan is complete, click Finish.
Setting up a Custom Scan time To create a Custom Scan for specific files, folders, and drives: 1 Double-click the Norton Internet Security icon on the desktop. 2 Click the Norton Internet Security tab. 3 Click the Tasks & Scans bar. 4 Click Configure a Scan. 5 Click Manage Custom Scans. 6 Click Create Custom Scan, and then click Next. 7 Click Add Folders or Add Files. Place a check mark next to the files and folders that you want to scan, click Add, and then click Next.
24 HP Firebird Desktop Essentials (Features may vary by model)
Using DVD Media Drives Your computer can come with one of several types of DVD drives that allow you to perform different tasks. What you can do depends on what kind of drive you have. Allows you to: DVD+RW/+R Blu-ray DVD+RW/+R Read data from CDs. • • Play music CDs. • • Read DVDs. • • Record (burn) data or music to discs. • • Play DVD movies. • • Record (burn) DVD movies. • • Read Blu-ray discs. • Record data to Blu-ray discs.
Inserting and removing CDs and DVDs CAUTION: Use only standard-shaped (circular) discs in the drive. Using non-standard discs, such as heart-shaped discs or business-card discs, may damage the drive. To insert a CD or DVD: 1 Remove the CD or DVD from its case, holding the disc edges or center hole only. 2 With the computer turned on, slide the disc into the slot drive with the label facing to the right.
Disc Features and Compatibility Table Disc File type Can be recorded onto CD-ROM Data No Yes No No Music No Yes Yes Varies by model Data Yes Yes No No Music Yes Yes Varies by model Varies by model Data Yes Yes No No Music Yes Yes Varies by model Varies by model Data No Yes No No DVD movie No Yes No Yes Data Yes Varies by model No No DVD movie Yes Varies by model No Varies by model DVD+R and DVD-R Data Yes Yes No No DVD movie Yes Yes No Varies
Disc (continued) HD DVD VCD File type Can be recorded onto Plays in computer Plays in home or car stereo Plays in home DVD player Data No Yes No Varies by model Movie No Yes No Varies by model DVD movie No Yes No Varies by model NOTE: Some computers come with the double-layer DVD Writer. It supports single-layer and double-layer DVD media. Double-layer technology gives you greater capacity and allows you to store up to 8 GB* of data on double-layer DVD+R or DVD-R media.
Optical CDdrive can: CD(continued) ROM RW DVD+ Combo RW/+R Double- CDDVD- DVD- DVDlayer RW/ ROM RAM RW/-R DVD DVD Light Scribe BD HD DVD+ DVD+ RW/+R RW/+R Play games. Yes Yes Yes No Yes Yes Yes Yes Yes Create LightScribe label. No No No No No No No Yes Yes Play No Blu-ray DVD. No No No No No No No Yes Record data to Blu-ray disc. No No No No No No No No Yes Record HD No data to DVD.
30 HP Firebird Desktop Essentials (Features may vary by model)
Caring for Your HP Firebird Keeping your powerful HP Firebird running at its optimal level does not require a lot of time or experience. You only need the basic steps outlined in this guide to do it! Having a maintenance schedule is critical to keeping your HP Firebird in excellent and reliable condition.
32 HP Firebird Desktop Essentials (Features may vary by model)
Maintenance To ensure that your computer works at peak performance, HP recommends that you keep current backups of your important data, protect against data loss, and perform simple maintenance of your computer. Creating System Recovery Discs One of the first things to do when you get a new computer is to create system recovery discs. In the event of a full system crash, these discs can be used to return your system to its original factory condition.
Reviewing programs that run automatically at startup To improve system speed and performance, set the Windows Start Menu to open only needed software programs: 1 Click the Windows Vista start button, All Programs, and then click Windows Defender. 2 Click Tools. 3 Click Software Explorer. 4 In the Category list, select Startup Programs. 5 Select the program that you want to prevent from running, and then click Disable.
8 Under Program/Script, click Browse. 9 Type cleanmgr.exe, click Open, and then click Next. 10 Review the summary of the schedule that you set. When you are done, click Finish. Disk Cleanup will run at the time that you set. Running the Disk Defragmenter Program When Microsoft Windows Vista stores files on your hard disk drive, it often divides them into fragments so that they fit into the available space on the drive.
Checking for Hard Disk Drive Errors Perform the following procedure to check the integrity of the hard disk drive in Windows Vista. Close all open programs before beginning the disk check. 1 Click the Windows Vista start button, and then click Computer. 2 Right-click the hard disk drive that you want to check, and then click Properties. 3 Click the Tools tab. 4 Under Error-checking, click Check Now.
Cleaning the HP Firebird 1 Unplug the HP Firebird from its power source. 2 Unplug the monitor from its power source. 3 Use a clean, dry cloth to dust the computer case. 4 Use a clean cloth dampened with warm water to wipe the computer case. 5 If there is sticker residue or a spill on the computer case, use isopropyl or rubbing alcohol and a lint-free cloth to remove it. 6 Use a clean cloth to dry the computer. Cleaning vents Air vents keep the system cool.
3 Remove the front cover; see “Opening the HP Firebird.” 4 Remove any debris that has accumulated in and around the computer ports (for example, the Ethernet and USB ports). Cleaning fans, heat sink, and inside the HP Firebird If your computer is air-cooled, critical components inside your system are cooled by fans. The heat sink absorbs and dissipates heat.
Troubleshooting Computer Problems The troubleshooting tables in this section appear in the following order: Audio CD and DVD Drives Video Display (Monitor) Hard Disk Drive Hardware Installation Internet Access Keyboard and Mouse Power Performance Miscellaneous For more information about monitor problems, or for problems related specifically to your printer, refer to the documentation provided by the product manufacturer.
Audio (continued) Symptom Possible solution Sound is only coming out of two speakers. Ensure that all speakers are connected into the correct audio connectors. If they are, use either your sound card software or the Windows Audio Controller (located in the Control Panel) to set your speakers to the appropriate settings: 2.1, 4, 4.1, 5.1, or 7.1. Codec error messages appear when certain audio files are played. Open the file in Windows Media Player.
CD and DVD Drives Symptom Possible solution The CD or DVD drive cannot read a disc, or it takes too long to start. Ensure that the disc is inserted into the drive with the label facing left. Wait at least 30 seconds for the drive to determine the type of media. Clean the disc with a disc cleaning kit, available from most computer stores. The driver may be corrupted or outdated. For detailed information about restoring and updating drivers, visit the HP Web site. I cannot remove a CD or DVD.
CD and DVD Drives (continued) Symptom Possible solution I cannot record (burn) a disc. (continued) Select a slower write speed for the recording drive, if a slower speed is available. The recording software may not let you add a track if it exceeds the available space on your disc. You can make space available by removing one or more tracks from the list before recording the files to the disc. Close all software programs and windows before recording.
Video Symptom Possible solution Some video files do not play. Your file may be corrupt or in an unsupported format. Open the video file in a video editor, and then resave the file in a supported format. Codec error messages appear when I play certain video files. Open the file in Windows Media Player. Ensure that Windows Media Player is configured to automatically download codecs. Error message: Files Needed To Display Video Are Missing or Corrupt.
Display (Monitor) In addition to the information listed here, also refer to the documentation that came with your monitor. Symptom Possible solution Screen is blank, and monitor power light is not lit. Reconnect the power cord to the back of the monitor and to the wall outlet. Screen is blank. Press the space bar on the keyboard, or move the mouse, to make the screen display visible again. Press the On button on the front of the monitor.
Hard Disk Drive Symptom Possible solution Computer seems to be locked up and is not responding. Use the Windows Task Manager to close any programs not responding, or restart the computer: 1 Press the Ctrl, Alt, and Delete keys on the keyboard simultaneously. 2 3 Click Start Task Manager. Select the program that is not responding, and then click End Task. If closing programs does not work, restart the computer: 1 Press the Ctrl, Alt, and Delete keys on the keyboard simultaneously.
Hardware Installation Symptom Possible solution A new device is not recognized as part of the system. Install the device driver from the CD provided with the device, or download and install the driver from the device manufacturer’s Web site. You may need an updated driver for Windows Vista. Contact the device vendor directly for an update. For HP peripherals, visit the HP Web site. For details, refer to the Limited Warranty and Support Guide for details.
Hardware Installation (continued) Symptom Possible solution A device does not work after installing a new device. To resolve a device conflict, you may need to disable one of the devices or uninstall an old device driver: 1 Click the Windows Vista start button, right-click Computer, and then click Properties. 2 Under Tasks, click Device Manager. 3 Click the plus sign (+) next to the problem device, and check for exclamation points in a yellow circle near the device icon.
Internet Access Symptom Possible solution I cannot connect to the Internet. Verify Internet settings, or contact your Internet Service Provider (ISP) for assistance. Verify that you are using the proper cables for your Internet connection type. Your computer may have a modem and an Ethernet network adapter (also called a network interface card, or NIC). A modem uses a standard telephone cable to make a dial-up connection. A NIC uses a network cable to connect to a local area network (LAN).
Internet Access (continued) Symptom Possible solution My Internet browser home page changed to something I did not want. You may have spyware on your computer. Spyware is software that usually runs silently in the background on your computer, collecting and sending information about you and your use of the computer to another person or system on the Internet.
Keyboard and Mouse Symptom Possible solution Keyboard commands and typing are not recognized by the computer. Turn off the computer by using the mouse, reconnect the keyboard to the back of the computer, and then turn on the computer. Keyboard Print button does not work. Use the Print menu item in the program (usually located on the File menu). Mouse (with cable) does not work or is not detected. Unplug and reconnect the mouse cable to the computer. Cursor does not respond to mouse movement.
Keyboard and Mouse (continued) Symptom Possible solution Cursor moves too fast or too slow. Adjust the cursor speed: 1 Click the Windows Vista start button, and then click Control Panel. 2 3 Click Hardware and Sound, and then click Mouse. Click the Pointer Options tab. 4 Adjust the Motion slider toward either Slow or Fast, to decrease or increase the speed at which the cursor responds to mouse movement. 5 Click OK. Power Symptom Possible solution Computer will not turn on or start.
Power (continued) Symptom Possible solution Computer displays the wrong date and time. The real-time clock (RTC) battery may need to be replaced. Battery life is approximately seven years. Before replacing the battery, try resetting the date and time in Windows Vista. 1 2 Click the Windows Vista start button, click Settings, and then click Control Panel. Click Clock, Language, and Region, and then click Date and Time.
Performance Symptom Possible solution System works improperly or stops. Your HP Firebird uses the operating system and installed software programs during normal operation. If your system works improperly or stops, you may be able to repair it using one of the two methods below: Restart your HP Firebird Restarting is the simplest method of repair for your system. When you restart, the computer reloads the operating system and software into its memory.
Performance (continued) Symptom Possible solution Software programs and files take longer than normal to open or respond. If you created multiple user accounts on your computer, ensure that no other users are logged in. If there are multiple users logged in simultaneously, system resources must be shared among them.
Performance (continued) Symptom Possible solution Software programs and files take longer than normal to open or respond. (continued) Remove unused programs: 1 Click the Windows Vista start button, and then click Control Panel. 2 3 Click Uninstall a program. Select the program you want to remove, and then click Uninstall. Follow the onscreen instructions. 4 Check for hard disk drive errors: 1 Close all open programs and windows. 2 Click the Windows Vista start button, and then Computer.
Miscellaneous Symptom Possible solution Computer overheats. If your computer is liquid-cooled and you replaced the power supply, check that you have reconnected all the cables. A buildup of dust also causes overheating. See “Keeping the HP Firebird Free of Dust and Dirt.” Error message: Insufficient memory. Close all open programs, and then try the desired task again, or restart your computer (click the Windows Vista start button, click the Arrow button next to the Lock button, and then click Restart).
Updating Drivers A driver is a software program that enables your computer to communicate with an attached device, such as a printer, hard disk drive, mouse, or keyboard. Complete the following procedure to update a driver, or to revert (or roll back) to an earlier version of the driver if the new one does not solve your problem: NOTE: Use driver updates from HP only. Driver versions available directly from component manufacturers could potentially harm your computer.
58 HP Firebird Desktop Essentials (Features may vary by model)
System Recovery Should your system fail or become corrupted, you have options. You might be able to recover your system from the recovery partition on the hard disk drive, from a recovery disc you made before the system failed, or from the Microsoft Windows Vista operating system (OS) disc included with your computer. Recovery methods are described here, after the instructions for making your own recovery disc.
6 In the From field, browse to and select the VDRS file, and then click Open. 7 Place a check mark in the Verify recorded data check box, and then click Burn. 8 When prompted, insert a DVD in the disc drive. A window opens, showing burning and verification progress. 9 When the message Burn disc image: Completed Successfully appears, click OK. The DVD ejects automatically. With a permanent pen, mark it clearly as your system recovery disc, and place it in a secure storage place.
Recovery from the recovery partition on your hard disk drive Choose one of the following procedures to reinstall the operating system and software from the recovery image on your hard disk drive: “Recovery from the Windows Start Menu”—if you can see your desktop “Recovery if you cannot get to the desktop” NOTE: System recovery deletes all data and programs you created or installed after purchase. Ensure that you have backed up any data you want to keep to a removable disc or external hard disk.
Recovery if you cannot get to the desktop If Windows Vista is not responding, but the computer is working, complete the following steps to perform a system recovery. 1 Turn off the computer. If necessary, press the Power button on the left side of the badge on the computer until the computer turns off. 2 Disconnect all peripheral devices from the computer, except the monitor, keyboard, and mouse. 3 Press the Power button on the left side of the badge to turn on the computer.
Recovery from the recovery disc This section describes how to perform a system recovery from the system recovery disc that you made. 1 Insert the recovery disc you made in the disc drive. 2 Shut down the computer. If you do not have access to the desktop, press the Power button on the left side of the badge on the computer to shut down. 3 Press the Power button on the left side of the badge to turn on the computer.
A window opens, showing the installation progress. 12 Wait while the computer prepares the desktop. 13 (Optional) Use the first part of this procedure to reverse the boot order again, to associate the 1st Boot Device with the hard disk drive. 14 Proceed to the “Post-recovery Procedure.” Recovery from the Microsoft Windows Vista OS recovery disc This section describes a system recovery with the Windows Vista operating system disc included with your computer.
9 Select the edition of Windows you purchased, and then click Next. If you entered your product key number, Windows automatically determines which edition you have. 10 Accept the license terms by placing a check mark in the check box, and then click Next. 11 Click Custom (Advanced) install. 12 In the next window, use the up arrow and down arrow keys to select System Drive. 13 Click Drive Options in the lower-right area of the window.
Next, use the Application and Driver Recovery disc to install important software and drivers. 1 Insert the Application and Driver Recovery disc in the disc drive slot. 2 View the contents of the supplemental disc. 3 Click the top folder, Install Me First. The HP System Information Utility within this folder must be installed first, before any other software programs or hardware drivers can be installed. 4 Click HP System Information Utility to view its folder contents. 5 Double-click the Install.
Index Numerics 5-in-1 media reader slot 4 A adjusting monitor 7, 8 anitvirus software 17 antivirus, installing program 20 Application and Driver Recovery disc 65 Audio 39 Audio Out connector 3 B Blu-ray compatibility 26 DVD 29 using a Blu-ray drive 25, 27, 29 buttons Off, See turning off computer 12 C cable modem, using 8 carpal tunnel syndrome 16 CD 41 CDs and DVDs handling discs 25 Cleaning 37, 38 computer connectors 2 setting up 1 transferring files 21 turning off 12 Computer locking slot 4 connecting
L S LAN (local area network) 8 setting up 9 using Local Area Network 3, 8 Limited Warranty and Support Guide 45 local area network (LAN) 8 location where to set up the HP Firebird 4 locking the computer 13 M Maintenance 33 maintenance schedule 31 Manual disk cleanup 34 manuals storing 1 Mic In connector 3 monitor adjusting 8 adjusting screen mode 7 monitor connector 3 N Network Interface Card (NIC) 9 Norton Internet Security software 17, 21 O Off button, See turning off computer 12 opening the HP Fireb