
HP Z400 and Z800 Workstations - NVIDIA Tesla Compute Processor card installation

Step 3—Connecting the power
1.
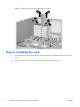
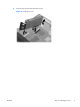
Close the expansion card retention clamp by rotating it downward (1). The retention clamp is
secured by the expansion card support.
NOTE: It is normal for the expansion card retention clamp to have a slight (5-10 degree) angle
when closed. If the angle is greater than this, open the clamp and ensure that all cards are
properly seated and all the brackets are mated to the chassis, then re-close the clamp.
2.
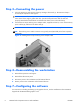
Connect the 6-to-8 pin auxiliary power adapter cable, supplied with this kit, to one of the auxiliary
power cables (2), and then to the Tesla card (3).
NOTE: No connection is made at point (4). If a label covers the outlet at (4), do not remove it.
TIP: The auxiliary power cable connectors are typically stored (attached) to the front expansion
card guide.
Figure 3 Installing the 6-to-8 pin auxiliary power adapter cable
Step 4—Reassembling the workstation
1.
Reinstall the expansion card support.
2.
Reinstall the side access panel.
3.
Reconnect power to the workstation and all external devices.
4.
Restore power to the workstation and all external devices.
Step 7—Configuring the software
For instructions on loading and setting up the graphics drivers, see the manufacturer’s documentation
shipped with the NVIDIA Tesla graphics card.
6 NVIDIA Tesla Compute Processor card installation ENWW