HP Pavilion FX75 Flat Panel Display User’s Guide Filename: fx75UGrw.doc Title: Book Title Template: HP-Print.dot Author: WASSER, Inc. Last Saved By: WASSER, Inc.
The information in this document is subject to change without notice. Hewlett-Packard® Company makes no warranty of any kind with regard to this material, including, but not limited to, the implied warranties of merchantability and fitness for a particular purpose. HP shall not be liable for errors contained herein or for incidental or consequential damages in connection with the furnishing, performance, or use of this material.
Contents Introduction ........................................................ 1 Changing Display Settings............................17 For Your Safety....................................................................................................... 2 Using the Control Buttons..............................................................................18 Installation......................................................... 4 Displaying the OSD Window..............................................
iv HP Pavilion FX75 Flat Panel Display User’s Guide Filename: fx75UGrw.doc Title: Book Title Template: HP-Print.dot Author: WASSER, Inc. Last Saved By: WASSER, Inc.
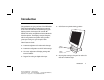
Introduction Congratulations on your purchase of the HP Pavilion FX75 Flat Panel Display. This display has a 15-inch active matrix TFT (thin film transistor) liquid crystal display module. It is designed for use with HP Pavilion PCs and is compatible with other Windows®based computers. The display’s compact footprint, with the integrated stereo speaker base, provides great space savings on your computer desk.
N A unique system for desktop cable management: a cable tunnel that goes under the base and a cable claw behind the display N Flicker-free performance across all recommended video modes N Support for high refresh rates up to 85 Hz for analog video input N Premium color performance using PerfectColor™ technology N State-of-the-art IQSync™ technology that synchronizes the display to any known video mode N A power-saving feature that is compatible with Microsoft® Windows N Compliance with Swedish MPR II guidel
If any of the following conditions occur, unplug the display and contact a qualified service technician: N The power cord or plug is frayed or damaged. N You have spilled liquid into the display. N The display has been exposed to rain or water. N The display does not operate correctly when the operating instructions are followed. N The display has been dropped or the cabinet has been damaged. Introduction Filename: fx75UGrw.doc Title: Book Title Template: HP-Print.dot Author: WASSER, Inc.
Installation N Unpacking the display N Positioning the display N Connecting the power and video cables N Connecting the stereo speaker system 4 HP Pavilion FX75 Flat Panel Display User’s Guide Filename: fx75UGrw.doc Title: Book Title Template: HP-Print.dot Author: WASSER, Inc. Last Saved By: WASSER, Inc.
Follow the instructions in this chapter to install your HP Pavilion FX75 Flat Panel Display. Note: Before connecting your display, first read through the instructions in this chapter and the safety precautions in the previous chapter. Unpacking the Display Positioning the Display Place the display on a flat, sturdy surface. Choose an area free from excessive heat, moisture, and sunlight. Avoid possible sources of electromagnetic interference, such as transformers, motors, and fluorescent lighting.
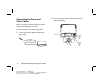
Connecting the Power and Video Cables 2 Connect the power cable to the power jack on the back of the display. Before connecting any cables, make sure that the computer and display are turned off. To connect the power and video signal cables: 1 Locate the A/C power adapter with attached power cable. Power jack Analog Video Input port Digital Video Input port 6 HP Pavilion FX75 Flat Panel Display User’s Guide Filename: fx75UGrw.doc Title: Book Title Template: HP-Print.dot Author: WASSER, Inc.
3 Plug the two-prong power cord into a power outlet, and plug the other end into the A/C power adapter. 6 Thread the cables through the cable claw at the base of the display. 4 Plug the analog video signal cable into the Analog Video Input port on the back of the display. (The port’s label is colored blue to match the blue mark on the cable plug.) Note: The display also offers a DVI Digital Video Input port.
Connecting the Stereo Speaker System To connect the stereo speaker system to your computer: Built into the base of the display is a set of passive Polk Audio® stereo speakers with a Power Port for enhanced bass performance. 1 Locate the audio cable. Note: 8 These speakers are designed to work with sound cards that have amplified sound output; most HP Pavilion PCs have this type of sound card. Refer to your PC specifications for information about your sound card.
2 Connect the speakerbase plug on the audio cable to the speaker input jack on the back of the display. (The jack is colored blue to match the cable plug.) 3 Insert the speaker port plug on the audio cable into the speaker port on your computer. If you have an HP Pavilion PC, the speaker plug is color-coded to match the port label on the PC. (For other PCs, check the computer documentation if you’re not sure where the port is located.
Using the Display N Turning the display on and off N Tilting the display N Setting the video mode N Setting the refresh rate N Minimizing energy use N Caring for and cleaning the display 10 HP Pavilion FX75 Flat Panel Display User’s Guide Filename: fx75UGrw.doc Title: Book Title Template: HP-Print.dot Author: WASSER, Inc. Last Saved By: WASSER, Inc.
This chapter contains information about using your HP Pavilion FX75 Flat Panel Display. Turning the Display On and Off Use the Power button on the front of the display to turn the display on and off. When the display is on, the light near the Power button is illuminated. The light is green when the display and computer are active and amber when the display is in a reduced power mode.
If your computer doesn’t use industry standard power-save signaling techniques, you can reduce power consumption by turning off the display when it won’t be used for an extended period. You can turn the display off even if you leave the computer running. Warning: To completely disconnect power from the display, you must remove the power cord from the wall socket and then remove the power cable from the display.
Setting the Video Mode To set the video mode in Microsoft Windows: Since the inherent format of the FX75 display is 1024 pixels by 768 lines, the display will perform best when your PC is set to a screen resolution of 1024 x 768. If you use a lower resolution (such as 640 x 480), the image is expanded to fill the screen. 1 Click Start on the taskbar.
Setting the Refresh Rate The image refresh rate is the number of times per second that the image is refreshed; it is also known as the vertical frequency. On standard CRT displays, you want to use the highest possible refresh rate supported by your computer at the current screen resolution. This is necessary to avoid screen flickering and to minimize eyestrain. However, with your FX75 liquid crystal display, flicker is not an issue. It is flicker-free at all supported refresh rates.
Minimizing Energy Use Many computers, including HP Pavilion PCs, support industry standard power-save signaling techniques. Power management features reduce the display’s power consumption after a period of keyboard inactivity. When the display is in a power-saving mode, the screen is blank and the power indicator is amber. Pressing a key on the keyboard or moving the mouse restores the image in several seconds. Consult your computer documentation for information about setting the power-saving modes.
Cleaning the Screen Your LCD module is a high-quality optical device that requires special care when cleaning. Warning: Don’t use liquid, aerosol, or abrasive cleaning solutions to clean the screen. To clean the screen: 1 Shut down the computer. 2 Turn off and unplug the display. 3 Gently dust the screen with a dry, soft, lint-free cloth. Note: If the screen is still dirty, you can dampen the cloth with several drops of distilled water.
Changing Display Settings N Using the control buttons N Displaying the OSD window N Selecting options in the OSD window N Using Auto Setup N Adjusting the image Changing Display Settings Filename: fx75UGrw.doc Title: Book Title Template: HP-Print.dot Author: WASSER, Inc. Last Saved By: WASSER, Inc.
Using the Control Buttons Three control buttons are located under your display: N Select – Displays the main On-Screen Display (OSD) window and selects options in the windows. N Minus (—) – Moves backward through the choices in the OSD windows. If an adjustment bar is displayed, this button decreases the setting. N Plus (+) – Moves forward through the choices in the OSD windows. If an adjustment bar is displayed, this button increases the setting.
The following table briefly describes each of the options in the OSD main window. Option Description Auto Setup Automatically adjusts the video level, image position, and other display settings. See “Using Auto Setup” on page 21. Note: For optimal performance, Auto Setup may be used whenever you apply a new mode. Brightness Contrast Controls the brightness of the display by adjusting the light output of the backlight. The default setting of brightness is at maximum.
Selecting Options in the OSD Window To choose options in the OSD window, you will use all three control buttons (Select, +, and —) under the display. Note: If you are using digital video input, you will not need to use many of the options in the OSD window. The only functions that are adjustable with digital input are Brightness, Color Temp, Gamma Correct, Scaling, and Sharpen. Although the other functions appear on the OSD menus, they are unnecessary for digital input and will not operate.
Using Auto Setup Whenever you apply a new video mode or change the refresh rate, the FX75 will automatically adjust the display for the new setting. However, the Auto Setup feature ensures optimal performance, and can be run whenever you change these settings. 4 Press the + or — buttons to highlight an option or to change the current setting. 5 Press the Select button to execute your selection. 6 To close an OSD window, select the Exit option or wait for the window to close automatically.
2 Press the Select button again to choose Auto Setup. The image will change color and appear to jitter during the Auto Setup routine. After the routine is complete, you are asked whether the image appears correct. 3 If the image looks correct, choose Yes, and then wait for the OSD window to close automatically. Or If the image requires further adjustment, choose No and adjust the phase by pressing the + or — buttons under the display.
The table below briefly describes each of these functions. Option Description Horizontal Position Adjusts the horizontal position of the image within the screen area. See “Positioning the Image” on page 23. Vertical Position Adjusts the vertical position of the image within the screen area. See “Positioning the Image” on page 23. Scale/Center Selects how the image fits within the screen area. See “Selecting a Scaling Mode” on page 24. Sharpen Controls the sharpness level manually or automatically.
6 Press the + or — buttons until the image is positioned where you like. 7 Press the Select button. 8 To exit the OSD, select Exit on each OSD window or wait for the OSD to close automatically. Selecting a Scaling Mode N Maintain Aspect Ratio – Sizes the image to the correct proportions of the applied video mode. (Note that in many modes, there will be no visible difference.) The image may not fill the entire display, but it will not be distorted.
5 Press the Select button. Note: A window appears with your scaling choices. 6 Press the + or — buttons to highlight Full Screen, Maintain Aspect Ratio, or Center. Note: As you highlight an option, your screen immediately updates to reflect this setting. 7 When the desired option is highlighted, press the Select button. 8 To exit the OSD, select Exit on each OSD window or wait for the OSD to close automatically.
6 Press the + or — buttons to highlight Smart sharpening, High, Medium, or Low. Note: As you highlight an option, your screen immediately updates to reflect this setting. 7 When the desired option is highlighted, press the Select button. 8 To exit the OSD, select Exit on each OSD window or wait for the OSD to close automatically. Adjusting Color Settings The OSD offers four different controls for fine-tuning colors on your display: Gamma Correct, Color Temp, RGB Adjust, and Black Level Adjust.
5 Press the Select button. Note: The Color window appears. 6 Press the + or — buttons to highlight Gamma Correct. 7 Press the Select button. 8 Press the + or — buttons to highlight LCD Corrected or CRT Corrected. Note: As you highlight an option, your screen immediately updates to reflect this setting. 9 Press the Select button. 10 When you are done with all color adjustments, make sure you save your color settings. See “Saving and Restoring Color Settings” on page 29.
8 Press the + or — buttons to highlight Cool, Neutral, or Warm. Note: As you highlight an option, your screen immediately updates to reflect this setting. 9 Press the Select button. 10 When you are done with all color adjustments, make sure you save your color settings. See “Saving and Restoring Color Settings” on page 29. To adjust RGB or black level: 1 Press the Select button under the display to open the OSD main window.
9 Press the Select button. Note: An adjustment bar appears in the bottom of the window. 10 Press the + button to increase the color level or the — button to decrease the color level. Note: As you change the color level, your screen immediately updates to reflect this setting. Saving and Restoring Color Settings You can freely adjust the color options as much as you like, and experiment with different combinations of settings.
The Restore Color Settings option reverts to the set of color settings you last saved with the Save option. It restores the settings you previously saved for gamma correct, color temperature, RGB levels, and black levels. Adjusting Advanced Settings The FX75 display offers three advanced image adjustment settings: Phase Adjust, Clock Adjust, and Video Interface.
6 Press the + or — buttons to highlight Phase Adjust or Clock Adjust. 7 Press Select. 8 Press the + or — buttons to adjust the image quality. 9 Press Select. 10 To exit the OSD, select Exit on each OSD window or wait for the OSD to close automatically. Selecting the Video Interface When a single cable is plugged into one of the video input ports, your display automatically detects which port to use. If you have cables plugged into the analog and digital ports, the analog port is used by default.
Troubleshooting My display doesn’t work, even though the computer appears to work. N Make sure the power cable is securely plugged into the display. N Make sure the display is turned on. N Check the cable connection between the display and the computer. The cable connectors must be pushed in all the way. The message “Check Cable” appears on my display. N Try turning the display off and then back on. This message appears when the video cable is not properly connected to the computer.
The message “Unknown Mode Detected” appears on my display. Your computer’s display settings for screen resolution and refresh rate are set to values that are inappropriate for your FX75 display. See “FX75 Video Modes” on page 35 for a table of supported modes. I don’t hear any sound coming from the built-in speakers. N Make sure the audio cable is plugged into the speaker port on the back of the display and into the speaker port on your computer. N Make sure headphones are not plugged into your system.
Technical Information This chapter contains technical information about the FX75 display. FX75 Display Information LCD module 15-in (38.1 cm), active matrix TFT, anti-glare coating, 0.297 mm pixel pitch Maximum viewable area 12 in (H) x 9 in (V) (304.1 mm x 228.1 mm) Line (horizontal) frequency 31.5 kHz — 68.7 kHz (analog) 31.5 kHz — 48.
FX75 Video Modes 1024 x 768 85 Hz The FX75 display supports the following industrystandard combinations of screen resolution and refresh rates. Other combinations are possible, but may require adjustments to the image. (See “Adjusting the Image” on page 22 for information about making these adjustments.) 1280 x 1024 85Hz For optimal performance, set your PC to a screen resolution of 1024 x 768 at a 75 Hz refresh rate.
Regulatory Information Declaration of Conformity According to ISO/IEC Guide 22 and EN 45014 Hewlett-Packard Company Manufacturer’s Name: 10500 Ridgeview Ct.
FCC Statement This equipment has been tested and found to comply with the limits for a Class B digital device pursuant to Part 15 of the FCC Rules. These limits are designed to provide reasonable protection against harmful interference in a residential installation. This equipment generates, uses, and can radiate radio frequency energy. If not installed and used in accordance with the instructions, it may cause harmful interference to radio communications.
General Notice The HP Pavilion FX75 Flat Panel Display has been tested according to MPR 1990:8 for emission properties, and meets the guidelines as given by MPR 1990:10 (2.01 — 2.04). Note: 38 This display is a Class 1 LED product. HP Pavilion FX75 Flat Panel Display User’s Guide Filename: fx75UGrw.doc Title: Book Title Template: HP-Print.dot Author: WASSER, Inc. Last Saved By: WASSER, Inc.
Filename: fx75UGrw.doc Title: Book Title Template: HP-Print.dot Author: WASSER, Inc. Last Saved By: WASSER, Inc.