
User's Manual

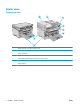

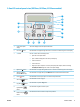


2 Ethernet port (network models only)
3 Fax "line in" port for attaching the fax phone line to the product (fax models only)
4 Telephone "line out" port for attaching an extension phone, answering machine, or other device (fax models only)
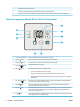
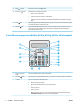
LED control-panel view (M130a, M132a, M133a, M134a models)
1
3
2
4
56
9
7
8
1 Control panel LED display This screen displays numerical information for copy jobs.
2 Up arrow
button Use this button to increase the value that appears on the display.
3 Down arrow
button Use this button to decrease the value that appears on the display.
4
Start Copy
button
Press this button to start a copy job.
5 Cancel
button Press this button to perform the following actions:
●
Cancel a print job when the printer is printing.
●
Reset the current copy settings to the default values when the printer is idle.
●
Exit Copy Default Setting mode without saving the value when the printer is in Copy Default
Setting mode.
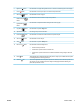
6
Copy Setup
button
Use this button to navigate through the Number of Copies, Lighter/Darker, and Reduce/Enlarge
options. The default option is Number of Copies.
7
Supplies
LED
The Supplies light blinks when a supply error occurs, and it glows without blinking when the
supply is very low and replacement is required.
8 Attention
LED The Attention light blinks when the printer requires user attention, such as when the printer runs
out of paper or a toner cartridge needs to be changed. If the light glows without blinking, the
printer has experienced an error.
9 Ready
LED The Ready light glows without blinking when the printer is ready to print. It blinks when the printer
is receiving print data or canceling a print job.
4 Chapter 1 Printer overview ENWW