Pointing Devices and Keyboard User Guide
© Copyright 2007 Hewlett-Packard Development Company, L.P. Windows is a U.S. registered trademark of Microsoft Corporation. The information contained herein is subject to change without notice. The only warranties for HP products and services are set forth in the express warranty statements accompanying such products and services. Nothing herein should be construed as constituting an additional warranty. HP shall not be liable for technical or editorial errors or omissions contained herein.
Table of contents 1 Pointing Devices TouchPad ............................................................................................................................................. 2 Using the TouchPad ............................................................................................................ 2 Setting TouchPad preferences ............................................................................................ 2 Pointing stick ....................................................
Keypads Using the embedded numeric keypad ................................................................................................ 19 Enabling and disabling the embedded numeric keypad .................................................... 19 Switching key functions on the embedded numeric keypad .............................................. 19 Using an external numeric keypad .....................................................................................................
1 Pointing Devices The following chapter describes the use of the TouchPad and pointing devices.
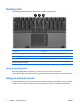
TouchPad The following illustration and table describe the computer TouchPad. Component Description (1) TouchPad* Moves the pointer and selects or activates items on the screen. Can be set to perform other mouse functions, such as scrolling, selecting, and double-clicking. (2) Left TouchPad* button Functions like the left button on an external mouse. (3) TouchPad scroll zone* Scrolls up or down. (4) Right TouchPad button* Functions like the right button on an external mouse.
Use Mouse Properties in Windows® to customize settings for pointing devices, such as button configuration, click speed, and pointer options.
Pointing stick The following illustration and table describe the computer pointing devices. Component Description (1) Left pointing stick button Functions like the left button on an external mouse. (2) Pointing stick Moves the pointer and selects or activates items on the screen. (3) Right pointing stick button Functions like the right button on an external mouse. *This table describes factory settings.
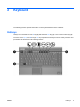
2 Keyboard The following sections provide information on the keyboard features of the notebook. Hotkeys Hotkeys are combinations of the fn key (2) and either the esc key (1) or one of the function keys (3). The icons on the f3, f4, and f8 through f11 keys represent the hotkey functions. Hotkey functions and procedures are discussed in the following sections.
Hotkey quick reference Function Key Combination Display system information. fn+esc Clear system information fn+esc or click OK. Initiate Sleep. fn+f3 Alternate image between the computer display and an external display. fn+f4 Display battery information. fn+f8 Clear battery information. fn+f8 Decrease screen brightness. fn+f9 Increase screen brightness. fn+f10 Turn on and off ambient light sensor.
NOTE If a critical battery level occurs while the computer is in the Sleep state, the computer initiates Hibernation and the information stored in RAM is saved to the hard drive. The factory setting for critical battery action is Hibernate, but this setting can be changed in advanced power settings. To exit Sleep, briefly press the power button. The function of the fn+f3 hotkey can be changed. For example, you can set the fn+f3 hotkey to initiate Hibernation instead of Sleep.
Switch the screen image (fn+f4) Press fn+f4 to switch the screen image among display devices connected to the system. For example, if a monitor is connected to the computer, each time you press fn+f4 the image switches among the computer display, the monitor display, and a simultaneous display on both the computer and the monitor. Most external monitors receive video information from the computer using the external VGA video standard.
3 HP Quick Launch buttons Use the HP Quick Launch buttons to open frequently used programs, sometimes called applications in the HP Quick Launch Buttons control panel. (1) (2) ENWW Component Description Info Center button Launches Info Center, which enables you to open various software solutions. You can also reprogram this button to perform one of the following actions: Presentation button ● Open presentation feature or the Q Menu. ● Open an e-mail editor.
Component Description The presentation button can be reprogrammed to perform one of the following actions: 10 Chapter 3 HP Quick Launch buttons ● Open the Q Menu or Info Center. ● Open an e-mail editor. ● Open a search box that allows you to search for a Web site.
Presentation button When you press the presentation button for the first time, the Presentation Settings dialog box opens. In this dialog box, you can set the button to perform one of the following actions: ● Open a program, folder, file, or Web site that you specify. ● Choose a display setting.
Info Center button When you press the Info Center button for the first time, the Info Center opens, enabling you to open preset software solutions. If you choose not to use this factory setting for the Info Center button, you can reprogram the button to perform one of the following actions: 12 ● Open the Q Menu or start the presentation feature. ● Open an e-mail editor. ● Open a search box that allows you to search for a Web site.
HP Quick Launch Buttons control panel NOTE Some of the preferences listed in the HP Quick Launch Buttons control panel may not be supported by your computer. Use the HP Quick Launch buttons to ● Program the presentation button and the Info Center button, and change the settings for each button. ● Add, modify, and remove items on the Q Menu. ● Set preferences for tiling windows on the Windows desktop.
To open an e-mail editor or to search for a Web site when the button is pressed: 1. In the HP Quick Launch Buttons control panel, click the Programmable Buttons tab. 2. Click the down arrow next to the button you want to set, and click Launch eMail or Search URL. 3. To save your preferences and close the control panel, click Apply, and then click OK. To open a program, folder, file, or Web site when the button is pressed: 1.
Adding a listed item to the Q Menu To add an item from the Items to display on Q Menu list to the Q Menu: 1. In the HP Quick Launch Buttons control panel, click the Q Menu tab. 2. Select the check box for the item you want to add. 3. To save your preferences and close the control panel, click Apply, and then click OK.
Repositioning a Q Menu item To change the location of an item on the Q Menu: 1. In the HP Quick Launch Buttons control panel, click the Q Menu tab. 2. Select the item on the Items to display on Q Menu list. Then 3. ● To move the item up in the list, click the Move Up button. ● To move the item down in the list, click the Move Down button. To save your preferences and close the control panel, click Apply, and then click OK.
To set a preference: 1. In the HP Quick Launch Buttons control panel, click the Preferences tab. 2. To display or enable a preference, select the check box next to the item. – or – To clear or disable a preference, clear the check box next to the item. NOTE For on-screen information about any item on the Preferences tab, click the Help button in the upper-right corner of the window, and then click the item.
4 Keypads The computer has an embedded numeric keypad and also supports an optional external numeric keypad or an optional external keyboard that includes a numeric keypad.
Using the embedded numeric keypad The 15 keys of the embedded numeric keypad can be used like the keys on an external keypad. When the embedded numeric keypad is turned on, each key on the keypad performs the function indicated by the icon in the upper-right corner of the key. Enabling and disabling the embedded numeric keypad Press fn+num lk to enable the embedded numeric keypad. The num lock light is turned on. Press fn +num lk again to return the keys to their standard keyboard functions.
Index A activating ambient light sensor hotkey 8 ambient light sensor setting 16 B battery charge information 6, 8 buttons Info Center 12 pointing stick 4 Presentation 11 Quick Launch 9 Quick Launch Buttons software 13 TouchPad 2 C composite video 8 D display image, switching 6, 8 screen brightness hotkeys 6, 8 E external keyboard assignments 16 F fn key 5 function keys 5 H hotkeys activating ambient light sensor 6 ambient light sensor 8 20 Index battery charge information 6, 8 clearing system informati