Quick Setup & Getting Started HP Compaq Business PC
© Copyright 2007 Hewlett-Packard Development Company, L.P. The information contained herein is subject to change without notice. Microsoft, Windows, and Windows Vista are either trademarks or registered trademarks of Microsoft Corporation in the United States and/or other countries. Adobe, Acrobat, and Acrobat Reader are trademarks or registered trademarks of Adobe Systems Incorporated.
About This Book This guide provides basic information about setting up and maintaining your computer. WARNING! Text set off in this manner indicates that failure to follow directions could result in bodily harm or loss of life. CAUTION: Text set off in this manner indicates that failure to follow directions could result in damage to equipment or loss of information. NOTE: ENWW Text set off in this manner provides important supplemental information.
iv About This Book ENWW
Table of contents 1 Quick Setup Step 1: Unpack the Computer .............................................................................................................. 1 Step 2: Confirm the Voltage Setting ..................................................................................................... 2 Step 3: Connect External Devices ........................................................................................................ 3 Step 4: Identify Front Panel Components ..................
vi ENWW
1 Quick Setup Step 1: Unpack the Computer WARNING! To reduce the risk of serious injury, read the Safety & Comfort Guide. It describes proper workstation setup, posture, and health and work habits for computer users, and provides important electrical and mechanical safety information. This guide is located on the Web at http://www.hp.com/ergo and on the Documentation and Diagnostics CD.
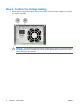
Step 2: Confirm the Voltage Setting Ensure that the voltage select switch for the power supply is set to the correct voltage for your region (115 volts or 230 volts). CAUTION: You should not need to change the voltage setting; however, you should verify that the voltage selection is compatible with your local power specifications. Failure to do so could result in damage to the computer.
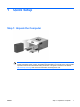
Step 3: Connect External Devices Connect the monitor, mouse, keyboard, and network cables. NOTE: Arrangement and number of connectors may vary by model.
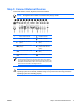
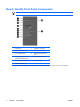
Step 4: Identify Front Panel Components NOTE: 1 4 The illustration shown below may look different than your computer model. 1 Optical Drive 7 Headphone Connector 2 Optical Drive Activity Light 8 Microphone Connector 3 5.25" Expansion Bay 9 USB (Universal Serial Bus) Ports 4 3.5" Expansion Bay (optional Media Card Reader shown)1 10 Optical Drive Eject Button 5 Dual-State Power Button 11 Power On Light 6 Hard Drive Activity Light The 3.
Step 5: Connect the Power Cords Connect the power cords and monitor cord as shown. Turn on the monitor, then turn on the computer. WARNING! To reduce the risk of electric shock or damage to the equipment: Do not disable the power cord grounding plug. The grounding plug is an important safety feature. Plug the power cord into a grounded (earthed) outlet that is easily accessible at all times. Disconnect power from the computer by unplugging the power cord from either the electrical outlet or the computer.
Step 6: Turn On the Computer and Install the Microsoft Operating System NOTE: If the computer was shipped with Microsoft Windows Vista loaded, you will be prompted to register the computer with HP Total Care before installing the operating system. You will see a brief movie followed by an online registration form. Fill out the form, click the Begin button, and follow the instructions on the screen.
Step 7: Turn Off the Computer To properly turn off the computer, first shut down the operating system software. In Microsoft Windows XP Professional, click Start > Shut Down. In Microsoft Windows XP Home, click Start > Turn Off Computer. In Microsoft Windows Vista, click Start, click the arrow on the lower right corner of the Start menu, then select Shut Down. The computer automatically shuts down.
2 Getting Started Downloading Microsoft Windows Updates 1. To set up your Internet connection, click Start > Internet Explorer and follow the instructions on the screen. 2. Once an Internet connection has been established, click the Start button. 3. Select the All Programs menu. 4. Click on the Windows Update link. In Microsoft Windows XP, you will be directed to the Microsoft Windows Update Web site. If you see one or more pop-up windows that ask you to install a program from http://www.microsoft.
Properties in Microsoft Windows XP or Personalize in Microsoft Windows Vista to change display settings. For more information, refer to the online documentation provided with the graphics controller utility or the documentation that came with your monitor. HP Backup and Recovery Manager NOTE: The features described below are only available on systems shipped with Microsoft Windows XP. The HP Backup and Recovery Manager included with Microsoft Windows Vista is a more limited version.
Finding More Information The following publications are available on the Documentation and Diagnostics CD: ● Quick Setup & Getting Started ● Hardware Reference Guide ● Troubleshooting Guide ● Computer Setup (F10) Utility Guide ● Safety & Regulatory Information ● Support Telephone Numbers ● Safety & Comfort Guide NOTE: If you do not have an optical drive capable of reading CDs, you may download the product documentation from the Web at http://www.hp.com/support.
the self-help resources at http://www.hp.com/support. Select your country and language, select See support and troubleshooting information, enter the model number of the computer, and press Enter. Helpful Hints If you encounter problems with the computer, monitor, or software, see the following list of general suggestions before taking further action: ● Check that the computer and monitor are plugged into a working electrical outlet.
Before You Call for Technical Support If you are having problems with the computer, try the appropriate solutions below to try to isolate the exact problem before calling for technical support. ● Run the diagnostics utility (available on some models only). Refer to the Troubleshooting Guide on the Documentation and Diagnostics CD for more information. ● Run the hard drive self-test in Computer Setup.
If it becomes necessary to call for technical assistance, be prepared to do the following to ensure that your service call is handled properly: ● Be in front of your computer when you call. ● Write down the computer serial number and product ID number, and the monitor serial number before calling. ● Spend time troubleshooting the problem with the service technician. ● Remove any hardware that was recently added to your system. ● Remove any software that was recently installed.