
HP Z210 CMT Workstation Maintenance and Service Guide

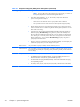
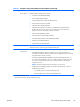


Table Of Contents
- Product overview
- Setting up the operating system
- Restoring the operating system
- System management
- BIOS ROM
- The Computer Setup (F10) Utility
- Desktop management
- Initial computer configuration and deployment
- Installing a remote system
- Replicating the setup
- Updating and managing software
- HP Client Manager Software
- Altiris Client Management Solutions
- HP SoftPaq Download Manager
- System Software Manager
- ROM Flash
- FailSafe Boot Block ROM
- Workstation security
- Asset tracking
- SATA hard disk drive security
- Password security
- Establishing a setup password using Computer Setup (F10) Utility
- Establishing a power-on password using computer setup
- Entering a power-on password
- Entering a setup password
- Changing a power-on or setup password
- Deleting a power-on or setup password
- National keyboard delimiter characters
- Clearing passwords
- Chassis security
- Fault notification and recovery
- Dual-state power button
- Replacing components
- Warnings and cautions
- Service considerations
- Customer Self-Repair
- Removing and installing components
- Component locations
- Predisassembly procedures
- Disassembly order
- Removing the cable lock (optional)
- Side access panel
- Side access panel sensor (optional)
- Side access panel solenoid lock
- Bezel
- Front panel I/O device assembly
- Optical disk drive (mini-tower configuration)
- Optical disk drive (desktop configuration)
- Speaker
- Power supply
- Power connections
- Rear system fan assembly
- Memory
- Expansion card slot identification
- Expansion card
- Battery
- Hard disk drive
- CPU heatsink
- CPU
- System board
- Converting to desktop configuration
- Product recycling
- Diagnostics and troubleshooting
- Calling technical support
- Locating ID labels
- Locating warranty information
- Diagnosis guidelines
- Troubleshooting checklist
- HP troubleshooting resources and tools
- Troubleshooting scenarios and solutions
- Self-troubleshooting with HP Vision Diagnostics
- Diagnostic codes and errors
- Configuring RAID devices
- Configuring password security and resetting CMOS
- Connector pins
- System board designators
- Routine Care
- Locating HP resources
- Index

Table 4-1 Computer Setup (F10) Utility menu descriptions (continued)
Heading Option Description
Power OS Power
Management
Enables or disables:
●
Runtime Power Management
●
Idle Power Savings: Extended (default) or Normal; extended mode reduces processor
power consumption when the CPU is idle
●
ACPI S3 PS2 Mouse Wakeup
●
Unique Sleep State Blink Rates
Hardware Power
Management
Enables or disables:
●
SATA Power Management
●
S5 Maximum Power Savings
Thermal Lets you set the minimum speed of the system fan when the CPU is idle.
Advanced
2
Power-On
Options
Sets the following:
●
POST Mode:
◦
QuickBoot—Do not clear memory or perform a memory test.
◦
FullBoot—Memory test (count) on cold boot. Clears memory on all boots.
◦
Clear Memory—No memory test (count) on cold boot. Clears memory on all
boots.
◦
FullBoot Every x Days—Memory count on first cold boot on or after the Xth day
and no more memory counts until that boot occurs. Clears memory on all boots.
●
POST Messages (Enabled/Disabled)
●
Press the ESC key for Startup Menu (Enabled/Disabled)
●
Option ROM Prompt (Enabled/Disabled)—Enabling this feature causes the computer to
display a message before loading option ROMs.
●
After Power Loss—Lets you specify computer behavior after a power loss:
◦
Power Off—Computer remains powered off when power is restored (default).
◦
Power On—Computer automatically powers on when power is restored. (This
lets you power on the computer using a power strip switch, if the computer is
connected to an electric power strip.)
◦
Previous state—Computer powers on automatically when power is restored
only if computer was on when power was lost.
ENWW
The Computer Setup (F10) Utility
33