
HP Z210 CMT Workstation Maintenance and Service Guide


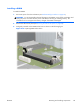


Table Of Contents
- Product overview
- Setting up the operating system
- Restoring the operating system
- System management
- BIOS ROM
- The Computer Setup (F10) Utility
- Desktop management
- Initial computer configuration and deployment
- Installing a remote system
- Replicating the setup
- Updating and managing software
- HP Client Manager Software
- Altiris Client Management Solutions
- HP SoftPaq Download Manager
- System Software Manager
- ROM Flash
- FailSafe Boot Block ROM
- Workstation security
- Asset tracking
- SATA hard disk drive security
- Password security
- Establishing a setup password using Computer Setup (F10) Utility
- Establishing a power-on password using computer setup
- Entering a power-on password
- Entering a setup password
- Changing a power-on or setup password
- Deleting a power-on or setup password
- National keyboard delimiter characters
- Clearing passwords
- Chassis security
- Fault notification and recovery
- Dual-state power button
- Replacing components
- Warnings and cautions
- Service considerations
- Customer Self-Repair
- Removing and installing components
- Component locations
- Predisassembly procedures
- Disassembly order
- Removing the cable lock (optional)
- Side access panel
- Side access panel sensor (optional)
- Side access panel solenoid lock
- Bezel
- Front panel I/O device assembly
- Optical disk drive (mini-tower configuration)
- Optical disk drive (desktop configuration)
- Speaker
- Power supply
- Power connections
- Rear system fan assembly
- Memory
- Expansion card slot identification
- Expansion card
- Battery
- Hard disk drive
- CPU heatsink
- CPU
- System board
- Converting to desktop configuration
- Product recycling
- Diagnostics and troubleshooting
- Calling technical support
- Locating ID labels
- Locating warranty information
- Diagnosis guidelines
- Troubleshooting checklist
- HP troubleshooting resources and tools
- Troubleshooting scenarios and solutions
- Self-troubleshooting with HP Vision Diagnostics
- Diagnostic codes and errors
- Configuring RAID devices
- Configuring password security and resetting CMOS
- Connector pins
- System board designators
- Routine Care
- Locating HP resources
- Index

Memory
This section presents memory module (DIMM) configuration information and removal/installation
procedures.
Supported DIMM configurations
The workstation supports these DIMM configurations:
●
Four DIMM slots
●
Memory configuration from 1 GB to 32 GB
●
No support for mirroring
●
No support for DIMM sparing
●
Error checking and correcting (ECC) and non-ECC DIMMs are supported.
DIMM installation guidelines
●
Install only HP-approved DDR3 DIMMs.
CAUTION: HP ships only DIMMs that are electrically and thermally compatible with this
workstation. Because third-party DIMMs might not be electrically or thermally compatible, they are
not supported by HP.
●
For ECC DIMMs, use only industry-standard ECC unbuffered DIMMs. See
http://www.hp.com/
go/quickspecs to find which DIMMs are compatible with the workstation.
●
Do not intermix non-ECC memory DIMMs with ECC memory DIMMs.
DIMM installation order
Review the following to determine the correct installation order for DIMMs.
Figure 5-24 DIMM load order
ENWW
Removing and installing components
83