
Setting up and configuring Intel AMT in HP Business Notebooks, Desktops, and Workstations - White Paper


25
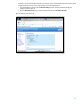
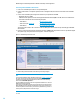
17. Having completed the network setup, select Activate Network Access from the Intel AMT Configuration menu, as shown
in Figure 20. This setting causes the ME to transition to the newly-provisioned state if all required settings have been
configured.
The Unconfigure Network Access option causes the ME to transition to the pre-provisioned state. For more information,
refer to Unprovisioning an Intel AMT system or Making a full return to factory default settings.
Figure 20. Transitioning the ME to the newly-provisioned state
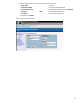
18. When MEBx displays Update Network Settings in the General Settings menu, press Enter.
19. At the MEBx CAUTION prompt, press Y.
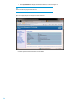
20. Press the ESC key to return to the MEBx Main Menu and select MEBx Exit to exit the MEBx setup and save settings. The
system will reboot.
Once the system reboots, it changes from Intel AMT In-Setup phase to Operational phase. Now, the system can be remotely
managed through the WebGUI or a remote console and can be provided to the end-user for regular use.
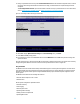
Using the WebGUI
The WebGUI is a browser-based interface that provides limited support for remote system management. It is often used to
verify that Intel AMT setup and configuration has been performed properly on a system. Obtaining a successful connection
between a remote system and the system running the WebGUI indicates proper Intel AMT setup and configuration on the
remote system.
The WebGUI is accessible from the following web browsers:
Microsoft Internet Explorer 6 SP1 or newer
Mozilla Firefox
Remote system management capabilities include:
Hardware inventory
Event logging
Remote system reset
Updating network settings
Adding new users and passwords
Updating ME firmware