
Setting up and configuring Intel AMT in HP Business Notebooks, Desktops, and Workstations - White Paper


26
WebGUI support is enabled by default for Manual mode setup and configuration.
Connecting with the WebGUI in Manual mode
1. Power on an Intel AMT system that is in its operational phase.
2. Invoke a web browser on a separate system (such as a management PC) that is on the same subnet as the Intel AMT
system.
3. Connect to the Intel AMT system using the IP address and port specified in the MEBx.
– By default, the port is 16992
– If DHCP has been specified, then use the Fully Qualified Domain Name (FQDN) for the ME, which is a combination of
the hostname and domain as in the following examples:
o IPv4 address: http://192.168.0.1:16992
o Host names (see Host Name): http://hpsystem.hp.com:16992
o IPv6 address: http://[2001:ABC::ABC]:16992
The remote system makes a TCP connection to the Intel AMT system and accesses the top-level web page embedded
within the ME.
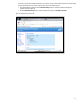
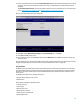
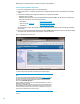
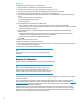
4. Enter your username and password. The default username is admin, while the password is the one specified during ME
setup. After login, the System Status screen appears, as shown in Figure 21.
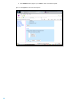
Figure 21. The WebGUI System Status screen
5. Review the system information and make any necessary changes.
Note
You can use the WebGUI to change the MEBx password (see Creating a password) for
the remote system. Note changing a password in the WebGUI or SCS results in two
passwords for Intel AMT setup and configuration, with the new credential being
known as the remote MEBx password.
The remote MEBx password only works remotely with the WebGUI or SCS. The local
MEBx password does not change.
If you create a remote MEBx password, you must now keep track of two passwords.
When the MEBx password is initially set in Intel AMT setup, it serves as both a local
and remote password. In this scenario, passwords are synchronized; if you create a
remote password, the passwords are now out of sync.
6. Exit.