
HP 1:10Gb Ethernet BL-c Switch for c-Class BladeSystem Application Guide
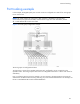

Ports and trunking
40
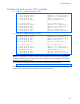
Configuring trunk groups (CLI example)
1. On Switch 1, configure trunk groups 5 and 3:
>> # /cfg/l2/trunk 5 (Select trunk group 5)
>> Trunk group 5# add 24 (Add port 24 to trunk group 5)
>> Trunk group 5# add 25 (Add port 25 to trunk group 5)
>> Trunk group 5# ena (Enable trunk group 5)
>> Trunk group 5# apply (Make your changes active)
>> # /cfg/l2/trunk 3 (Select trunk group 3)
>> Trunk group 3# add 22 (Add port 22 to trunk group 3)
>> Trunk group 3# add 23 (Add port 23 to trunk group 3)
>> Trunk group 3# ena (Enable trunk group 3)
>> Trunk group 3# apply (Make your changes active)
>> Trunk group 3# save (Save for restore after reboot)
2. On Switch 2, configure trunk groups 4 and 2:
>> # /cfg/l2/trunk 4 (Select trunk group 4)
>> Trunk group 4# add 24 (Add port 24 to trunk group 4)
>> Trunk group 4# add 25 (Add port 25 to trunk group 4)
>> Trunk group 4# ena (Enable trunk group 4)
>> Trunk group 4# apply (Make your changes active)
>> # /cfg/l2/trunk 2 (Select trunk group 2)
>> Trunk group 2# add 22 (Add port 22 to trunk group 2)
>> Trunk group 2# add 23 (Add port 23 to trunk group 2)
>> Trunk group 2# ena (Enable trunk group 2)
>> Trunk group 2# apply (Make your changes active)
>> Trunk group 2# save (Save for restore after reboot)
NOTE: In this example, two switches are used. Any third-party device supporting link aggregation
should be configured manually. Connection problems might arise when using automatic trunk group
negotiation on the third-party device.
3. Examine the trunking information on each switch, using the following command:
>> /info/l2/trunk (View trunking information)
Information about each port in each configured trunk group is displayed. Make sure that trunk groups
consist of the expected ports and that each port is in the expected state.