
HP Virtual Connect for c-Class BladeSystem Version 3.00 Setup and Installation Guide for HP Integrity BL8x0c i2 Series Server Blades

Installation 51
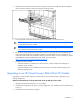
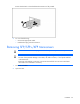
3.
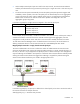
Install the VC-FC module into the interconnect bay (HP Virtual Connect 4Gb Fibre Channel Module
shown). Push the module in slowly and smoothly until firmly seated.
4. Connect the data center SAN switch ports to the VC-FC module 1/2/4 Gb SFP ports.
IMPORTANT: For proper thermal operation, always install SFP dust covers in SFP ports
without SFP transceivers installed.
IMPORTANT: For proper Virtual Connect operation, always assign an IP address to each
server blade iLO and interconnect module.
5. Review the Onboard Administrator bay summary screens to verify that each server blade iLO and
interconnect module has been assigned an IP address. Each IP address must be valid and unique,
and all iLOs and Virtual Connect modules must be on the same subnet. For more information, see the
HP BladeSystem Onboard Administrator User Guide on the HP website
(
http://www.hp.com/go/bladesystem/documentation).
6. Configure the VC-FC module:
o If VC-Enet modules are installed in the same enclosure, use the Virtual Connect Manager to
administer VC-FC modules.
o If VC-Enet modules are not installed in the same enclosure, the VC-FC module operates in the
default configuration only.
Upgrading to an HP Virtual Connect 8Gb 24-Port FC Module
Upgrading to an HP VC 8Gb 24-port FC module requires several important steps, depending on the
starting configuration.
Replacing an HP 4Gb VC-FC or HP VC 4Gb FC with an HP VC 8Gb 24-port FC module
1. Upgrade the VC domain firmware to v2.10 or higher.
2. Verify that the replacement will result in a good configuration. See "Multiple enclosure guidelines (on
page 41)."
3. Verify that the user has Domain privileges.