HP IO Accelerator Version 3.2.3 Windows User Guide Abstract This document describes software requirements for all relevant HP IO Accelerators using Microsoft Windows operating systems. This document is intended for system administrators who plan to install and use HP IO Accelerators with a Microsoft Windows operating system. It is helpful to have previous experience with HP IO Accelerators and a Microsoft Windows operating system. This user guide is intended for IO Accelerator software release 3.2.
© Copyright 2011, 2013 Hewlett-Packard Development Company, L.P. The information contained herein is subject to change without notice. The only warranties for HP products and services are set forth in the express warranty statements accompanying such products and services. Nothing herein should be construed as constituting an additional warranty. HP shall not be liable for technical or editorial errors or omissions contained herein. Confidential computer software.
Contents About this guide ........................................................................................................................... 6 Contents summary ..................................................................................................................................... 6 Introduction .................................................................................................................................. 7 Overview ...................................................
Maintenance .............................................................................................................................. 37 Maintenance tools ................................................................................................................................... 37 Common maintenance tasks ..................................................................................................................... 37 Uninstalling the IO Accelerator driver package.........................
Introduction to performance and tuning ...................................................................................................... 65 Disabling DVFS ....................................................................................................................................... 65 Limiting APCI C-states .............................................................................................................................. 65 Setting NUMA affinity ......................................
About this guide Contents summary • Instructions on downloading and installing the approved driver and utilities • Instructions on maintaining the IO Accelerator • Description of the following IO Accelerator models: o HP IO Accelerator for BladeSystem c-Class o HP PCIe IO Accelerator o HP PCIe IO Accelerator Duo CAUTION: Before upgrading to 3.x.x software and firmware, back up all data on the IO Accelerator. The 3.2.
Introduction Overview Designed around ioMemory, a revolutionary storage architecture, HP IO Accelerator is an advanced NAND flash storage device. With performance comparable to DRAM and storage capacity on par with hard disks, the IO Accelerator increases performance so that every server can contain internal storage that exceeds the I/O performance of an enterprise SAN. HP IO Accelerator is the first data accelerator designed specifically to improve the bandwidth for I/O-bound applications.
• QK762A: HP 785GB IO MLC Accelerator for BladeSystem c-Class • QK763A: HP 1.2 TB IO MLC Accelerator for BladeSystem c-Class IMPORTANT: Generation 2 IO accelerators for BladeSystem c-Class are only compatible with Gen8 and later server blades.
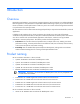
NOTE: MSI was disabled to obtain these statistics. Required operating environment The IO Accelerator is supported for use in the following operating environments: • Windows Server 2003 (x86_64-bit only) SP2 (not supported on Gen8 servers) • Windows Server 2008 (x86_64-bit only) R1 with SP2 or higher • Windows Server 2008 (x86_64-bit only) R2 • Windows Server 2012 (x86_64-bit only) IMPORTANT: All operating systems must be 64-bit architecture.
enabling a total of two cards in a half-height server blade, and three cards in a full-height server blade and up to 6 in a double-high, double-wide server (BL680c). The Gen8 adapter is provided in a c-Class Type B Mezzanine card form factor. It can only be installed in Type B mezzanine slots within the Gen 8 or later servers, enabling one IO Accelerator in a half-height Gen8 server. The Type I mezz card and the Type B mezz card are distinguished by the mezzanine connector.
100GB of storage space, using various block sizes. The amount of RAM used in driver version 3.0 is significantly less than the amount used in version 1.2.x. Average block size (bytes) RAM usage for each 80 GB IO Accelerator (Megabytes) RAM usage for each 100 Minimum system RAM requirement for 320 GB GB IO Accelerator MezzIO Accelerator* (Megabytes) 8,192 250 280 1 GB 4,096 400 530 1.6 GB 2,048 750 1,030 3 GB 1,024 1,450 2,000 5.8 GB 512 2,850 3,970 11.
Windows Server environments Installation overview CAUTION: The firmware for all IO Accelerator devices in a system running HP IO Accelerator VSL 3.1.x or later must be upgraded to the latest version of the firmware. CAUTION: If you have IO Accelerator devices configured for HP IO Accelerator VSL 2.x or earlier, you must upgrade the firmware before installing new devices in the system. For upgrade procedures, see "Upgrading device firmware from VSL 1.x.x or 2.x.x to 3.x.x (on page 19)." 1.
recognizes those drivers for the IO Accelerator. This situation causes issues with the installation of Version 3.x. After the software is uninstalled and the system is rebooted, Windows operating systems display a New Hardware Found message and normally do not find a driver for the new device. If a driver is found, go to Control Panel > Device Manager and search for HP IO Accelerator. View the driver details and check the revision of the driver.
Using the Setup Wizard 1. Download the IO Accelerator installation program. The Welcome screen appears. 2. Click Next. The Installation Recommendations screen appears.
3. If you have a previous version of the IO Accelerator software installed, follow the directions on the screen to uninstall it. Otherwise, click Next. The Select Installation Folder screen appears. 4. If you want to use the default installation location (C:\Program Files\HP IO Accelerator), click Next. If you want to change the default location, click Browse, navigate to the folder you want, and then click Next. The Custom Setup screen appears. 5.
CAUTION: Changing the default features might affect the performance or functionality of the IO Accelerator software. The following features are available: o Device Driver (required for the drive to be recognized in Windows® operating system) o HP IO Accelerator Management Tool (Java® Runtime Software) o SNMP (requires Microsoft® SNMP to be installed) o Utilities (Command Line Utilities) HP recommends that you select will be installed on local hard drive for each feature.
The Configure Shortcuts screen appears. 6. If you want to accept the default program shortcuts, click Next. Otherwise, clear any options you do not want, and then click Next. The Ready to Install screen appears. 7. Click Install to begin installation. An installation status screen appears. When installation is complete, the Completed screen appears. NOTE: You might be prompted to stop installation and start the Microsoft® SNMP service during the software installation.
8. Click Finish to exit the Wizard and launch the IO Accelerator software. The installation program performs the following: • Creates a folder for the IO Accelerator software components (the default path is C:\Program Files\HP IO Accelerator).
• Installs and loads the IO Accelerator Windows® driver. (When complete, you will need to reboot the system.) • Installs support for SNMP (if installed, and if Microsoft® SNMP is installed and the SNMP service is running). When the installation program creates the IO Accelerator folder on the drive, it also creates these sub-folders: • \Driver—Installs manually using Device Manager. • Firmware—Contains the latest IO Accelerator firmware.
The –o overformat option is not supported in the 3.x.x VSL software. All upgraded HP IO Accelerator devices are formatted to the maximum advertised capacity, regardless of whether the device was overformatted prior to the upgrade. Upgrading procedure Be sure to follow the upgrade path and make sure that all previously installed IO Accelerator devices are updated with the appropriate 2.3.1-compatible firmware. 1. Prepare each existing IO Accelerator device for upgrade. a.
d. To select a different folder for the installation, browse to the folder and click OK. The default folder is C:\Program Files\HP IO Accelerator. The uninstaller file is placed in the root of the HP IO Accelerator (default install folder). e. Follow the onscreen prompts to complete the install. f. Choose Reboot Now on the finish screen of the installer. For full installation instructions, see "Installing software on a Windows system ("Installing software on a Windows operating system" on page 13)." 5.
Manually installing on Windows Server 2003 The Windows® Driver Wizard automatically detects the new IO Accelerator and begins to locate its driver after you restart the system. First, Windows® prompts you to locate the software driver. 1. If you have not done so, download and run the IO Accelerator Windows® Setup program from the HP website (http://www.hp.com/support). 2. Return to the Update Driver dialog box. 3. Select Install from a list or specific location. Click Next. 4. Select Don't Search.
Manually installing on Windows Server 2008 and 2012 The Windows Driver Wizard automatically detects the new IO Accelerator and begins to locate its driver after you restart the system. First, the OS prompts you to locate the software driver. 1. Click Browse next to the path field. A file dialog box appears. 2. Select the folder that contains the IO Accelerator driver. The default is C:\Program Files\HP StorageWorks IO Accelerator\Drivers. 3. Click OK. 4. Click Next.
CAUTION: Do not turn off the power during a firmware upgrade, because this might cause device failure. If a UPS is not in place, consider adding one to the system before performing a firmware upgrade. NOTE: You might be required to upgrade the IO Accelerator driver if you upgrade the device firmware. For more information, see the Release Notes. Upgrading the firmware might take several minutes. The update command displays a progress bar to indicate the pace of the upgrade.
CAUTION: Be sure to read the Release Notes document that comes with each new release as well as these installation instructions to ensure no loss of data when performing upgrades. 2. Follow the steps in "Uninstalling the IO Accelerator driver" uninstall the existing driver. 3. Download the latest driver from the HP website (http://www.hp.com/support). 4. Either unzip or run the Windows® package to copy the files to a convenient directory. 5. Go to Start > Control Panel. 6.
Your Windows® operating system now detects the devices in the RAID configuration with the upgraded software. Defragmentation The IO Accelerator does not need to be defragmented. However, some Windows® versions automatically run defragmentation as a scheduled task. If necessary, turn off automatic defragmentation. Silent install option Uninstalling the previous version If you have a version of the HP IO Accelerator previously installed, you must uninstall it first.
You can use the (optional) HP IO Accelerator Management Tool GUI program to check for outdated firmware. To check for outdated or old firmware: 1. Launch the IO Accelerator Management Tool application and look for any devices that have a warning symbol. 2. To ensure that the alert is from outdated firmware, click any devices with a warning symbol. 3. Select all devices requiring firmware update and use the IO Accelerator Management Tool to update the firmware.
2. Expand HP StorageWorks IO Accelerators, and then double-click HP StorageWorks IO Accelerator. The Properties dialog box appears. The Location field shows the bus number for your device (fct8 in the following example). NOTE: HP assigns bus numbers, which begin at 0. These numbers might or might not reflect the physical location of the bus. For example, the second slot from the edge of the motherboard may be Bus 2, but it might also be Bus 16, or another arbitrary number.
3. After the device is initialized, you can add partitions or volumes. For more information, see the Disk Management documentation. You can create dynamic volumes, which can be used in multi-disk RAID configurations (spanned, striped, or mirrored). For more information, see the Disk Management documentation. Creating a RAID configuration You can use your IO Accelerator as part of a RAID configuration. To do so, you must format the IO Accelerator as a dynamic volume.
NOTE: To use SNMP test mode, you must have installed the SNMP option with your PCIe IO Accelerator. Using test mode registry values The following table shows the registry entries included for SNMP test values. Entries marked by an asterisk (*) generate SNMP traps when set to the indicated values, and the cpqDrvMIBCondition and cpqDrvInfoStatus MIB variables might be affected because of the changes. NOTE: All entries, except those marked by **, reflect your registry changes immediately.
SNMP test registry entry Description • • • • • • formatting(8) updating(9) attach(10) detach(11) format(12) update(13) cpqioDrvInfoWearoutIndicator* Boolean: True = device has surpassed the wearout threshold.
• cpqIoDimmInfoPCISlot • cpqIoDimmInfoWearoutIndicator • cpqIoDimmInfoFlashbackIndicator • cpqIoDimmInfoWritableIndicator • cpqIoDimmInfoInternalTemp • cpqIoDimmInfoHealthPercentage • cpqIoDimmInfoMinimalModeReason • cpqIoDimmInfoReducedWriteReason • cpqIoDimmInfoMilliVolts • cpqIoDimmInfoMilliVoltsPeak • cpqIoDimmInfoMilliVoltsMin • cpqIoDimmInfoMilliWatts • cpqIoDimmInfoMilliWattsPeak • cpqIoDimmInfoMilliAmps • cpqIoDimmInfoMilliAmpsPeak • cpqIoDimmInfoAdapterType • cpqIoD
• cpqIoDimmExtnBytesReadL • cpqIoDimmExtnBytesWrittenU • cpqIoDimmExtnBytesWrittenL • cpqIoDimmExtnFormattedBlockSize • cpqIoDimmExtnCurrentRAMUsageU • cpqIoDimmExtnCurrentRAMUsageL • cpqIoDimmExtnPeakRAMUsageU • cpqIoDimmExtnPeakRAMUsageL • cpqIoDimmWearoutTrap • cpqIoDimmNonWritableTrap • cpqIoDimmFlashbackTrap • cpqIoDimmTempHighTrap • cpqIoDimmTempOkTrap • cpqIoDimmErrorTrap • cpqIoDimmPowerlossProtectTrap Using installation logs You can create a Windows® installation log t
Option Description *x Extra debugging information *+ Append to existing log file *! Flush each line to the log ** Log all information except for v and x options Creating an installation log 1. Determine the path of the MSI file (for example, C:\MyPackage\Example.exe). 2. Decide the path of the log (for example, C:\log\example.log). 3. Open cmd.exe. You can use any command shell. 4. Use the msiexec command line to launch the MSI with logging parameters.
1. Open the Installer project of your installation package. 2. Go to the Media page and select the Bootstrapper tab. 3. Select the Create EXE setup file option. 4. Set the MSI Command Line field to /L*V "C:\package.log". When the user launches the installation through the bootstrapper, a log of the installation ("package.log") will be created automatically in the "C:\" drive. The command line received by the bootstrapper overrides the command line in the MSI Command Line field.
The following table lists common Event Log error messages, along with suggested solutions. Message Suggested solution To update the firmware, see "Upgrading the device firmware using Windows (on page Error: ioDrive(x) 23)." firmware is too old. The firmware must be updated. 1 Error: The ioDrive(x) 2 initialization 3 failed with error code 0xerrorcode (where errorcode is a number which might vary) Error: The ioDrive(x) was not attached. Use the fio-attach utility to rebuild the drive.
Maintenance Maintenance tools The IO Accelerator includes both software utilities to maintain the device and external LED indicators to display the status. You can also install SNMP as a monitoring option. The following are the most common tasks for maintaining your IO Accelerator. You can also use the IO Accelerator Management Tool application to perform firmware upgrades. For more information, see the HP IO Accelerator Management Tool User Guide.
4. When you finish troubleshooting the driver issue, use the IO Accelerator Management Tool to attach the IO Accelerators and make them available to Windows® operating system. Enabling Autoattach 1. Open the IO Accelerator Utilities folder. The default location is C:\Program Files\HP IO Accelerator\Utils\. 2. Double-click the autoattachenable.reg file. 3. If necessary, confirm that you want to modify the registry. This action resets the AutoAttach parameter in the Registry.
CAUTION: If the PCIe slot is not capable of providing the needed amount of power, then enabling full power draw from the PCIe slot might result in malfunction or even damage to server hardware. The user is responsible for any damage to equipment due to improper use of the override parameter. HP expressly disclaims any liability for damage arising from improper use of the override parameter.
fct2: SN:1149D0969-1121 fct3: SN:1149D0969-1111 In this example, 1149D0969 is the adapter serial number. If you have multiple IO Accelerator devices installed on your system, use the fio-beacon command to verify where each device is physically located. o 2. Inspect the adapter serial number labels on the IO Accelerator devices to determine the serial numbers. However, HP recommends confirming that each serial number is an adapter serial number by running the fio-status command.
Utilities Utilities reference The IO Accelerator installation packages include various command line utilities, installed by default to the C:\Program Files\HP IO Accelerator\Utils folder. These utilities provide a number of useful manners to access, test, and manipulate your device.
If the IO Accelerator device is in minimal mode, then auto-attach is disabled until the cause of the device being in minimal mode is fixed. Syntax fio-attach [options] where is the name given to the IO Accelerator during the installation process. The syntax is /dev/fctx, where x indicates the PCIe bus number where you installed the IO Accelerator. For example, the name /dev/fct4 refers to the IO Accelerator device installed in PCIe Bus 4 in your Windows® operating system.
This utility captures the current state of the device. When a performance or stability problem occurs with the device, run the fio-bugreport utility and contact HP support (http://www.hp.com/support) for assistance in troubleshooting. fio-bugreport runs several information-gathering utilities and combines the resulting data into a text file. The results are saved in the utils directory (default installation path is C:\Program Files\HP IO Accelerator\Utils\) in a .
Option Description -e Enumerates configuration parameter names and values. -g Gets the configuration parameter. -s Set the configuration parameter in memory only. -p Set and persist the configuration parameter. -V Print verbose information. Print version information. -v fio-config options The following table describes the driver parameters you can set with the fio-config utility. IMPORTANT: fio-config options must be entered in uppercase to function properly.
Option Default (min/max) Description After the affinity is queried correctly, the driver sets the affinity of the adapter interrupt and associated worker threads to the default operating system setting. This action has the effect of setting the affinity of the interrupt and worker threads to all processors on a single NUMA node in the system. When WIN_DISABLE_DEFAULT_NUMA_AFFINITY is set to 1, the driver will ignore the affinity settings assigned to the adapter by the OS.
IMPORTANT: Although the -f (force) option causes the IO Accelerator device to detach, even in a RAID setup, it is strongly recommended to take the drives/volume offline using the Windows® Disk Management plug-in and then perform the detach. Forcing the detach may result in loss of data. Notes Attempting to detach an IO Accelerator device might fail with an error indicating that the device is busy. This might occur if the device is part of a software RAID (0,1,5) volume.
Option Description -y Auto-answer "yes" to all queries from the application (bypass prompts). fio-pci-check Description Checks for errors on the PCI bus tree, specifically for IO Accelerators. This utility displays the current status of each IO Accelerator. It also prints the standard PCI Express error information and resets the state. It is normal to see a few errors (perhaps as many as five) when fio-pci-check is initially run.
Option Description -a Report all available information for each device. -e Show all errors and warnings for each device. This option is for diagnosing issues, and it hides other information such as format sizes. -c Count: Report only the number of ioMemory devices installed. -fj Format JSON: creates the output in JSON format. Show basic information set plus the total amount of data read and written (lifetime data volumes). This option is not necessary when the -a option is used.
Data Volume Information: If the -d option is used, then the following data volume information is reported in addition to the basic information: • Physical bytes written • Physical bytes read All Information: If the -a option is used, then all information is printed, which includes the following information in addition to basic and data volume information: Adapter information: • Manufacturer number • Date of manufacture • Power loss protection status • PCIe bus voltage (avg, min, max) • PCIe b
fio-sure-erase CAUTION: Before using this utility, back up any important data. IMPORTANT: As a best practice, do not use this utility if you have any IO Accelerator devices installed in the system that you do not want to clear or purge. First remove any devices that you do not want to accidentally erase. After the data is removed with this utility it is not recoverable. IMPORTANT: If the device is in Read-only mode, perform a format using fio-format before running fio-sure-erase.
Option Description -p Purge instead of Clear: Performs a write followed by an erase. Purging the device might take several hours to complete, depending on the size of the device. -y No confirmation: Does not require a yes/no response to execute the utility. Quiet: Do not display the status bar.
Syntax fio-trim-config [options] Options Option Description -d Disable Trim on this computer. (Default) Enable Trim on this computer. -e fio-update-iodrive Description The fio-update-iodrive utility updates the HP IO Accelerator firmware. This utility scans the PCI-Express bus for all HP IO Accelerators and updates them all sequentially. You must detach all IO Accelerator devices before updating the firmware. Detach the device from the system using the fio-detach utility.
Option Description -f Force upgrade. Used primarily to downgrade to an earlier firmware version. If the IO Accelerator driver is not loaded, this option also requires the -d option. -l Lists firmware available in the archive. -p Pretend. Shows what updates are done. The firmware is not modified. -y Confirm all warning messages. -c Clears locks placed on a device. -q Runs the update process without displaying the progress bar or percentage.
Monitoring IO Accelerator health NAND flash and component failure The IO Accelerator is a highly fault-tolerant storage subsystem that provides many levels of protection against component failure and the loss nature of solid state storage. However, as in all storage subsystems, component failures might occur. When a large enough number of data blocks is retired due to error, the NAND flash media is considered worn out.
... Media status: Healthy; Reserves: 100.00%, warn at 10.00%; Data: 99.12% Lifetime data volumes: ...Physical bytes written: 6,423,563,326,064 ...Physical bytes read: 5,509,006,756,312 The following Health Status messages are produced by the fio-status utility: • Healthy • Low metadata • Read-only • Reduced-write • Unknown HP IO Accelerator Management Tool In the Device Report tab, look for the Reserve Space percentage in the right column.
mode is evicted when write I/Os are returned from the device as failed. Catastrophic failures are detected and handled just as though they were on traditional storage devices.
Trim support Introduction to Trim Trim is used to address a unique property of solid state drives. The issue occurs when a user deletes a file, and then the drive that contains the file does not recognize that it can reclaim that space. Instead, the drive reads the data as valid until the system informs the drive it can overwrite that data. With a typical hard drive you can continually write to the same sector of the drive without significant degradation.
Starting and stopping Trim To start or stop the Trim service through the Windows® Services Manager: 1. Search for IO Accelerator Trim Service. 2. Click Start service or Stop service. Stopping the service only stops it for that session. Trim begins running again when the computer is restarted. Enabling Trim 1. Open a registry editor. 2. Navigate to HKEY_LOCAL_MACHINE\SYSTEM\CurrentControlSet\Services\fiodrive\Parameters 3. Add the TrimEnabled value as a DWORD (see TrimEnabled below).
Trim configurations Trim can be used with the following configurations and features: • RAID volumes (mirrored, spanned, or striped). NOTE: RAID 5 (striped with parity) is not currently supported. • Simple volumes (no RAID). • Any combination of the above RAID levels across multiple devices, so long as there is at least one IO Accelerator in the RAID set. • Multiple partitions on the same IO Accelerator device. • NTFS and FAT32 file systems.
Using Windows page files with the IO Accelerator Introduction to Windows page files This section describes how to effectively use paging (swap) files on IO Accelerator devices with Windows® operating systems. Using a page file with a traditional disk drive places practical limits on the usable size of the page file and virtual memory due to the poor performance of disk drives in relation to RAM.
On Windows® operating systems, NTFS will generally use a cluster size of 4K, so formatting to 512 is not useful except for applications that are compatible only with 512-byte sector sizes (such as Windows® XP and Windows Server® 2003). The indicated amount is needed per IO Accelerator that supports paging. You must carefully plan which IO Accelerators are used to hold a paging file. Non-paged memory pool Pre-allocated memory for the IO Accelerator comes from the Windows kernel non-paged memory pool.
An alternate method to manage (enable or disable) paging support is to use the IO Accelerator Management Tool. NOTE: You must reload the IO Accelerator driver for the new preallocation setting to take effect. Typically this can be done by restarting the machine or using disable/enable within Device Manager for each IO Accelerator instance. Using the Windows System Properties to change paging file configuration requires a system restart before the properties are applied.
System drive paging file configuration By default, Windows® operating systems create and manage a page file on the system boot drive (typically a hard disk), which is where the operating system is installed. Maintaining a regular page file on the system hard disk is typically not optimal, because the hard disk I/O performance is many orders of magnitude slower than an IO Accelerator. To resolve this issue, you can eliminate or minimize the size of the system boot drive page file, as explained later.
Verifying page file operation To verify that a page file is actively placed on an IO Accelerator, you can browse for hidden files at the drive root. For example, run the following command at a prompt: dir c: /ah In the output listing there should be a file called pagefile.sys. If no page file is present, recheck the page file configuration in the Virtual Memory dialog box to verify that page file support has been enabled on the queried IO Accelerator.
Performance and tuning Introduction to performance and tuning HP IO Accelerator devices provide high bandwidth and high IOPS and are specifically designed to achieve low latency. As IO Accelerator devices improve in IOPS and low latency, the device performance may be limited by operating system settings and BIOS configuration. To take advantage of the revolutionary performance of IO Accelerator devices, you might have to tune these settings.
Setting NUMA affinity Servers with a NUMA (Non-Uniform Memory Access) architecture require special installation instructions in order to maximize ioMemory device performance. These servers include the HP ProLiant DL580 and HP DL980 Servers. On servers with NUMA architecture, during system boot, the BIOS on some systems will not distribute PCIe slots evenly among the NUMA nodes. Each NUMA node contains multiple CPUs.
NUMA configuration Introduction to NUMA architecture Servers with NUMA (Non-Uniform Memory Access) architecture require special installation instructions in order to maximize IO Accelerator device performance. These servers include the HP DL580 and the HP DL980 server. On servers with NUMA architecture, during system boot, the BIOS on some systems will not distribute PCIe slots evenly among the NUMA nodes. Each NUMA node contains multiple CPUs.
Advanced configuration example This example server has four NUMA nodes with eight hyper-threaded cores per node (16 logical processors per node, a total of 64 logical processors in the system). This system also uses the expansion configuration and has 11 PCIe expansion slots. During system boot, the system BIOS assigns PCIe slots 1-6 to NUMA node 2 and PCIe slots 7-11 to NUMA node 0. NUMA nodes 1 and 3 have no assigned PCIe slots.
processors in the specified nodes. To fine tune the configuration, you can stipulate the hex mask in each and specify the processors for each device. Checking the log for errors If you enter a configuration that is not valid, the settings will be disabled and an error will be display in the system logs. Example: fio-config -p FIO_AFFINITY 5,g0,0xf;6,0xf In this example, the affinity for device fct6 is set incorrectly, because there is no group or node number before the mask.
Resources Subscription service HP recommends that you register your product at the Subscriber’s Choice for Business website (http://www.hp.com/support). After registering, you will receive e-mail notification of product enhancements, new driver versions, firmware updates, and other product resources. For more information For additional information, see the following HP websites: • HP BladeSystem technical resources (http://www.hp.
Support and other resources Before you contact HP Be sure to have the following information available before you call HP: • Active Health System log (HP ProLiant Gen8 or later products) Download and have available an Active Health System log for 3 days before the failure was detected. For more information, see the HP iLO 4 User Guide or HP Intelligent Provisioning User Guide on the HP website (http://www.hp.com/go/ilo/docs).
providers or service partners) identifies that the repair can be accomplished by the use of a CSR part, HP will ship that part directly to you for replacement. There are two categories of CSR parts: • Mandatory—Parts for which customer self repair is mandatory. If you request HP to replace these parts, you will be charged for the travel and labor costs of this service. • Optional—Parts for which customer self repair is optional. These parts are also designed for customer self repair.
Pour plus d'informations sur le programme CSR de HP, contactez votre Mainteneur Agrée local. Pour plus d'informations sur ce programme en Amérique du Nord, consultez le site Web HP (http://www.hp.com/go/selfrepair). Riparazione da parte del cliente Per abbreviare i tempi di riparazione e garantire una maggiore flessibilità nella sostituzione di parti difettose, i prodotti HP sono realizzati con numerosi componenti che possono essere riparati direttamente dal cliente (CSR, Customer Self Repair).
HINWEIS: Einige Teile sind nicht für Customer Self Repair ausgelegt. Um den Garantieanspruch des Kunden zu erfüllen, muss das Teil von einem HP Servicepartner ersetzt werden. Im illustrierten Teilekatalog sind diese Teile mit „No“ bzw. „Nein“ gekennzeichnet. CSR-Teile werden abhängig von der Verfügbarkeit und vom Lieferziel am folgenden Geschäftstag geliefert. Für bestimmte Standorte ist eine Lieferung am selben Tag oder innerhalb von vier Stunden gegen einen Aufpreis verfügbar.
sustituciones que lleve a cabo el cliente, HP se hará cargo de todos los gastos de envío y devolución de componentes y escogerá la empresa de transporte que se utilice para dicho servicio. Para obtener más información acerca del programa de Reparaciones del propio cliente de HP, póngase en contacto con su proveedor de servicios local. Si está interesado en el programa para Norteamérica, visite la página web de HP siguiente (http://www.hp.com/go/selfrepair).
Opcional – Peças cujo reparo feito pelo cliente é opcional. Essas peças também são projetadas para o reparo feito pelo cliente. No entanto, se desejar que a HP as substitua, pode haver ou não a cobrança de taxa adicional, dependendo do tipo de serviço de garantia destinado ao produto. OBSERVAÇÃO: Algumas peças da HP não são projetadas para o reparo feito pelo cliente. A fim de cumprir a garantia do cliente, a HP exige que um técnico autorizado substitua a peça.
Support and other resources 77
Support and other resources 78
Regulatory information Safety and regulatory compliance For safety, environmental, and regulatory information, see Safety and Compliance Information for Server, Storage, Power, Networking, and Rack Products, available at the HP website (http://www.hp.com/support/Safety-Compliance-EnterpriseProducts). Turkey RoHS material content declaration Ukraine RoHS material content declaration Warranty information HP ProLiant and X86 Servers and Options (http://www.hp.
Acronyms and abbreviations ACPI Advanced Configuration and Power Interface DVFS dynamic voltage and frequency scaling FAT file allocation table IOPS input/output operations per second LEB Logical Erase Block LFM linear feet per minute MIB management information base MSI Message Signaled Interrupt NAND Not AND NTFS NT File System NUMA Non-Uniform Memory Architecture PCIe peripheral component interconnect express Acronyms and abbreviations 80
SMI-S Storage Management Initiative Specification SSD solid-state drive VM Virtual Machine VSL virtual storage layer Acronyms and abbreviations 81
Documentation feedback HP is committed to providing documentation that meets your needs. To help us improve the documentation, send any errors, suggestions, or comments to Documentation Feedback (mailto:docsfeedback@hp.com). Include the document title and part number, version number, or the URL when submitting your feedback.
Index A F about this guide 6 Adding a file system 28 authorized reseller 71 automated logging 35 FIO_AFFINITY parameters 44, 67 fio-attach utility 41 fio-beacon utility 42 fio-bugreport utility 42 fio-config options 44 fio-config utility 43 fio-detach utility 45 fio-format utility 46 fio-pci-check utility 47 fio-status utility 47 fio-sure-erase utility 50 fio-trim-config utility 51 fio-update-iodrive utility 52 firmware version 23 firmware, upgrading 19, 20 flashback substitution events 55 For more infor
manual installation on Windows Server 21 monitoring IO Accelerator health 54 N naming 27 NAND flash and component failure 54 non-paged memory pool 61 NUMA architecture 67 NUMA configuration 67, 68 O operating environment 9 outdated firmware 26 overview 7 P page files, setting up 62 PCIe power override, enabling 38 PCIe power, enabling 27 performance and tuning 65 performance and tuning, introduction 65 performance attributes 8 performing a multi-disk configuration 28 phone numbers 71 R RAID configuratio