HP 10000 G2 Series Rack Options Installation Guide Abstract This document is for the person who installs racks and rack products. This procedure is performed only by trained personnel. HP assumes you are qualified in performing installations and trained in recognizing hazards in rack products.
© Copyright 2008, 2013 Hewlett-Packard Development Company, L.P. The information contained herein is subject to change without notice. The only warranties for HP products and services are set forth in the express warranty statements accompanying such products and services. Nothing herein should be construed as constituting an additional warranty. HP shall not be liable for technical or editorial errors or omissions contained herein.
Contents About this guide ........................................................................................................................... 7 Rack options installation guide .................................................................................................................... 7 Important safety information........................................................................................................................ 7 Additional rack considerations ...........................
Cable Management Tray kit ......................................................................................................... 36 About this device..................................................................................................................................... 36 Kit contents ................................................................................................................................... 36 Required tool .............................................................
Important safety information...................................................................................................................... 76 Installing the 110V/220V Light ................................................................................................................. 77 Operating the 110V/220V Light ............................................................................................................... 79 Connecting the power cord to the 110V/220V light ....................
Tie-Down kit ............................................................................................................................. 119 About this device................................................................................................................................... 119 Required tools ............................................................................................................................. 119 Kit contents ..........................................................
About this guide Rack options installation guide This installation guide includes the instructions for installing rack option kits that are compatible with the HP 10000 G2 Series Rack. For more information, see the HP 10000 G2 Series Rack User Guide on the HP website (http://www.hp.com/go/rackandpower). Important safety information WARNING: To reduce the risk of personal injury or damage to the equipment, be sure that: • The rear leveling feet are extended to the floor.
• Keyboard—The rack keyboard requires installation of a 1U keyboard drawer rack option kit. • Monitor—The monitor requires installation of a monitor/utility shelf rack option kit unless you are using a rack-mountable flat-panel monitor. • Server console switch—If a console switch is configured, use the CPU-to-console switch cable included with the server. The standard distance between the console switch and the keyboard, monitor, and mouse can vary by 3-, 7-, 12-, 20-, and 40-ft lengths.
Rack options Ordering rack options HP provides several rack option kits to complement or complete your rack solution. The following list is a sample of the many rack option kits available. For information about ordering rack option kits, see the HP website (http://www.hp.com/go/rackandpower), or contact your nearest HP authorized reseller.
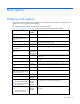
Rack option kit Part number Description Server/Utility Shelf kit (on page 253449-B21 Holds rack components inside the rack 112) AF054A Provides enclosures for the sides of a rack Side Panel kit (on page 116) Tie-Down kit (on page 119) AF076A Increases the stability of free-standing racks Vertical PDU Mounting kit (on page 124) H6L32A Allows HP PDU vertical models to be mounted in the rack Rack options 10
100 Kilo Sliding Shelf kit About this device The HP 100 Kilo Sliding Shelf kit enables you to install a sliding shelf in your rack mount system for placement and easy access to various components. This option occupies 2Us of rack space.
3. Extend the inner slides of the sliding rail until the screw holes on the sliding rail and the left rail with fixed brackets are aligned. Gently push down on the sliding rail to lock it into place. 4. Secure the rails together with two M4 x 12 flat HD screws and M4 external washers. 5. Repeat steps 1 through 4 for the right rail with fixed brackets.
1. Use the template on the front and rear of the rack frame to mark the attachment points for the sliding shelf rail assemblies, by measuring from the top of the component installed below the desired position for the sliding shelf. IMPORTANT: When using the template on the rear of the rack frame, mark the rack at the top of the template to help align the next rack component. 2.
3. Secure the front of the left sliding shelf rail assembly to the front of the rack frame with two M6 x 12 pan HD screws and M6 external washers. 4. Repeat steps 2 and 3 to install the right sliding shelf rail assembly. Installing the sliding shelf 1. Move the sliding shelf into the rack while tilting the front of the shelf up. Align the rear notches on the sliding shelf over the rear tabs on the sliding shelf rail assemblies. 2.
4. Secure the sliding shelf to each sliding rail using one M4 x 12 flat HD screw and M4 external washer with one M4 nut on the inside of the shelf. 5. Attach the cable management arm to the sliding shelf with the flat side of the cable management arm mounting bracket flush with the sliding shelf. 6. Secure the cable management arm to the sliding shelf using two M4 x 12 flat HD screws and M4 external washers with two M4 nuts on the inside of the shelf.
7. Secure the opposite end of the cable management arm to the rack using two M6 x 12 pan HD screws and M6 external washers. Installation is complete. Using the 100 Kilo Sliding Shelf Use the handle on the front of the sliding shelf to slide it in and out of the rack. When sliding the shelf back into the rack, there may be resistance. Apply pressure as needed to fully move the shelf into the rack. IMPORTANT: Be sure to secure all rack mount system components when moving the shelf out of the rack.
Airflow Optimization kit About this device The HP Airflow Optimization kit enables you to install foam rail gaskets in your HP 10000 G2 Series 22U, 36U, 42U, and 47U 600-mm (24-in) wide racks and in to 42U 800-mm (31-in) wide racks to improve separation between hot and cold aisles in the data center. Kit contents Item Quantity 600-mm (24-in) perforated floor gasket —or— 800-mm (31-in) perforated floor gasket 1 Foam rail gasket roll 4 1 Extra hardware might be included for your convenience.
3. Insert the foam rail gasket into the space between the 19-in mounting rails and the vertical frame on both sides of the rack, with the closed cell side of the foam rail gasket facing the front of the rack. 4. Gently push the foam rail gasket into the space until it is flush with the vertical frame. Installing foam rail gaskets between racks CAUTION: The foam rail gasket must be installed into the rack before two or more racks can be bayed together.
3. Insert the foam rail gasket into the space between the racks with the closed cell side of the foam rail gasket facing the front of the rack. NOTE: Follow steps 1 through 3 to install the foam rail gasket into a rack that will be bayed using a 24-in. baying bracket. If the rack will be bayed using a 600-mm baying bracket, rotate the foam rail gasket 90 degrees before inserting it into the space between the racks. 4.
5. (Optional) See the HP Baying Rack Option Kit for specific information on baying racks. Installing the floor gasket 1. Depending on the size of your rack, cut the floor gasket at the perforation to reduce the length from 800-mm (31 in) to 600-mm (24 in).
2. Remove the protective tape from the bottom edge of the floor gasket, and apply it to the bottom of the rack with the adhesive strip facing the front of the rack. Installation is complete.
Ballast kit About this device The HP Ballast kit provides additional stability with single-rack installations. Kit contents Item Quantity Ballast assembly 2 M6 screws 10 Cage nuts 10 Extra hardware might be included for your convenience.
1. Install the two bottom cage nuts using the cage nut insertion tool included in your original rack hardware kit. 2. Count 16 holes up the rack, starting at the bottom cage nuts, and install the two top cage nuts using the cage nut insertion tool. 3. Align the screw holes of the ballast assembly with the installed cage nuts.
4. Insert the M6 screws into one side of the ballast assembly to secure it to the rack. 5. Repeat step 4 to secure the other side of the ballast assembly to the rack. Installation is complete.
Baying kit About this device The HP Baying kit enables you to connect multiple racks of the same series (HP 10000 and 10000 G2 Series Racks), height, and depth. For example, two HP 10622 Racks can be bayed together, as well as two HP 10842 Racks. Kit contents Item Quantity 24-inch baying brackets 6 600-mm baying brackets 6 T-30 Torx screws 15 Extra hardware might be included for your convenience. Required tool You will need a T-30 Torx driver.
1. Remove the front and rear doors. 2. Remove the side panels (if present between the racks). 3. Position the racks side by side, ensuring that the feet of the racks are on solid flooring (no cracks or openings). 4. Attach three baying brackets (either 24-inch or 600-mm depending on the floor layout) to the front and rear of each rack set using two T-30 Torx screws in each bracket.
If you bay HP racks with a rear extension, you do not need to remove the rear extensions. Attach three baying brackets to the rear extensions using two T-30 Torx screws in each bracket. 5. Bay any additional racks. 6. Attach side panels to each end of the bayed racks, and reattach the front and rear doors. Installation is complete.
Cable Management Bracket kit About this device The HP Cable Management Bracket kit assists with cable management and is designed for use with all HP racks. Kit contents Item Quantity 1U cable management bracket 1 2U cable management bracket 1 Cable management D-ring bracket clips 10 Cable management D-ring bracket clamps 10 Cross-over brackets 2 12.7-cm (5-in) hook-and-loop cabling 10 strap 20.3-cm (8-in) hook-and-loop cabling 10 strap clips M6 cage nuts 11 M6 x 16-mm Torx screws 11 M5.
Installing the 1U cable management bracket 1. Insert one 1/4 turn plastic latch on either side of the 1U cable management bracket. 2. Align the 1U cable management bracket to the screw holes in the desired location of the rack (1). 3. Turn the 1/4 turn plastic latch on either side of the 1U cable management bracket clockwise until it locks in place (2).
Installing the 2U cable management bracket 1. Insert two 1/4 turn plastic latches on either side of the 2U cable management bracket. 2. Align the 2U cable management bracket to the screw holes in the desired location of the rack (1). 3. Turn the two 1/4 turn plastic latches on either side of the 2U cable management bracket clockwise until they lock in place (2).
1. Place a cable management D-ring bracket clip (1) on a cable management D-ring bracket clamp (2). 2. Install the cable management D-ring bracket in a front mount ("Front mount" on page 31). 3. Install the cable management D-ring bracket in a side mount ("Side mount" on page 32). Front mount 1. Using a cage nut insertion tool, install an M6 cage nut into the desired location on the front of your rack. 2. Align the cable management D-ring bracket with the previously installed M6 cage nut (1).
3. Using a T-25 Torx driver, insert one M6 x 16-mm Torx screw to secure the cable management D-ring bracket to the rack (2). Side mount 1. Align the cable management D-ring bracket with the screw hole in the desired location on the side of your rack (1). 2. Using a T-25 Torx driver, insert one M5.5 x10-mm Torx screw to secure the cable management D-ring bracket to the rack (2). Installing the cross-over bracket 1.
NOTE: The screw holes for the cross-over bracket are located on the side of the rear rack screw column, towards the inside of the rack. 2. Using a T-25 Torx driver, insert two M5.5 x 10-mm Torx screws on either side of the cross-over bracket and secure to the rack frame (2).
Installing the hook-and-loop cabling straps Attach the clip to the rack in any of the following positions, then route and secure your cables with the hook-and-loop cabling straps.
Installation is complete.
Cable Management Tray kit About this device The HP Cable Management Tray kit enables you to attach cable management trays to the top of HP racks to improve cable management.
Installing the cable management tray 1. Attach the wire for the trough to the cable management tray. 2. Remove the two screws from the rack top.
3. Install the cable management tray on top of the rack, using the same two screws you removed in step 2. 4. Route the cables through the cable management tray.
5. Hook and slide the cover into place. Installing the cable management inner and outer trays 1. Attach the cable management outer tray to the cable management tray.
2. Slide the inner tray into the outer tray, and adjust them to the desired length. 3. Attach the cable management inner tray to the cable management tray.
4. Route the cables through the cable management tray.
Fan (110V/220V) kit About this device The HP Fan (110V/220V) kit enhances the natural convection cooling by increasing rack airflow. Kit contents Item Quantity Fan assembly 1 Power cord 2 Cable fastener 4 This kit might contain extra hardware for your convenience. Required tools You will need a T-30 Torx driver. Installing the fan NOTE: The rack top covers might be different, but the installations are identical. 1.
3. Insert the fan assembly into the top of the rack and secure using the four T-30 Torx screws from step 1. 4. Connect the power cord to the fan assembly.
5. Insert the notched end of the tie wrap into a small hole in the rack rail and push the tie wrap in to lock it in place. Encircle the power cord with the tie wrap by inserting the free end of the tie wrap into the hole on the other end of the tie wrap, pulling the tie wrap tight, and cutting off excess length. Installation is complete.
Filler Panel kit About this device The HP Filler Panel kit enables you to cover open areas of the rack to better control airflow. Kit contents Item Quantity 1U Filler panels —or— 1U Filler panels 10 100 This kit might contain extra hardware for your convenience. Required tools No tools are required for this procedure. Installing the filler panel 1. Position the filler panel in the desired rack location. 2. Snap the filler panel into place.
Front Door kit About this device The HP Front Door kit enables you to add a front door to your HP 10000 G2 Series rack. You can also install this option kit on HP 10000 series racks of the same size. Kit contents Item Quantity Front door 1 Keys 2 Hinge brackets 2 Lock catches 2 This kit might contain extra hardware for your convenience.
Installing the hinge brackets and lock catches The following tables indicate where the hinge brackets and lock catches are to be mounted in a 36U or 42U front door installation. The distance is measured from the bottom of the rack to an indicated hinge bracket or lock catch fastening hole. Hinge bracket mounting distance from the bottom of the rack Position number 36U 42U 1 1598.5 mm (62.9 in) 1856 mm (73.1 in) 2 98.5 mm (3.9 in) 98.5 mm (3.
Installing the front door 1. Slide the bottom door hinge onto the hinge bracket on the rack frame. 2. Lift the top hinge pin up, and slide the upper door hinge into place. 3. Release the top hinge pin to secure the front door to the rack. 4. Close the front door. Installation is complete.
Ground Bonding kit About this device The HP Ground Bonding kit reduces the electromagnetic emissions outside the rack. These emissions are produced during normal operation of the electronic components within the rack. Typically, rack-mounted equipment must meet class A emissions levels, but you might want to reduce these levels even further.
a. Unlock and open the front door. b. Lift the top hinge pin up, and tilt the door away from the rack. c. Lift the door up and out of the bottom hinge. 2. Insert an M6 T-25 Torx screw through one end of a 15.24-cm (6-in) grounding strap, and insert it in the second hole below the upper front door hinge on the vertical frame member of the rack. Tighten the screw. 3. Replace the rack front door.
4. Insert a T-25 Torx screw through the other end of the same grounding strap, and insert it in the hole on the rack front door. Tighten the screw. From the system chassis rail to the front door (with a grounding lug): 1. Insert a T-25 Torx screw through one end of a 36.83-cm (14.5-in) grounding strap, and secure it to the system chassis rail. 2. Place the other end of the same grounding strap over the grounding lug on the front door. 3.
3. Place an M8 internal serrated lock washer and an M8 hex nut over the grounding lug on the right rear door and tighten. From the system chassis rail to the left rear door: 1. Insert a T-25 Torx screw through the end of a 36.83-cm (14.5-in) grounding strap, and secure it to the system chassis rail. 2. Place the other end of the grounding strap over the grounding lug on the left rear door. 3.
4. Place an M8 internal serrated lock washer and an M8 hex nut over the grounding lug on the cable access panel and tighten. From the system chassis rail to the rack top: 1. Insert a T-25 Torx screw through one end of a 15.24-cm (6-in) grounding strap, and secure it to the system chassis rail. 2. Place the other end of the same grounding strap over the grounding lug on the rack top. 3. Place an M8 internal serrated lock washer and an M8 hex nut over the grounding lug on the rack top and tighten.
4. Place an M8 internal serrated lock washer and an M8 hex nut over the grounding lug on the perforated panel and tighten. From the grounding lug on the perforated panel or fan kit to the grounding lug on the egress slot: 1. Place one end of a 15.24-cm (6-in) grounding strap over the grounding lug on the perforated panel or fan kit. 2. Place an M8 internal serrated lock washer and an M8 hex nut over the grounding lug on the perforated panel or fan kit and tighten. 3.
From the rack to a building facility, contact your building supervisor for more information. The following figure illustrates parts for this step. Reference Item 1 48.
5. Repeat steps 1 through 4 for the other bottom side panel. From the middle system chassis rail to the middle side panel: 1. Connect a 36.83-cm (14.5-in) and a 15.24-cm (6-in) grounding strap with connectors together. 2. Insert a T-25 Torx screw through the end of the 36.83-cm (14.5-in) grounding strap, and secure it to the middle system chassis rail. 3. Place the end of the 15.24 (6-in) grounding strap over the grounding lug on the middle side panel. 4.
3. Place the end of the 15.24-cm (6-in) grounding strap over the grounding lug on the top side panel. 4. Place an M8 internal serrated lock washer and an M8 hex nut over the grounding lug on the top side panel and tighten. 5. Repeat steps 1 through 4 for the other top side panel. Installing the ground bonding rack option kit on HP 10000 G2 Series Rack fan kits From the grounding lug on the rack top to the grounding lug on the fan kit: 1. Place one end of a 15.
4. Place an M8 internal serrated lock washer and an M8 hex nut over the grounding lug on the perforated panel and tighten. From the grounding lug on the fan kit to the grounding lug on the egress slot: 1. Place one end of a 36.83-cm (14.5-in) grounding strap over the grounding lug on the fan kit. 2. Place an M8 internal serrated lock washer and an M8 hex nut over the grounding lug on the fan kit and tighten. 3. Place the other end of the same grounding strap over the grounding lug on the egress slot.
Installing the ground bonding rack option kit on HP 10000 G2 Series Rack 150-mm extension kits 1. Insert a T-25 Torx screw through one end of a 15.24-cm (6-in) grounding strap, and secure it to the rear rack chassis. 2. Place an M8 internal serrated lock washer and the other end of the same grounding strap over the grounding lug on the extension kit. 3. Place an M8 hex nut over the grounding lug and tighten.
3. Place an M8 internal serrated lock washer and an M8 hex nut over the grounding lug on the extension kit and tighten. 4. Repeat the previous steps for the opposite side of the rack. From the extension kit to the top rack side panel: 1. Insert a T-25 Torx screw through the end of the 36.83-cm (14.5 in) grounding strap, and secure it to the top side panel. 2. Place the other end of the same grounding strap over the grounding lug on the extension kit.
3. Place an M8 internal serrated lock washer and an M8 hex nut over the grounding lug on the extension kit and tighten. From the side panel grounding lug to the bottom panel grounding lug: 1. Place the 36.83-cm (14.5 in) grounding strap over the grounding lug on the side panel of the extension kit. 2. Place an M8 internal serrated lock washer and an M8 hex nut over the grounding lug on the side panel of the extension kit and tighten. 3.
3. Repeat the previous steps to secure the other end of the same grounding strap to the grounding lug on the bottom panel of the extension kit. Installing the ground bonding rack option kit on HP 10000 Series Racks Attach the appropriate grounding straps to the following locations: From the system chassis rail to the front door: 1. Insert a T-25 Torx screw through one end of a 36.83-cm (14.5-in) grounding strap, and secure it to the system chassis rail. 2. Remove the inside front door panel screw. 3.
4. Reinsert and tighten the front door panel screw. From the system chassis rail to the right rear door: 1. Insert a T-25 Torx screw through the end of a 36.83-cm (14.5-in) grounding strap, and secure it to the system chassis rail. 2. Place the other end of the same grounding strap over the grounding lug on the right rear door. 3. Place an M8 internal serrated lock washer and an M8 hex nut over the grounding lug on the right rear door and tighten.
3. Place an M8 internal serrated lock washer and an M8 hex nut over the grounding lug on the left rear door and tighten. From the left rear door to the left rear door cable access panel: 1. Place one end of a 15.24-cm (6-in) grounding strap over the same grounding lug on the left rear door. 2. Place an M8 internal serrated lock washer and an M8 hex nut over the grounding lug on the left rear door and tighten. 3.
3. Place an M8 internal serrated lock washer and an M8 hex nut over the grounding strap on the rack top and tighten. From the grounding lug on the rack top to the grounding lug on the perforated panel: 1. Place one end of a 36.83-cm (14.5-in) grounding strap over the same grounding strap on the rack top. 2. Place an M8 internal serrated lock washer and an M8 hex nut over the grounding lug on the rack top and tighten. 3.
3. Place the other end of the same grounding strap over the grounding lug on the egress slot. 4. Place an M8 internal serrated lock washer and an M8 hex nut over the grounding lug on the egress slot and tighten. From the rack to a building facility, contact your building supervisor for more information. The following figure illustrates parts for this step. Reference Item 1 48.
Installing the ground bonding rack option kit on HP 10000 Series Rack side panels From the system chassis rail to the side panel: 1. Connect a 36.83-cm (14.5-in) and a 15.24-cm (6-in) grounding strap with connectors together. 2. Insert a T-25 Torx screw through the end of the 36.83-cm (14.5-in) grounding strap, and secure it to the system chassis rail. 3. Place the end of the 15.24-cm (6-in) grounding strap over the grounding lug on the side panel. 4.
4. Place an M8 internal serrated lock washer and an M8 hex nut over the grounding lug on the perforated panel and tighten. From the grounding lug on the fan kit to the grounding lug on the egress slot: 1. Place one end of a 36.83-cm (14.5-in) grounding strap over the grounding lug on the fan kit. 2. Place an M8 internal serrated lock washer and an M8 hex nut over the grounding lug on the fan kit and tighten. 3. Place the other end of the same grounding strap over the grounding lug on the egress slot.
Heavy Duty Stabilizer kit About this device The HP Heavy Duty Stabilizer kit provides stability and support and prevents possible tipping when you install, remove, or access equipment within the rack. If you have a stand-alone rack with a single rack-mountable component that exceeds 99.8 kg (220 lb) or if you have three or fewer bayed racks with a single rack-mountable component that exceeds 99.8 kg (220 lb), you must use the heavy duty stabilizer.
b. Insert and partially tighten four M8 x16-mm bolts with washers, securing the front stabilizer mount to the front caster plate. c. Insert and partially tighten two M8 x16-mm bolts with washers on each side of the caster plate skirt, securing the front stabilizer mount to the front caster plate. d. Tighten the bolts from step b. e. Tighten the bolts from step c.
2. Slide the rack into its final location. 3. Raise the rack by lowering the leveling feet, raising the casters approximately 6.4 mm (0.25 in) off the floor. 4. Install one stabilizer foot on each side of the front stabilizer mount (1) by inserting and partially tightening one M8 x 30-mm bolt and washer on each foot (2). 5. Fully seat each stabilizer foot to the front stabilizer mount, and tighten the bolts from step 4. 6.
Hook-and-Loop Cabling Strap Clip kit About this device The HP Hook-and-Loop Cabling Strap Clip kit enables you to add hook-and-loop cabling strap clips to manage your cable configurations. Kit contents Item Quantity 12.7-cm (5-in) hook-and-loop cabling strap clip 20 20.3-cm (8-in) hook-and-loop cabling strap clip 20 30.5-cm (12-in) hook-and-loop cabling strap clip 10 This kit might contain extra hardware for your convenience. Required tools No tools are required for this procedure.
Installing the hook-and-loop cabling strap clips Route and secure your cables with the hook-and-loop cabling strap clips.
Hook-and-Loop Cabling Strap Clip kit 74
Installation is complete.
Light kit About this device The HP Light kit enables you to add a light to the rack. Kit contents Item Quantity 110V/220V light assembly 1 Light cover 1 F14W/133-T8 fluorescent lamp 1 Power cord (10 ft), C13-C14 1 Mounting screws 2 This kit might contain extra hardware for your convenience. Required Tool You will need a flat-head screwdriver. Important safety information Before installing this product, read the Important Safety Information guide provided.
Installing the 110V/220V Light 1. Remove the fluorescent lamp cover. 2. Insert two screws, securing the light to the rack frame.
3. Insert the fluorescent lamp pins into the light socket (1) and gently turn the fluorescent lamp toward the rack (2) until the lamp locks into place. 4. Replace the fluorescent lamp cover.
Operating the 110V/220V Light Item Description Status 1 On Turns on the light. 2 Off Turns off the light. 3 Standby mode Turns on the light when the rack door is open, and turns off the light when the rack door is closed.
WARNING: To reduce the risk of personal injury, fire, or damage to the equipment, do not exceed the recommended voltage for the rack.
F14W/133-T8 fluorescent lamp specifications Electrical data* Nominal value Minimum Maximum Frequency 50 Hz — — Lamp nominal wattage 14 W — — 14.0 W 30 W 12.8 W — 15.
Color No Luminous Flux* CRI Color Temp ILCOS-Code 1A group n/a 6500 K n/a FD-14/65/1A-E-G13-26/360 Not for general lighting purposes Nominal Value Special colors • • Activa Gro-lux 172 gro 600 lm n/a *At 50-Hz operation, lamp aged for 100 h. Material disposal This HP product contains the following material that might require special handling at end-of-life: • Mercury in the user replaceable fluorescent lamp. Disposal of mercury might be regulated because of environmental considerations.
Mini Stabilizer kit About this device The HP Mini Stabilizer kit provides stability and support and prevents possible tipping when you install, remove, or access equipment within the rack. Kit contents Item Quantity 600-mm (23.62-in) Front stabilizer mount —or— 800-mm (31.50-in) Front stabilizer mount 1 Stabilizer feet 2 M8 x 20-mm bolt 8 M8 flat washer 8 1 This kit might contain extra hardware for your convenience.
2. Insert and partially tighten four bolts with washers, securing the front foot to the front caster plate. 3. If you are using the side feet, align the side feet with the holes on the caster plate skirt and front foot.
4. Insert and partially tighten two bolts with washers, securing the side feet (if installed) and front foot to the caster plate skirt. 5. Tighten the bolts from step 2. 6. Tighten the bolts from step 4. Installation is complete.
Rack Air Duct kit About this kit The HP 10000 G2 Rack Air Duct kit removes warm air from the rack by channeling the warm air into the data center ceiling return air plenum. The air duct sits on top of the rack, directly joined to the ceiling plenum, preventing the warm air from entering the data center aisle. Three kits support this product. Part number Option kit name Description AF028A HP 10642G2 Top Exhaust Extension Kit This kit includes the rear extension assembly and rack air duct assembly.
— Draw latch assembly (1) — Plastic push fastener (4) — 510-mm foam gasket (2) — 520-mm foam gasket (2) o Lower air duct assembly (1) — M5.5 self-tapping screw (4) • o M3.5 self-drilling screw (2) o M10 x 25 bolt (2) Baying gaskets o 876-mm foam gasket (2) o 1850-mm foam gasket (2) AF029A HP 10642G2 Top Exhaust Field Retrofit Kit • Top rack plate • Base rack plate o Base plate (2) o Egress slot plate (2) o M5.
Installation video HP recommends watching the HP 10000 G2 Rack Air Duct Installation video. The video provides a demonstration of installation strategies and techniques that might be helpful while installing the air duct. To access the video: 1. Go to the HP website (http://www.hp.com/go/sml). 2. In the Product category section, select Options and Accessories. 3. In the Product family section, select Server Rack and Rack Options. 4. In the Product series section, select HP 10000 G2 Rack Air Duct Kit.
3. Using a T-30 Torx screwdriver, remove the M6 flathead screw securing each hinge bracket to the rack (1), and then remove all of the hinge brackets from the rack (2). Retain the hinge brackets and screws for reinstallation. 4. Using a T-25 Torx driver, remove the upper and lower rear door lock catches by removing the two screws from each of the upper and lower rear door lock catches. Retain the door lock catches and screws for reinstallation.
2. Remove the perforated top plate of the rack (2). 3. Align the solid plate with the top of the rack (1). 4. Using a T-30 Torx screwdriver, insert and tighten two of the four M-12 bolts (from step 1) into the two corner holes at the front of rack (2). Installing the solid rack base plate 1. From the rear of the rack, insert the left side plate into the rack, and set the plate on the lip of the rack frame (1).
3. Insert the right side plate into the rack, overlapping the left side plate, and set it on the lip of the rack frame (3). 4. Using a T-25 Torx screwdriver, insert and tighten one M5.5 self-tapping screw at the rear, right corner and one M5.5 self-tapping screw at the front, right corner to secure the right side plate to the rack frame (4). 5. From the rear of the rack, align the two egress cover plates with the egress slot at the rear of the rack (1). 6. Secure the egress cover slot. a.
3. Insert the airflow rail gasket into the space between the 19-in mounting rails and the vertical frame on both sides of the rack, with the closed cell side of the airflow rail gasket facing the front of the rack. 4. Gently push the airflow rail gasket into the space until it is flush with the vertical frame. For more information, see the HP Airflow Optimization Kit Installation Instructions (AF090A).
Installing the floor gasket 1. Cut the floor gasket at the perforation to reduce the length from 800-mm (31-in) to 600-mm (24-in). 2. Remove the protective tape from the bottom edge of the floor gasket, and then apply it to the bottom of the rack with the adhesive strip facing the front of the rack. Installation is complete.
4. Assemble the kits ("Assembling the kits" on page 98). 5. Install the kit assembly to the top of your rack. 6. Adjust the height of the kit. Removing the rear doors 1. Open the hinge brackets by pulling up the top hinge pin and pulling down the bottom hinge pin (1). 2. Lift the rear doors off the hinge brackets, and then remove the doors from the rack (2). 3.
4. Using a T-25 Torx driver, remove the upper and lower rear door lock catches by removing the two screws from each of the upper and lower rear door lock catches. Retain the door lock catches and screws for reinstallation. NOTE: Install the solid rear rack doors after you have installed the AF028A kit. Installing the rear extension assembly 1. Install the side assemblies of the rear extension assembly. a. Align the right-side assembly with the rack frame (1). b.
d. Repeat steps a through c for the left-side assembly. 2. Install the top assembly of the rear extension assembly. a. Align the top assembly with the installed side assemblies (1). b. Using a T-25 Torx driver, insert and tighten two M6 machine screws into the rear screw holes (2). c. 3. Using a T-25 Torx driver, insert and tighten two M6 machine screws into the front screw holes (3). Install the bottom assembly of the rear extension assembly. a.
b. Using a T-25 Torx driver, insert and tighten four M6 machine screws into each corner hole (3). Installing the solid rear doors 1. Using a T-25 Torx driver, insert and tighten two screws into each of the upper and lower rear door lock catches. 2. Install the hinges brackets. a. Align the eight hinge brackets that you removed from the rear of your rack to the designated locations on the rear extension assembly (1).
b. Using a T-30 Torx driver, insert and tighten one M6 flathead screw to secure each hinge bracket to the rear extension assembly (2). 3. Lift the rear doors, aligning them with the hinge brackets on the rear extension assembly (1). 4. Push down the hinge pins, and then insert the hinge into the holes on the rear door (2). Assembling the kits 1. Assemble the lower duct. a. Align the hooks of the side panels with the slots of the front and back panels (1). b.
c. Insert one M5.5 self-tapping screw into each bottom corner of the assembly (3). d. Repeat steps a through c for the other side panel. 2. Assemble the upper duct. a. Align the hooks of the side panels with the slots of the front and back panels (1). b. Slide the six hooks into the slots, and then slide the panel down until it locks in place (2). c. From the inside of the assembly, insert two M6 cap screws in the middle of the assembly.
c. Insert two plastic push fasteners into the holes on both sides of the assembly to secure the draw-latch strap to the upper duct assembly (2). d. Repeat steps a through c for the second draw-latch strap. 4. With the draw-latch straps in the loose position, slide the upper duct down over the lower duct. 5. Lock the draw-latch straps. NOTE: The two 510-mm gaskets sit on the inside edges of the two 520-mm gaskets.
6. Apply the foam gasketing to the top of the upper duct by peeling the adhesive backing and aligning the gasketing with the top edges of the upper duct. Installing the kit assembly WARNING: The rack air duct weighs approximately 22.5 kg (50 lb). To reduce the risk of personal injury or damage to the equipment: • Observe local occupational health and safety requirements and guidelines for manual material handling. • Use at least two people to lift and stabilize the product during installation or removal.
5. Using a T-30 Torx screwdriver, insert and tighten two M-12 bolts (from step 1) through the holes of the air duct assembly and into the two rear holes of the rack (3). Adjusting the kit After you have installed the air duct to the top of your rack: 1. Loosen both draw-latch straps (1). 2. Raise the upper duct until it reaches the ceiling opening, and the gasketing is pressed firmly against the ceiling (2). 3. Tighten and lock both draw-latch straps to hold the upper duct in place (1). 4.
b. Using an electric drill, drill one 2.38-mm (3/32-in) hole through the lower duct, in the location you marked. c. Insert one M3.5 self-drilling screw through the holes in both the upper and lower ducts (2). Baying options You can order the HP Baying Rack Option Kit to bay your HP 10000 G2 Rack Air Duct rack to another HP 10000 G2 Rack Air Duct rack. You cannot bay an HP 10000 G2 Rack Air Duct rack to a standard rack.
For more information, see Baying kit (on page 25).
Rear Extension kit About this device The HP Rear Extension kit enables you to add 200-mm (7.87-in) of depth to the rear of the HP 10000 Series and HP 10000 G2 Series racks. The HP Rear Extension kit only fits the 600-mm (23.62-inch) wide (42U and 47U) rack models. Kit contents Item Quantity Rear extension assembly 1 • • • • Left side assembly Right side assembly Top assembly Bottom assembly M5.
2. Lift the rear doors off the hinge brackets, and then remove the doors from the rack (2). 3. Using a T-30 Torx screwdriver, remove the M6 flathead screw securing each hinge bracket to the rack (1), and then remove all of the hinge brackets from the rack (2). Retain the hinge brackets and screws for reinstallation.
4. Using a T-25 Torx driver, remove the upper and lower rear door lock catches by removing the two screws from each of the upper and lower rear door lock catches. Retain the door lock catches and screws for reinstallation. Installing the rear extension assembly 1. Install the side assemblies of the rear extension assembly. a. Align the right-side assembly with the rack frame (1). b. Hook the extension into the rack frame at the three hook locations at the top, middle, and bottom of the rack. c.
a. Align the top assembly with the installed side assemblies (1). b. Using a T-25 Torx driver, insert and tighten two M6 machine screws into the rear screw holes (2). c. 3. Using a T-25 Torx driver, insert and tighten two M6 machine screws into the front screw holes (3). Install the bottom assembly of the rear extension assembly. a. Align the bottom assembly with the installed side assemblies (1), making sure to set the metal tab at the front of the assembly over the rear rack frame (2). b.
4. Insert the filler panels into the side and top assemblies. Installing the rear doors 1. Using a T-25 Torx driver, insert and tighten two screws into each of the upper and lower rear door lock catches. 2. Install the hinges brackets. a. Align the hinge brackets that you removed from the rear of your rack to the designated locations on the rear extension assembly (1).
b. Using a T-30 Torx driver, insert and tighten one M6 flathead screw to secure each hinge bracket to the rear extension assembly (2). 3. Lift the rear doors, aligning them with the hinge brackets on the rear extension assembly (1). 4. Push down the hinge pins, and then insert the hinge into the holes on the rear door (2). Installing the cable management brackets 1.
3. Using a T-25 Torx driver, insert and tighten one M5.5 self-tapping screw into each side of the bracket to secure the cable management bracket to the rack frame and extension kit (2). Installation is complete.
Server/Utility Shelf kit About this device The HP Server/Utility Shelf kit enables you to install a convenient shelf in your rack-mount system. This kit can be used with all HP racks. Kit contents Item Quantity Server/Utility shelf 1 Cage nut 2 M6 screw 2 Quick-release tie-down straps 2 This kit might contain extra hardware for your convenience.
1. Align the cage nuts with the square-rail perforations on the front of the shelf. 2. Use the cage nut insertion tool (not included) to secure each cage nut to the shelf. a. Hook the bottom lip of the cage nut in the square-rail perforation. b. Insert the tip of the insertion tool through the perforation, and then hook the top lip of the cage nut. c. Pull the cage nut through the square-rail perforation until the top lip snaps into position. 3.
5. Align each cage nut assembly with the mounting holes on the inside front of the rack. 6. Secure the shelf to the rack with two M6 screws using a Phillips screwdriver.
7. Secure servers to the shelf using the quick-release tie-down straps. Installation is complete.
Side Panel kit About this device The HP Side Panel kit enables you to attach side panels to HP 10000 G2 Series Racks. Kit contents Item Quantity Top side panel 2 Middle side panel 2 Bottom side panel 2 Key 2 This kit might contain extra hardware for your convenience. Required tools No tools are required for this procedure.
Installing the side panels 1. Install the top and bottom side panel by sliding the brackets on the side panel behind the tabs on the rack frame.
2. Install the middle side panel by locking the side panel locks, securing it to the rack. 3. Repeat steps 1 and 2 for the other side of the rack. Installation is complete.
Tie-Down kit About this device The HP 10000 G2 Series Rack Tie-down Kit enables you to secure HP 10000 G2 Series Racks to the floor. This kit is for all 10000 G2 Series Racks except for Rack SKUs AF092A and AF094A. A separate tie-down kit is used exclusively for the 1200 full frame racks. This separate kit is for Rack SKUs AF092A and AF094A only.
3. Insert and partially tighten four bolts with washers, securing the front tie-down to the front caster plate. 4. Align the rear tie-down with the holes on the rear caster plate (1). 5. Insert the four spring clips (2), and then partially tighten four bolts with washers (3), securing the rear tie-down to the rear caster plate. 6. Tighten the bolts from step 3. 7. Tighten the bolts from step 5. 8. Secure the rack to the floor ("Securing the rack to the floor" on page 121).
Securing the rack to the floor The following illustration indicates where to drill the holes to secure the rack to the floor. The distances are measured from the holes on the tie-downs. Have your building structural engineer drill the holes. After your holes have been drilled, insert a bolt with a washer into each hole to secure the rack to the floor.
1. Adjust the leveling feet on the rack so that the full weight of the rack rests on the leveling feet. 2. Align the front tie-down with the holes on the front caster plate. 3. Insert and then partially tighten four bolts with washers, securing the front tie-down to the front caster plate. 4. Align the rear tie-down with the holes on the rear caster plate (1). 5. Insert the six bolts with washers (2), securing the rear tie-down to the rear caster plate. 6. Tighten the bolts from step 3. 7.
Securing the 1200 mm full frame rack to the floor The following illustration indicates where to drill the holes to secure the 1200 mm full frame rack to the floor. The distances are measured from the holes on the tie-downs. Have your building structural engineer drill the holes. Then secure the rack to the floor by inserting a bolt with a washer into each hole.
Vertical PDU Mounting kit About this device The HP Vertical PDU Mounting kit allows HP PDU vertical models to be mounted in HP 10000 G2 Series Racks and in the HP V142 Rack. Kit contents Item Quantity Top bracket 1 Bottom bracket 1 Phillips self tapping screw 4 8-32 Torx machine screw 2 Required tools The following tools are required for installation: • Phillips screwdriver • 8-32 screwdriver Installing the Vertical PDU Mounting kit 1. Install the brackets.
HP monitored PDU 2. Install the PDU. The installation is complete.
Electrostatic discharge Preventing electrostatic discharge To prevent damaging the system, be aware of the precautions you need to follow when setting up the system or handling parts. A discharge of static electricity from a finger or other conductor may damage system boards or other static-sensitive devices. This type of damage may reduce the life expectancy of the device. To prevent electrostatic damage: • Avoid hand contact by transporting and storing products in static-safe containers.
Support and other resources Before you contact HP Be sure to have the following information available before you call HP: • Active Health System log (HP ProLiant Gen8 or later products) Download and have available an Active Health System log for 3 days before the failure was detected. For more information, see the HP iLO 4 User Guide or HP Intelligent Provisioning User Guide on the HP website (http://www.hp.com/go/ilo/docs).
Acronyms and abbreviations KVM keyboard, video, and mouse PDU power distribution unit RKM rackmount keyboard monitor TMRA recommended ambient operating temperature UPS uninterruptible power system Acronyms and abbreviations 128
Documentation feedback HP is committed to providing documentation that meets your needs. To help us improve the documentation, send any errors, suggestions, or comments to Documentation Feedback (mailto:docsfeedback@hp.com). Include the document title and part number, version number, or the URL when submitting your feedback.