
HP Desktop Accessories - (English) Adding Memory to Your PC 5990-5644

Removing a Memory Module
1 Remove the PC chassis side panel using the
thumbscrews. (Refer to the Upgrading and
Servicing the PC guide.)
2 Gently lay the PC on its side.
3 Locate the memory sockets on the
motherboard.
4 If necessary, move any cabling out of
the way.
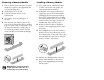
5 Push down the two retaining clips on the
ends of the socket until the memory module
pops out of the socket. It’s important to hold
the memory module by its edges only, as
you lift it away from the socket. Store the
memory module in its antistatic packaging.
Warning:
Do not pull the memory
module out of the socket. Use the
retaining clips to eject the module.
Installing a Memory Module
1 If you need remove old memory module
to make room for the new module, see
“Removing a Memory Module.”
2 Holding the new memory module by its
edges only, remove it from the antistatic
packaging. (Avoid touching the memory
chips or the gold contacts on the module.)
The memory module has one or two small
notches on the lower edge, which fit into
raised bumps in the memory socket.
3 Hold the memory module in alignment
with the socket, aligning the notches with
the bumps.
4 Push straight down on top of the memory
module until it is fully seated in the socket.
The retaining clips on the ends of the socket
automatically lock it into position when the
memory module is fully seated.
5 Replace any cabling that was removed.
6 Put the side panel back on the chassis.
(Refer to the Upgrading and Servicing
the PC guide.)