
HP 10Gb Ethernet BL-c Switch User Guide


Installing the switch 21
1.
Access the switch ("Accessing the switch" on page 20). After connecting to the switch console, the
login prompt appears.
2. Enter admin as the default administrator password.
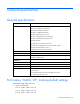
The Main Menu appears and displays all administrator privileges:
See the HP 10Gb Ethernet BL-c Switch Command Reference Guide for information on configuring the IP
address, changing configuration settings, and monitoring switch operation using one of the following
interfaces:
• Local RS-232 serial console management interface
• Remote telnet console management interface
See the HP 10Gb Ethernet BL-c Switch Browser-based Interface Reference Guide for information on using
the embedded HTML interface to manage the switch from anywhere on the network using a standard
browser, such as Netscape Navigator or Microsoft
®
Internet Explorer.
See "SNMP MIBs support (on page 44)" for more information on the SNMP agents. This section also
describes how to use the MIBs to configure and monitor the switch using a generic SNMP manager, such
as HP OpenView Network Node Manager or HP Systems Insight Manager.
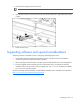
Installing XFP transceivers
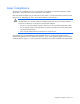
CAUTION: To prevent damage to the fiber optic cable or the XFP transceiver, do not install or
remove fiber-optic XFP transceivers with cables attached. Disconnect all cables from the XFP
transceiver before removing or installing an XFP transceiver.
CAUTION: Removing and installing an XFP transceiver can shorten the useful life. Do not
remove and insert XFP transceivers more often than is necessary.
CAUTION: HP recommends attaching an ESD-preventative wrist strap to your wrist and to a
bare metal surface on the chassis to prevent electrostatic discharge.
CAUTION: Do not remove the dust plugs from the fiber-optic XFP transceiver or the rubber caps
from the fiber-optic cable until you are ready to connect the cable. The plugs and caps protect
the XFP transceiver ports and cables from contamination and ambient light.