HP ProCurve Switches and Hubs HP ProCurve Switch 2424M Gigabit Stacking Module Installation Guide L e s s Wo r k , M o r e N e t w o r k http://www.hp.
JRUG ERRN 3DJH L 7KXUVGD\ 0DUFK $0 HP ProCurve Switch 2424M Gigabit Stacking Module Installation Guide
JRUG ERRN 3DJH LL 7KXUVGD\ 0DUFK $0 © Copyright 1999 Hewlett-Packard Company All Rights Reserved Reproduction, adaptation, or translation without prior written permission is prohibited, except as allowed under the copyright laws. Publication Number J4130-90001 March 1999 Applicable Products HP ProCurve Switch 2424M Gigabit Stacking Module (HP J4130A) Disclaimer The information contained in this document is subject to change without notice.
JRUG ERRN 3DJH LLL 7KXUVGD\ 0DUFK $0 Contents Description . . . . . . . . . . . . . . . . . . . . . . . . . . . . . . . . . . . . . . . . . . . . . . . . . . . . 1 Installing the Module . . . . . . . . . . . . . . . . . . . . . . . . . . . . . . . . . . . . . . . . . . . 2 Overview . . . . . . . . . . . . . . . . . . . . . . . . . . . . . . . . . . . . . . . . . . . . . . . . . . . . 2 1. Download Switch Software . . . . . . . . . . . . . . . . . . . . . . . . . . . . . . . . . .
JRUG ERRN 3DJH LY 7KXUVGD\ 0DUFK $0
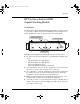
JRUG ERRN 3DJH 7KXUVGD\ 0DUFK $0 Description HP ProCurve Switch 2424M Gigabit Stacking Module Description The HP ProCurve Switch 2424M Gigabit Stacking Module is a component that you can add to an HP ProCurve Switch 2424M to provide stacking between Switch 2424Ms and a variety of other network connectivity options.
JRUG ERRN 3DJH 7KXUVGD\ 0DUFK $0 Installing the Module Installing the Module Overview You can install the Gigabit Stacking Module into only the HP ProCurve Switch 2424M. The installation steps are: 1. Verify that your HP ProCurve Switch 2424M has the correct operating system software (OS) version. Switch 2424M units that were shipped before the Gigabit Stacking Module became available may be running software that does not support the module. The switch must be running OS version C.06.
JRUG ERRN 3DJH 7KXUVGD\ 0DUFK $0 Installing the Module 1. Download Switch Software Verify Current Switch Software Your HP ProCurve Switch 2424M must be running OS version C.06.06 or later to support the Gigabit Stacking Module. To determine which OS version is running in the switch, connect a console to the switch and perform the following (see the switch Installation Guide for more information about connecting a console and using the console interface): 1.
JRUG ERRN 3DJH 7KXUVGD\ 0DUFK $0 Installing the Module Download the New OS Software This procedure describes how to use a personal computer (PC) to download the software. If you are using a UNIX workstation, refer to the Note at the bottom of this page. 1.
JRUG ERRN 3DJH 7KXUVGD\ 0DUFK $0 Installing the Module 2. Install Transceivers Into the Module Any of the HP Gigabit Transceivers (Gigabit-SX, Gigabit-LX, or Gigabit Stacking) can be installed in either of the transceiver slots in the Gigabit Stacking Module. The order or location does not matter. Installation Precautions: ■ Static electricity can severely damage the electronic components on the module and on transceivers you install into the module.
JRUG ERRN 3DJH 7KXUVGD\ 0DUFK $0 Installing the Module 3. Install the Module 1. Use a Torx T-10 or flat-bladed screwdriver to unscrew the screws in the module slot cover plate in the back of the Switch 2424M. Then remove the cover plate and store it for possible future use. 2. Hold the module by its bulkhead, taking care not to touch the metal connectors or components on the board. Orient the module as shown in the illustration below. 3.
JRUG ERRN 3DJH 7KXUVGD\ 0DUFK $0 Installing the Module 5. Tighten the two retaining screws to hold the module in place. The retaining screws should be secure but be careful to not overtighten them. tighten the two retaining screws 4. Verify the Module is Installed Correctly Observe the Module Status, Self Test, and Fault LEDs on the front of the switch to verify that the module is installed properly.
JRUG ERRN 3DJH 7KXUVGD\ 0DUFK $0 Installing the Module If the Module Status, Self Test, and Fault LEDs are flashing, the module may not be completely installed. Make sure the module is installed all the way into the switch slot. If the flashing continues, see the Troubleshooting section on page 13. 5. Connect the Network Cables 1. Connect the appropriate network cables to the module’s transceiver ports. The table below shows the supported cable types for each of the transceivers.
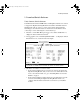
JRUG ERRN 3DJH 7KXUVGD\ 0DUFK $0 Installing the Module 2. Check the port LEDs for the newly-installed module to ensure that the port(s) connected in the preceding step are operating correctly. For each of the two transceiver ports on the switch module there are Link and Mode LEDs as shown in the next illustration. Example Link and Mode LEDs Link LED • The Link LED will be lit for each port that is connected properly to an active network device.
JRUG ERRN 3DJH 7KXUVGD\ 0DUFK $0 Installing the Module 6. Reset the Switch (if necessary) Reasons for Resetting the Switch Generally, you only need to reset the switch when it needs to recognize a change in its hardware or software (console) configuration.
JRUG ERRN 3DJH 7KXUVGD\ 0DUFK $0 Installing the Module 7. Customize the Port Configuration (Optional) If the module slot in the Switch 2424M was empty the last time the switch was either rebooted or reset (or the power to the switch was cycled), then the module will use preconfigured default parameter values that will work for most networks.
JRUG ERRN 3DJH 7KXUVGD\ 0DUFK $0 Sample Connections Sample Connections The HP Gigabit Stacking Module allows you to easily stack multiple Switch 2424Ms with gigabit speed while at the same time connecting the stack to network backbones, servers and other network devices with gigabit fiberoptic connections. The following illustration shows an example of these connections.
JRUG ERRN 3DJH 7KXUVGD\ 0DUFK $0 Troubleshooting Troubleshooting The primary tools for troubleshooting the switch modules are the LEDs on the front of the switch and on the module. Refer to “LED Behavior” on page 7. Also, refer to the Installation Guide and the Management and Configuration Guide shipped with the switch, for more detailed troubleshooting information.
JRUG ERRN 3DJH 7KXUVGD\ 0DUFK $0 Troubleshooting Tip Number 14 Problem Solution ➋ The module was installed in the slot after a different type module was previously installed, and the switch has not yet been reset. When you “hot swap” modules in the switch slot, if you install a different module type than the one that was previously installed in the slot, you must reset the switch so the switch processor can properly initialize and configure the new module type.
JRUG ERRN 3DJH 7KXUVGD\ 0DUFK $0 Customer Support Services Tip Number ➎ Problem Solution The network connection is not working properly. Try the following procedures: • For the indicated port, verify that both ends of the cabling, at the switch and the connected device, are snug. • Verify the connected device and switch are both powered on and operating correctly.
JRUG ERRN 3DJH 7KXUVGD\ 0DUFK $0 Replacing or Removing the Module Replacing or Removing the Module Follow these procedures to replace the Gigabit Stacking Module with another, or to remove the module without replacing it: 1. Remove any network cables from the ports on the module. 2. On the module you want to remove from the switch, unscrew the retaining screws enough to disconnect them from the threaded holes in the switch. 3.
JRUG ERRN 3DJH 7KXUVGD\ 0DUFK $0 Mode Conditioning Patch Cord for Gigabit-LX Mode Conditioning Patch Cord for Gigabit-LX The following information applies to installations in which multimode fiber-optic cables are connected to a Gigabit LX Transceiver installed in the Gigabit Stacking Module. Unlike Gigabit SX, which connects to only multimode fiber-optic cabling, Gigabit LX can use either single-mode or multimode cable.
JRUG ERRN 3DJH 7KXUVGD\ 0DUFK $0 Mode Conditioning Patch Cord for Gigabit-LX Installing the Patch Cord As shown in the illustration below, connect the patch cord to the Gigabit LX Transceiver with the section of single-mode fiber plugged in to the Tx (transmit) port. Then, connect the other end of the patch cord to your network cabling patch panel, or directly to the network multimode fiber.
JRUG ERRN 3DJH 7KXUVGD\ 0DUFK $0 Specifications Specifications Environmental Operating Non-Operating Temperature: 0°C to 55°C (32°F to 131°F) -40°C to 70°C (-40°F to 158°F) Relative humidity: (non-condensing) 15% to 95% at 40°C (104°F) 15% to 90% at 65°C (149°F) Maximum altitude: 4.6 Km (15,000 ft) 4.6 Km (15,000 ft) Connectors ■ The Gigabit-SX Transceiver transmits at 850 nm wavelength, and is compatible with the IEEE 802.3z Gigabit-SX standard.
JRUG ERRN 3DJH 7KXUVGD\ 0DUFK $0 EMC Regulatory Statements EMC Regulatory Statements U.S.A. FCC Class A This equipment has been tested and found to comply with the limits for a Class A digital device, pursuant to Part 15 of the FCC Rules. These limits are designed to provide reasonable protection against interference when the equipment is operated in a commercial environment.
JRUG ERRN 3DJH 7KXUVGD\ 0DUFK $0 EMC Regulatory Statements Korea Taiwan European Community Declaration of Conformity This product is designed for operation with the HP ProCurve Switch 2424M. Please see the Declaration of Conformity included in the HP ProCurve Switch 2424M Installation Guide.
JRUG ERRN 3DJH 7KXUVGD\ 0DUFK $0 Technical information in this document is subject to change without notice. Copyright Hewlett-Packard Company 1999. All rights reserved. Reproduction, adaptation, or translation without prior written permission is prohibited except as allowed under the copyright laws.