
DCFM Professional Plus User Manual (53-1001774-01, June 2010)

376 DCFM Professional Plus User Manual
53-1001774-01
15
Editing a CEE map
1. Select Configure > Switch > CEE from the menu bar.
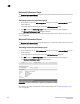
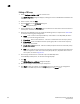
The CEE Configuration dialog box displays, showing the status of all CEE-related hardware and
functions.
2. Select a switch, and click Edit.
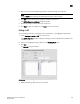
3. Click the QoS tab on the Edit Switch dialog box.
The QoS dialog box displays.
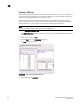
4. Select a CEE Map from the CEE Maps table, and click the left arrow button to load its values to
the left pane. The fields are now editable.
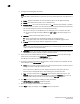
5. Keep the same CEE Map name and modify the following values, as required. See Table 23 for
an example of priority group configuration.
• Name - Enter a name to identify the CEE map. If the switch is a 10 Gbps CEE/FC switch
module, you cannot change the name.
• Precedence - Enter a value between 1 - 100. This number determines the map’s priority.
• % Bandwidth - Enter a bandwidth value for priority group IDs 0-7. The total of all priority
groups must equal 100%.
• Priority Flow Control check box - Check to enable priority flow control on individual priority
groups.
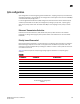
• CoS - Enter a Class of Service value to correspond to the Priority Group ID rows. Each CoS
must be mapped to at least one of the Priority Group IDs (0-7), separated with a comma
and a space, as shown in Figure 115.
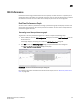
6. Click the right arrow button to re-add the map to the CEE Maps table.
If the CEE Map already exists, an overwrite message displays.
7. Click OK.
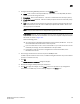
The CEE Confirmation and Status dialog box displays.
8. Review the changes carefully before you accept them.
9. Click Start to apply the changes, or click Close to abort the operation. If any configuration
errors exist in the CEE map, an error message displays in the Status area.