
HP 3PAR Citrix Implementation Guide


Setting the Host CHAP for Citrix
To set the host CHAP for Citrix, complete the following steps:
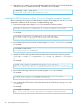
1. Go to the iSCSI Initiator host console, or, at a terminal, edit the /etc/iscsid.conf file
and enable CHAP authentication:
# To enable CHAP authentication set node.session.auth.authmethod
# to CHAP. The default is None.
node.session.auth.authmethod = CHAP
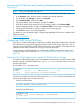
2. Configure the host CHAP password for the discovery and login session by again editing the
configuration file /etc/iscsid.conf file.
# To set a discovery session CHAP username and password for the initiator
# authentication by the target(s), uncomment the following lines:
discovery.sendtargets.auth.username = citrix
discovery.sendtargets.auth.password = host_secret0
# To set a CHAP username and password for initiator
# authentication by the target(s), uncomment the following lines:
node.session.auth.username = citrix
node.session.auth.password = host_secret0
NOTE: The OutgoingPassword must be the same as the host CHAP secret configured on
the HP 3PAR StoreServ Storage.
3. Perform discovery and login as described in “Discovering iSCSI Devices and Creating Storage
Repositories with Citrix 5.6 or 6.x” (page 29).
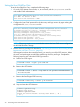
If the targets have been discovered previously, you must log out of the iSCSI sessions, delete
the node, and send target records before performing discovery and login. Complete the
following steps for each individual iSCSI login sessions:
a. Perform an iSCSI Logout:
# iscsiadm -m node --logout -p 10.0.100.101
b. Remove the iSCSI Node:
# iscsiadm -m node -o delete -T iqn.2000-05.com.3pardata:20310002ac000079 -p
10.0.100.101,3260
c. Remove the SendTarget iSCSI Discovery:
# iscsiadm -m discovery -o delete -p 10.0.100.101
d. Stop and start the iSCSI daemon:
# service open-iscsi stop
Stopping iSCSI daemon:
# service open-scsi start
Turning off network shutdown. Starting iSCSI daemon: [ OK ]
[ OK ]
30 Connecting a Host with Software iSCSI