HP 3PAR Windows Server 2012 and Windows Server 2008 Implementation Guide Abstract This implementation guide provides the information needed to configure the HP 3PAR StoreServ Storage with Microsoft® Windows® Server 2008 or Windows Server 2012.
© Copyright 2014 Hewlett-Packard Development Company, L.P. Confidential computer software. Valid license from HP required for possession, use or copying. Consistent with FAR 12.211 and 12.212, Commercial Computer Software, Computer Software Documentation, and Technical Data for Commercial Items are licensed to the U.S. Government under vendor's standard commercial license. The information contained herein is subject to change without notice.
Contents 1 Introduction...............................................................................................6 Supported Configurations..........................................................................................................6 HP X3000 and X3000 G2 Storage Systems.................................................................................7 HP 3PAR OS Upgrade Considerations.........................................................................................7 Peer Motion.....
5 Setting Up a Windows Server 2012 or 2008/HP 3PAR StoreServ Storage Configuration with iSCSI Storage...................................................................32 Setting Up the iSCSI Initiator and iSCSI Target Ports....................................................................32 Configuring the HP 3PAR StoreServ Storage for iSCSI..................................................................32 Configuring Host iSCSI “no traffic” reattach.....................................................
10 Using Failover Clustering with Microsoft MPIO............................................71 11 Using Failover Clustering in a Virtualized Environment..................................72 12 Using the Veritas Cluster Server................................................................73 Symantec Storage Foundation..................................................................................................73 Installing the Veritas Cluster Server........................................................
1 Introduction This implementation guide provides the information needed to configure the HP 3PAR StoreServ Storage with Microsoft® Windows® Server 2012 or Microsoft® Windows® 2008.
NOTE: For a Software iSCSI-connected configuration, consult the Microsoft iSCSI Software Initiator Version 2.8 Users Guide, downloadable from the Microsoft website. In addition, HP 3PAR Host Explorer software is recommended for Windows Server 2008 servers connected to an HP 3PAR StoreServ Storage running HP 3PAR OS 3.1.x or OS 2.3.x. HP 3PAR Host Explorer software is not supported in the Windows Server 2012 or Windows Server 2012 R2 OS.
HP SPOCK WARNING! Failing to comply with the procedures outlined in “Upgrading to HP 3PAR OS 3.1.1 or 3.1.2” (page 8) or “Upgrading to HP 3PAR OS 3.1.3” (page 9) may result in the following issue: On the first Windows Server 2008, 2008 R2, 2012, or 2012 R2 reboot following an HP 3PAR StoreServ Storage array firmware upgrade (whether a major upgrade or an MU update within the same release family) the Windows server will mark the HP 3PAR LUNs as offline, but the data remains intact.
3. The Administrator will then be prompted to provide a Vendor String, which is used to distinguish between different vendor types. The script will only modify those devices whose Vendor String matches the one that has been entered into the prompt. Enter 3PAR in the prompt to allow the script to be executed on all HP 3PAR LUNs currently presented to the host as shown in the output below: Enter Vendor String: 3PAR 4.
NOTE: This implementation guide is not intended to reproduce or replace any third-party product documentation. For details about devices such as hosts, HBAs, fabric switches, and non-HP 3PAR software management tools, consult the appropriate third-party documentation.
2 Performing Preliminary HP 3PAR StoreServ Storage and Host Configuration Required If you are setting up a fabric along with your installation of the HP 3PAR StoreServ Storage, see “Setting Up and Zoning the Fabric” (page 19) before configuring or connecting the HP 3PAR StoreServ Storage and host. Configuring the HP 3PAR StoreServ Storage Host Persona and Ports (HP 3PAR OS 3.1.x or OS 2.3.x) For an HP 3PAR StoreServ Storage running HP 3PAR OS 3.1.x or OS 2.3.
1. 2. To determine whether a port has already been configured for a host port in fabric mode, issue showport -par on the HP 3PAR StoreServ Storage. If the port has not been configured, take the port offline before configuring it for connection to a host. To take the port offline, issue the HP 3PAR OS CLI command controlport offline . # controlport offline 0:4:1 3.
NOTE: With HP 3PAR OS 3.1.1, HP requires host persona 1 for Windows Server 2008 R2 (only) and host persona 2 for Windows Server 2008, 2012, or 2012 R2 hosts. However, host persona 6 is automatically assigned following an online HP 3PAR OS upgrade from OS version 2.2.x. After such an upgrade, you must change host persona 6 to host persona 2. With HP 3PAR OS 3.1.2, HP requires host persona 2 for Windows Server 2008, 2008 R2, 2012, or 2012 R2 hosts. Following an online upgrade from HP 3PAR OS 3.1.
The change to host persona 15 is an online procedure. Use the HP 3PAR CLI sethost command to change the persona and verify using the showhost command. # sethost -persona 15 windowshost # showhost Id Name Persona -WWN/iSCSI_Name- Port 0 windowshost WindowsServer 10000000C9606724 0:5:1 10000000C9606724 1:5:1 Changing from Host Persona 6 or Persona 1 to Host Persona 2 (Generic-ALUA) The change to host persona 2 is an offline procedure: 1. Stop all host I/O on the Windows Server 2008 or 2008 R2 host. 2.
2. To verify that each port has the correct persona and connection type, issue showport -par. For example: # showport -par 0:4:1 loop auto disable disable (1) g_ven, g_hba, g_os, 0, DC enabled 3. 4. Connect each Host HBA port to its associated HP 3PAR StoreServ Storage port. Each host HBA port's worldwide name (WWN) should be associated with the HP 3PAR StoreServ Storage port it is connected to. Issue showhost to verify that the host has connected to the HP 3PAR StoreServ Storage.
3. To configure the port to the host, issue the following command: # controlport persona 7 controlport vcn disable For example: # controlport persona 7 1:5:1 # controlport vcn disable 1:5:1 NOTE: The required port persona value for fabric is 7. For this port persona value, VCN must be disabled. 4. To bring the port online, issue controlport rst ; for example: # controlport rst 1:5:1 5. 6. Connect each host HBA port to the fabric.
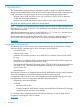
running HP 3PAR OS 2.2.x requires the Round Robin MPIO policy (the Veritas DMP I/O policy setting is "Round Robin"). This section explains: • Installing and configuring the native Microsoft MPIO for HP 3PAR StoreServ Storage • Setting the MPIO policy to round robin for HP 3PAR OS 2.2.x Configuring Microsoft MPIO for HP 3PAR Storage Required For the required prerequisite Microsoft hotfixes, see HP SPOCK at HP SPOCK.
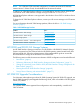
Figure 1 Adding MPIO Support for HP 3PAR Devices 7. Reboot as directed. NOTE: You can also use MPIO-cli to add 3PARdataVV. The command is: "mpclaim -r -I -d "3PARdataVV" Configuring MPIO for Round Robin A Windows Server 2008 server connected to an HP 3PAR StoreServ Storage running HP 3PAR OS 2.2.x or later requires that the multipath policy be set to Round Robin.
Figure 2 Specifying MPIO Policy 3. Click OK. Setting Up and Zoning the Fabric NOTE: This section does not apply when deploying HP Virtual Connect direct-attach FC storage for HP 3PAR StoreServ Storage systems, where the HP 3PAR StoreServ Storage ports are cabled directly to the uplink ports on the HP Virtual Connect FlexFabric 10 Gb/24-port Module for c-Class BladeSystem. Zoning is automatically configured based on the Virtual Connect SAN Fabric and server profile definitions.
zoning method with the HP 3PAR StoreServ Storage, the WWN zoning method is recommended because the zone survives the changes of switch ports when cables are moved around on a fabric. Required Employ fabric zoning, using the methods provided by the switch vendor, to create relationships between host HBA ports and storage server ports before connecting the host HBA ports or HP 3PAR StoreServ Storage ports to the fabric(s).
Speed AN AN Trunk Port ON ON Locked L_Port .. .. Locked G_Port .. .. Disabled E_Port .. .. where AN:AutoNegotiate, AN AN ON ON .. .. .. .. .. .. ..:OFF, AN AN AN AN ON ON ON ON .. .. .. .. .. .. .. .. .. .. .. .. ??:INVALID. The following fill-word modes are supported on a Brocade 8 G/s switch running FOS firmware 6.3.
◦ HP 3PAR HBA 4G: 1638 ◦ HP 3PAR HBA 8G: 3276 (HP 3PAR StoreServ 10000 and HP 3PAR StoreServ 7000 systems only) • The I/O queues are shared among the connected host HBA ports on a first-come, first-served basis. • When all queues are in use and a host HBA port tries to initiate I/O, it receives a target queue full response from the HP 3PAR StoreServ Storage port. This condition can result in erratic I/O performance on each host .
HP Support Center • the HP 3PAR Command Line Interface Administrator’s Manual, “Using Persistent Ports for Nondisruptive Online Software Upgrades” This document is available on the following HP SC website: HP Support Center Fibre Channel HP 3PAR OS Persistent Ports Setup and Connectivity Guidelines for FC Starting with HP 3PAR OS 3.1.2, the HP 3PAR OS Persistent Ports feature is supported for FC target ports. Starting with HP 3PAR OS 3.1.
3 Configuring the HP 3PAR StoreServ Storage for FCoE Setting Up the FCoE Switch, FCoE Initiator, and FCoE target ports FCoE target support has been added in HP 3PAR OS 3.1.3. Connect the Windows host FCoE initiator ports and the HP 3PAR StoreServ Storage FCoE target ports to the FCoE switches. NOTE: FCoE switch VLANs and routing setup and configuration is beyond the scope of this document. Consult your switch manufacturer's documentation for instructions of how to set up VLANs and routing. 1.
3. Check the current settings of the FCoE ports by issuing showport -fcoe. For example: # showport -fcoe N:S:P ENode_MAC_Address PFC_Mask 0:3:1 00-02-AC-07-01-21 0x08 0:3:2 00-02-AC-06-01-21 0x00 NOTE: If changing the config from iSCSI to FCoE, follow the steps below. 1. Issue the showport command. # showport 0:3:1 target ready - 000E1E05BEE6 iscsi iSCSI - - 0:3:2 target ready - 000E1E05BEE2 iscsi iSCSI - - - 2.
Creating the Host Definition The same steps for FC and FCoE hosts are followed when creating a Host Definition. For more information, see “Creating the Host Definition” (page 12). HP 3PAR OS Persistent Ports The HP 3PAR OS Persistent Ports (or virtual ports) feature minimizes I/O disruption during an HP 3PAR StoreServ Storage online upgrade or node-down event (online upgrade, node reboot, or cable pull test). Port shutdown or reset events do not trigger this feature.
4 Setting Up a Windows Server 2008 or 2012/HP 3PAR StoreServ Storage Configuration for Fibre Channel Checking the Host for Required Drivers Check the Microsoft website for required packages and hotfixes, including updated drivers. Also consult HP SPOCK for support drivers, and follow HBA vendor instructions: HP SPOCK You can also use the Emulex One Command or QLogic QConvergeConsole software to verify support for HBA driver versions.
Configuring the QLogic Support Driver After installing the driver, set HBA driver parameters, such as maximum number of LUNs per target and the Port Down Retry Count; consult the HBA driver documentation for details. To avoid overwhelming a target port and to ensure continuous I/O operations, observe the limitations on a target port; see “Target Port Limits and Specifications” (page 21).
Figure 3 Modifying the Path TOV Setting Installing Veritas DMP Multipathing on the Windows Server 2008 Host NOTE: Check with Veritas for supported compatibility: Symantec Otherwise, when Veritas tries to validate server components, you might see the following error message: Error message as (NOT a supported OS) In addition, the installation will fail. If the configuration includes Veritas Storage Foundation software, configure it for use with the HP 3PAR StoreServ Storage. Follow these steps: 1.
2. Select only 3PARDATA (V3PARAA) as your DMP device: see “Setting Up Veritas Storage for the HP 3PAR StoreServ Storage” (page 30). Figure 4 Setting Up Veritas Storage for the HP 3PAR StoreServ Storage For details about this software, refer to the Veritas Storage Foundation for Windows Administration Guide and the Veritas Storage Foundation & High Availability Solutions Installation & Upgrade Guide.
Figure 5 Veritas Enterprise Administrator Disabling the Write Cache Option for HP 3PAR LUNs 31
5 Setting Up a Windows Server 2012 or 2008/HP 3PAR StoreServ Storage Configuration with iSCSI Storage The HP 3PAR StoreServ Storage supports Windows Server 2012 and Windows Server 2008 software iSCSI initiators, which are described in this chapter. In addition, as of HP 3PAR OS 3.1.2.x, the HP 3PAR StoreServ 7000 Storage and HP 3PAR StoreServ 10000 Storage introduce support for hardware iSCSI with supported Converged Network Adapters (CNAs).
2. Check the current iSCSI port settings: issue showport -iscsi. The following example shows ports offline and unconfigured. 3. Issue controliscsiport addr to set the IP addresses and netmask addresses of the iSCSI target ports; for example: # controliscsiport addr 10.101.1.31 255.255.0.0 -f 0:3:1 # controliscsiport addr 10.101.1.131 255.255.0.0 -f 1:3:1 4. Verify the configuration; the following example shows two ports ready: 5. Issue createhost -iscsi [options] [...].
NOTE: hosts: For HP 3PAR OS 3.1.3 and later, HP requires host persona 15 for the following • Windows Server 2008 • Windows Server 2008 R2 • Windows Server 2012 • Windows Server 2012 R2 With HP 3PAR OS 3.1.2, HP requires host persona 2 for the following hosts: • Windows Server 2008 • Windows Server 2008 R2 • Windows Server 2012 • Windows Server 2012 R2 With HP 3PAR OS 3.1.
Using the Microsoft iSNS Server to Discover Registrations Use the Microsoft iSNS server to discover the iSCSI initiator and iSCSI targets on the dedicated network. When the iSCSI Initiator and iSCSI targets have registered with the iSNS server, they automatically start discovery of the registered devices by querying the iSNS client/server via TCP/IP. A database of these registrations is also maintained.
3. To add iSNS to the iSCSI initiator, follow these steps: 1. Click Start→Administrative Tools→iSCSI Initiator. 2. From the iSCSI Initiator Properties, select the Discovery tab, click the Add Server in iSNS Servers section, and enter iSNS-Server or iSNS-IP in the popup window's Add iSNS Server setting. Establishing a Connection with the iSCSI Initiator Software This section explains procedures for configuring Microsoft iSCSI Initiator software to establish a connection.
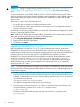
Figure 7 Starting the Windows Server 2008 iSCSI Initiator 2. From iSCSI Initiator Properties select Discovery tab.
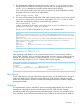
Figure 8 iSCSI Initiator Properties 3. 38 From the Discovery tab, Target portals area, click the Discover Portal... button, and in the Add Target Portal dialog box, enter the IP address of the portal you want to add, as shown in “Specifying a Target Portal IP Address” (page 39).
Figure 9 Specifying a Target Portal IP Address 4. Establish the connection: click Advanced; the Advanced Settings dialog box appears, as shown in “Configuring a Target Portal Connection” (page 40).
Figure 10 Configuring a Target Portal Connection In the Connect using section of this dialog box, do the following: • In the Local Adapter text field, select Microsoft iSCSI Initiator. • In the Initiator IP: text field, select the IP address of the NIC adapter or CNA that you want to use to connect to the iSCSI target. The CRC/Checksum is not required. For more information about setting the CHAP login, see “Configuring Host and Target CHAP” (page 44). 5.
Figure 11 Target Portal Discovery 6. Repeat these steps to connect additional target ports. Check the connections in the Discovery tab in the iSCSI Initiator Properties window. Establishing an iSCSI Session and Enabling Multipathing To establish an iSCSI logon session with an HP 3PAR StoreServ Storage iSCSI target port, follow these steps: 1. Click the Targets tab. Its window displays the names and status of the ports you have configured. 2.
Figure 12 Connecting to a Target 4. 42 Do not click OK; instead click the Advanced... button. The Advanced Settings window appears, as shown in “Specifying Connection Parameters” (page 43).
Figure 13 Specifying Connection Parameters 5. In this window, select the following settings in the Connect using section: NOTE: If you leave the default settings for these options, the Microsoft iSCSI Initiator will not work correctly, especially if you have multiple local adapters, source IP addresses, and target ports. 6.
8. Perform Step 4 through Step 7 to add the connection to the second target portal. The iSCSI Initiator Properties window shows the status of both; see “Verifying Connected Status for Both Targets ” (page 44).
2. Use showhost -chap to show that no CHAP secret is already set up. In the output, host CHAP appears as Initiator_CHAP_Name. # showhost -chap Id Name 3. -Initiator_CHAP_Name- -Target_CHAP_Name Issue sethost initchap to set initchap. For example: root@xnodee86a:~# sethost initchap MyChapSecret sqa-dl360g6-02-iscsi Calling "sethost initchap" for host sqa-dl360g6-02-iscsi. Continue? select q=quit y=yes n=no: y 4. Issue showhost -chap to verify that initchap has been created.
5. In the iSCSI Initiator Properties window, click the Targets tab. In the Targets tab, choose the targets where the CHAP applies. Click Connect from Connect to Target, then check the Enable multi-path and click the Advanced... button. From the Advanced Settings windows, follow these steps, as shown in “Setting Up the Target CHAP Secret for HP 3PAR StoreServ Storage initchap” (page 46): a. Set Microsoft iSCSI Initiator for Local adapter b. Select Initiator IP c. Select Target Portal IP d.
1. Issue showhost -chap to show that no CHAP secret is already set up. # showhost -chap Id Name 2. -Initiator_CHAP_Name- -Target_CHAP_Name- To set a CHAP secret for a target, issue sethost targetchap -chapname where is the secret. For example: # sethost targetchap -f target_secret0 sqa-dl380g5-08 3. To check results, issue showhost -chap; for example: # showhost -chap Id Name -Initiator_CHAP_Name- -Target_CHAP_Name 0 sqa-dl380g5-08 s055 4.
Setting Mutual (Bidirectional) CHAP To set mutual (bidirectional) CHAP, follow these steps: 1. Set the host CHAP secret following instructions in “Setting Host CHAP” (page 44). 2. Set the target CHAP secret following instructions in “Setting Target CHAP” (page 46). 3. Issue showhost -chap.
3. In the iSCSI Initiator Properties window, click the Targets tab where the CHAP applies; click the Connect button from the Connect to Target window and check the Enable multi-path option. Then click the Advanced... button and in the Advanced Settings window, follow these steps, as shown in “Removing CHAP” (page 49): a. Set Microsoft iSCSI Initiator for Local adapter. b. Select Initiator IP c. Select Target portal IP d. Clear the Enable CHAP log on check box.
NOTE: For the Hardware iSCSI with Emulex CNAs, the UCNA driver has an extended timeout value that is set to 90 seconds. This parameter determines the amount of time the UCNA driver waits for the target to become available after it has lost connection to the target during an I/O operation. If the iSCSI initiator loses a path to the target, this default value will delay any MPIO operations until this timeout has been reached, causing a significant delay in I/O operations.
3. 4. 5. Select a controller and press Enter. From the Controller Configuration screen, select Network Configuration and press Enter. In the Network Configuration screen, select Configure Static IP Address and press Enter. The screen for setting a static IP address displays. Figure 19 Setting a Static IP Address 6. After entering the IP address, subnet mask, and default gateway, click Save to return to the Controller Configuration menu.
Figure 20 Adding an iSCSI Target 8. After the information is filled in, click Ping to verify connectivity. 9. After a successful ping, click Save/Login. 10. After both controllers have been configured, issue the showiscsisession command to display the iSCSI sessions on the HP 3PAR StoreServ Storage and the host. If everything is configured correctly, the displays should appear as follows: root@jnodec103140:S99814# showiscsisession 0:2:1 10.101.0.100 21 15 1 iqn.1990-07.com.
Figure 21 One-Way CHAP The CHAP Configuration screen appears (see “CHAP Configuration for One-Way CHAP” (page 53)). Figure 22 CHAP Configuration for One-Way CHAP Fill in the Target CHAP Name (the initiator IQN name) and Target Secret, then click OK. • In the Authentication Method setting on the Add-Ping iSCSI Target screen (“One-Way CHAP” (page 53)), select Mutual CHAP. The CHAP Configuration screen appears (see “CHAP Configuration for Mutual CHAP” (page 54)).
Figure 23 CHAP Configuration for Mutual CHAP Fill in the Target CHAP Name (the initiator IQN name), the Target Secret, the Initiator CHAP Name (which is the DNS name of the storage), and an Initiator Secret, and then click OK. • If you want to remove CHAP authentication later on, in the Authentication Method setting on the Add-Ping iSCSI Target screen (“One-Way CHAP” (page 53)), select None. 12.
Target Port Limits and Specifications To avoid overwhelming a target port and ensure continuous I/O operations, observe the following limitations on a target port: • For information on the maximum number of supported host ports per HP 3PAR StoreServ Storage port, consult the HP 3PAR Support Matrix on the HP SPOCK website: HP SPOCK • I/O queue depth on each HP 3PAR StoreServ Storage HBA model, as follows: ◦ QLogic 1G: 512 ◦ QLogic 10G: 2048 (HP 3PAR StoreServ 10000 and HP 3PAR StoreServ 7000 systems o
iSCSI HP 3PAR OS Persistent Ports Setup and Connectivity Guidelines for iSCSI Starting with HP 3PAR OS 3.1.3, the HP 3PAR OS Persistent Ports feature is supported for iSCSI. The HP 3PAR OS Persistent Ports feature is enabled by default for HP 3PAR StoreServ Storage iSCSI ports during node-down events. HP 3PAR OS Persistent Ports Setup and Connectivity Guidelines for iSCSI Specific cabling setup and connectivity guidelines need to be followed for HP 3PAR OS Persistent Ports to function properly.
6 Setting Up a Windows Hyper-V Server/HP 3PAR StoreServ Storage Configuration This chapter pertains to a Windows server with an x64-based processor running an x64 version of Windows Server 2008, 2008 R2, 2012 and 2012 R2. For details on Hyper-V operation, consult its documentation on the Microsoft website. Required A hotfix, available from Microsoft, is required to support live storage migrations with Windows Server 2012 and 2012 R2 using Cluster Shared Volumes on HP 3PAR OS 3.1.2 and later.
7 Configuring the Windows Server 2012/2008 Host as an FCoE Initiator This chapter describes the procedures for setting up a Windows Fibre Channel over Ethernet (FCoE) configuration with an HP 3PAR StoreServ Storage. These instructions cover both end-to-end FCoE and FCoE initiator to FC target.
Procedure 1 Using system BIOS to configure FCoE 1. Enter the setup menu. The combination of keys to press to enter setup may be different depending on the host being configured. The example below is for an HP ProLiant: Figure 24 Setup menu for Configuring FCoE 2. In the System Options pane, select NIC Personality Options. Figure 25 NIC Personality Options 3. In the PCI Slot 2 Pane, select FCoE for both Port 1 and Port 2.
Figure 26 Configuring the Port Personality 4. PCI Slot 2 Port 1 and Port 2 now display FCoE. Figure 27 Port 1 and Port 2 Configured for FCoE 5. Save the changes and exit the BIOS. Configuring an HP 3PAR StoreServ Storage Port for a FCoE Host Connection When setting up FCoE initiator to FC target, there is nothing unique that needs to be configured on the HP 3PAR StoreServ Storage.
NOTE: For specific configurations that support FCoE CNAs and forwarder switches, refer to the appropriate HP 3PAR OS release version on the HP SPOCK website: HP SPOCK Configuring Initiator FCoE to FC Target If an FCoE to FC configuration is being set up, the following figure summarizes the general steps you should follow to configure a CNA and FCoE Forwarder Switch.
Configuring Initiator FCoE to Target FCoE StoreServ ports must be configured for FCoE. For notes on how to configure FCoE ports on the StoreServ, see “Configuring the HP 3PAR StoreServ Storage for FCoE” (page 24). Figure 29 Initiator FCoE to Target FCoE 1. 2. 3. 4. 5. Install the CNA card in the server just like any other PCIe card - refer to the server vendor documentation.
8 Allocating Storage for the Windows Server 2012/2008 Host WARNING! When using HP 3PAR OS 3.1.1 MU2 (and only MU2) with Windows Server 2012 and 2012 R2, for both NTFS and ReFS filesystem types, run the following command from a PowerShell or CMD window before you run a Perform a quick format action on a TPVV in the Disk Management utility. NOTE: 2012. These steps are not required with later versions of HP 3PAR OS with Windows Server Run the following command: 1.
Using the HP 3PAR OS CLI: To create a fully-provisioned or thinly-provisioned virtual volume, follow these steps: 1. Issue the following HP 3PAR OS CLI command: createvv [options] [.] [g|G|t|T] Here is an example: # createvv -cnt 10 demo 5g 2. Issue showvv to check the volumes created: # showvv --Rsvd(MB)--- -(MB)Id Name 0 831 832 833 834 835 836 837 838 839 840 admin demo.0 demo.1 demo.2 demo.3 demo.4 demo.5 demo.6 demo.7 demo.8 demo.
• The maximum number of usable LUNs per host port is 255. Although the HP 3PAR StoreServ Storage can export LUNs 0 to 65535, only LUNs 0 to 254 should be used for Windows configurations. • For an HP 3PAR OS earlier than version 2.3.1, the maximum LUN size that can be presented to a Windows Server is 2 TB; for version 2.3.1 or later, the maximum LUN size that can be presented to a Windows Server is 16 TB.
NOTE: If dynamic disks are used, data corruption can occur if duplicate copies of the same volume are ever concurrently exposed to a server. If you need duplicate copies, use the HP 3PAR StoreServ Storage Virtual Copy feature, or break a Windows mirrored set of disks created on two discrete HP 3PAR StoreServ Storage volumes.
Removing a Storage Volume from the Host To remove a volume from the Windows Server 2012/2008 host, follow standard Microsoft administrative procedures for removing a volume, and follow the HP 3PAR StoreServ Storage standard procedure to remove a volume. NOTE: Removing a disk from a Windows Server 2012/2008 host does not erase the data on the disk.
9 Booting from the HP 3PAR StoreServ Storage For details about connecting the HP 3PAR StoreServ Storage to the host, see “Performing Preliminary HP 3PAR StoreServ Storage and Host Configuration” (page 11). Configuring for iSCSI SAN Boot Hardware iSCSI SAN Boot is support on Windows Server 2012, Windows Server 2012 R2, and Windows Server 2008 R2 SP1 with HP 3PAR StoreServ 7000 Storage and HP 3PAR StoreServ 10000 Storage.
3. • Select Auto Scan Setting; set the parameter to First LUN 0 Device; press Esc to return to the previous menu. • Select Topology. ◦ Select Fabric Point to Point for fabric configurations. ◦ Select FC-AL for direct connect configurations. Press Esc to return to the previous menu if you need to set up other adapters. When you are finished, press x to exit and reboot. Configuring for an HP 3PAR StoreServ Storage Boot: QLogic HBA Use the QLogic HBA Fast!UTIL utility to configure the HBA.
Connecting the HP 3PAR StoreServ Storage to the Host: Fibre Channel For Fibre Channel HBAs in a Windows Server 2012/2008 host, you do not need to set any parameters for SAN boot other than those set in “Installing and Configuring an Emulex Fibre Channel HBA” (page 27) and “Installing and Configuring a QLogic Fibre Channel HBA” (page 27). Assigning a LUN as the Boot Volume The Windows Server 2012/2008 server must use a LUN as the boot volume for a Fibre Channel SAN boot.
10 Using Failover Clustering with Microsoft MPIO The HP 3PAR StoreServ Storage supports failover clustering. Set up the cluster according to Microsoft recommendations.
11 Using Failover Clustering in a Virtualized Environment The HP 3PAR StoreServ Storage supports failover clustering on some VMware ESX/ESXi virtualized environments as guest OS clustering. For the purposes of setup and configuration, such an environment is to be considered a VMware ESX configuration. Setup of the host ESX/ESXi servers should be in accordance with the HP 3PAR VMware ESX Implementation Guide.
12 Using the Veritas Cluster Server Symantec Storage Foundation Symantec Storage Foundation (SF) 5.1 SP1, SP2 and SF 6.0.x have a space-reclamation feature to reclaim space from a thinly-provisioned virtual volume (TPVV). When working with a failover cluster and VxDMP, this feature is not supported, as a failover cluster requires basic disks, and the space reclamation feature is available only on dynamic disks (the Veritas DMP I/O policy setting is "Round Robin").
5. By default, the 3PAR Support for SCSI 3 appears as 0x00000000 (0) in the Data column. To confirm, click Start→Run→regedit→Computer→HKEY_LOCAL_MACHINE→SYSTEM→CurrentControlSet→Services→v3paraa→Parameters. See Figure 33 (page 74) Figure 33 V3PARAA Parameters 6. To enable HP 3PAR SCSI-3 support, click the EnableSupportSCSI3V3paraa script (Figure 34 (page 74)), then reboot the server after the script runs. Figure 34 Enabling Script Support 7.
8. Open the Veritas Enterprise Administrator (VEA) to verify the new settings (Figure 35 (page 75)).
13 Using Microsoft Failover Cluster with Veritas DMP The HP 3PAR StoreServ Storage supports Microsoft failover clustering with Veritas DMP on Windows Server 2008, but not on Windows Server 2012 or Windows Server 2012 R2. Follow Microsoft recommendations when setting up the cluster, as well as Symantec recommendations when setting up DMP to support Microsoft clustering (the Veritas DMP I/O policy setting is "Round Robin").
Installing the Veritas DMP When installing Veritas DMP, be sure that 3PARDATA (VA3PARAA) is checked. See “Setting Up Veritas Storage for the HP 3PAR Storage Server” (page 78). WARNING! Veritas Storage Foundation 5.1 and Veritas Storage Foundation HA 5.1 require the use of 8-byte long WWNs on every virtual volume exported from an HP 3PAR StoreServ Storage array to the Windows Server host.
Figure 36 Setting Up Veritas Storage for the HP 3PAR Storage Server 78 Using Microsoft Failover Cluster with Veritas DMP
14 Support and Other Resources Contacting HP For worldwide technical support information, see the HP support website: http://www.hp.
For information about: See: Migrating data from one HP 3PAR storage system to another HP 3PAR-to-3PAR Storage Peer Motion Guide 80 Configuring the Secure Service Custodian server in order to monitor and control HP 3PAR storage systems HP 3PAR Secure Service Custodian Configuration Utility Reference Using the CLI to configure and manage HP 3PAR Remote Copy HP 3PAR Remote Copy Software User’s Guide Updating HP 3PAR operating systems HP 3PAR Upgrade Pre-Planning Guide Identifying storage system compo
For information about: See: Planning for HP 3PAR storage system setup Hardware specifications, installation considerations, power requirements, networking options, and cabling information for HP 3PAR storage systems HP 3PAR 7200, 7400, and 7450 storage systems HP 3PAR StoreServ 7000 Storage Site Planning Manual HP 3PAR StoreServ 7450 Storage Site Planning Manual HP 3PAR 10000 storage systems HP 3PAR StoreServ 10000 Storage Physical Planning Manual HP 3PAR StoreServ 10000 Storage Third-Party Rack Physic
Typographic conventions Table 2 Document conventions Convention Element Bold text • Keys that you press • Text you typed into a GUI element, such as a text box • GUI elements that you click or select, such as menu items, buttons, and so on Monospace text • File and directory names • System output • Code • Commands, their arguments, and argument values • Code variables • Command variables Bold monospace text • Commands you enter into a command line interface • System
15 Documentation feedback HP is committed to providing documentation that meets your needs. To help us improve the documentation, send any errors, suggestions, or comments to Documentation Feedback (docsfeedback@hp.com). Include the document title and part number, version number, or the URL when submitting your feedback.