
HP 3PAR Windows 2012 and Windows Server 2008 Implementation Guide


Installing the Veritas DMP
When installing Veritas DMP, be sure that 3PARDATA (VA3PARAA) is checked. See “Setting Up
Veritas Storage for the HP 3PAR Storage Server” (page 78).
WARNING! Veritas Storage Foundation 5.1 and Veritas Storage Foundation HA 5.1 require
the use of 8-byte long WWNs on every virtual volume exported from an HP 3PAR StoreServ Storage
array to the Windows Server host. Using 16-byte-long WWNs instead with the above Veritas
Storage Foundation version may prevent the Veritas Storage Foundation software from recognizing
3PAR disks properly.
To verify the length of the WWN currently assigned to a virtual volume, issue the following
command:
# showvv -d
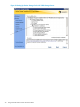
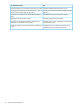
The below example illustrates how both types of WWNs appear in the above command's output.
Please note that testvv1 has a 16-byte WWN assigned against it whereas testvv2has an
8-byte long WWN.
# showvv -d
Id Name Rd Mstr Prnt Roch Rwch PPrnt PBlkRemain ------------ VV_WWN-------------
-----CreationTime------
1 .srdata RW 1/0/- --- --- --- --- -- 60002AC00000000000000001000185E4
2012-08-17 09:44:48 PDT
0 admin RW 1/0/- --- --- --- --- -- 60002AC00000000000000000000185E4
2012-08-17 09:41:04 PDT
998 testvv1 RW 1/0/- --- --- --- --- -- 60002AC00000000000000382000185E4
2013-06-03 01:23:13 PDT
999 testvv2 RW 1/0/- --- --- --- --- -- 50002AC003E885E4
2013-06-03 01:22:20 PDT
The WWN of a virtual volume cannot be changed while it's actively exported to hence the change
must be performed before the virtual volume is exported or after all its associated VLUNs were
removed. To change the WWN of a virtual volume, issue the following command:
# setvv -wwn <new wwn> <vv name>
For example:
# setvv -wwn 50002AC003D885E4 testvv1
The above command assumes that 50002AC003D885E4 is the newly assigned WWN and testvv
is the name of the virtual volume for which the WWN is being changed.
To verify that the WWN change has taken place, issue showvv -d and examine the output.
Installing the Veritas DMP 77