
HP 3PAR VMware ESX Implementation Guide
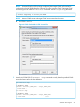

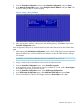
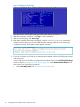
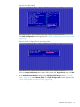
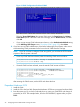
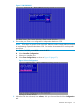
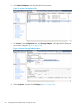
Table Of Contents
- HP 3PAR VMware ESX Implementation Guide
- Contents
- 1 Introduction
- 2 Configuring the HP 3PAR StoreServ Storage for Fibre Channel
- 3 Configuring the HP 3PAR StoreServ Storage for iSCSI
- 4 Configuring the HP 3PAR StoreServ Storage for FCoE
- 5 Configuring the Host for a Fibre Channel Connection
- Installing the HBA and Drivers
- Installing Virtual Machine Guest Operating System
- Multipath Failover Considerations and I/O Load Balancing
- Performance Considerations for Multiple Host Configurations
- ESX/ESXi 4.1, ESXi 5.x Additional Feature Considerations
- Storage I/O Control
- vStorage APIs for Array Integration (VAAI)
- HP 3PAR VAAI Plugin 1.1.1 for ESX 4.1
- HP 3PAR VAAI Plugin 2.2.0 for ESXi 5.x
- UNMAP (Space Reclaim) Storage Hardware Support for ESXi 5.x
- Out-of-Space Condition for ESX 4.1 and ESXi 5.x
- Additional New Primitives Support on ESXi 5.x
- VAAI and New Feature Support Table
- VAAI Plugin Verification
- 6 Configuring the Host as an FCoE Initiator Connecting to a FC target or an FCoE Target
- 7 Configuring the Host for an iSCSI Connection
- Setting Up the Switch, iSCSI Initiator, and iSCSI target ports
- Installing iSCSI on VMware ESX
- Installing Virtual Machine Guest Operating System
- Creating a VMkernel Port
- Configuring a Service Console Connection for the iSCSI Storage
- Configuring the VMware SW iSCSI Initiator
- iSCSI Failover Considerations and Multipath Load Balancing
- Performance Considerations for Multiple Host Configurations
- ESX/ESXi Additional Feature Considerations
- 8 Allocating Storage for Access by the ESX Host
- 9 Booting the VMware ESX Host from the HP 3PAR StoreServ Storage
- 10 Support and Other Resources
- 11 Documentation feedback
- A Appendix
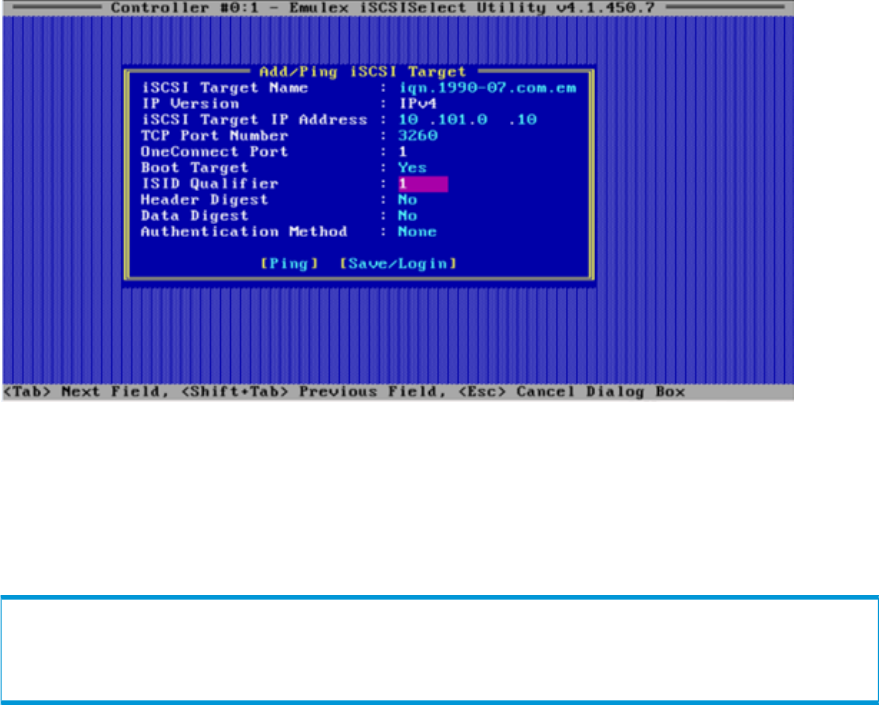
Figure 7 Adding an iSCSI Target
8. After the information is filled in, click Ping to verify connectivity.
9. After a successful ping, click Save/Login.
10. After both controllers have been configured, issue the showiscsisession command to
display the iSCSI sessions on the HP 3PAR StoreServ Storage and the host. If everything is
configured correctly, the displays should appear as follows:
root@jnodec103140:S99814# showiscsisession
0:2:1 10.101.0.100 21 15 1 iqn.1990-07.com.emulex:a0-b3-cc-1c-94-e1 2012-09-24 09:57:58 PDT
1:2:1 10.101.1.100 121 15 1 iqn.1990-07.com.emulex:a0-b3-cc-1c-94-e1 2012-09-24 09:57:58 PDT
root@jnodec103140:S99814# showhost -d Esx50Sys1
1 Esx50Sys1 VMware iqn.1990-07.com.emulex:a0-b3-cc-1c-94-e1 0:2:1 10.101.0.100
1 Esx509Sys1 VMware iqn.1990-07.com.emulex:a0-b3-cc-1c-94-e1 1:2:1 10.101.1.100
11. If you do not want to use CHAP as an authentication method, exit the CN1100E setup screens
and reboot now.
If you would like to use CHAP as an authentication method, return to the Add/Ping iSCSI Target
screen as shown in “Adding an iSCSI Target” (page 24), select Authentication Method, and
then choose one of the following options:
• Select One-Way CHAP (see “One-Way CHAP” (page 25)).
24 Configuring the HP 3PAR StoreServ Storage for iSCSI