
HP 3PAR VMware ESX Implementation Guide
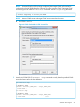

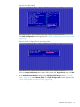
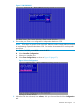
Table Of Contents
- HP 3PAR VMware ESX Implementation Guide
- Contents
- 1 Introduction
- 2 Configuring the HP 3PAR StoreServ Storage for Fibre Channel
- 3 Configuring the HP 3PAR StoreServ Storage for iSCSI
- 4 Configuring the HP 3PAR StoreServ Storage for FCoE
- 5 Configuring the Host for a Fibre Channel Connection
- Installing the HBA and Drivers
- Installing Virtual Machine Guest Operating System
- Multipath Failover Considerations and I/O Load Balancing
- Performance Considerations for Multiple Host Configurations
- ESX/ESXi 4.1, ESXi 5.x Additional Feature Considerations
- Storage I/O Control
- vStorage APIs for Array Integration (VAAI)
- HP 3PAR VAAI Plugin 1.1.1 for ESX 4.1
- HP 3PAR VAAI Plugin 2.2.0 for ESXi 5.x
- UNMAP (Space Reclaim) Storage Hardware Support for ESXi 5.x
- Out-of-Space Condition for ESX 4.1 and ESXi 5.x
- Additional New Primitives Support on ESXi 5.x
- VAAI and New Feature Support Table
- VAAI Plugin Verification
- 6 Configuring the Host as an FCoE Initiator Connecting to a FC target or an FCoE Target
- 7 Configuring the Host for an iSCSI Connection
- Setting Up the Switch, iSCSI Initiator, and iSCSI target ports
- Installing iSCSI on VMware ESX
- Installing Virtual Machine Guest Operating System
- Creating a VMkernel Port
- Configuring a Service Console Connection for the iSCSI Storage
- Configuring the VMware SW iSCSI Initiator
- iSCSI Failover Considerations and Multipath Load Balancing
- Performance Considerations for Multiple Host Configurations
- ESX/ESXi Additional Feature Considerations
- 8 Allocating Storage for Access by the ESX Host
- 9 Booting the VMware ESX Host from the HP 3PAR StoreServ Storage
- 10 Support and Other Resources
- 11 Documentation feedback
- A Appendix
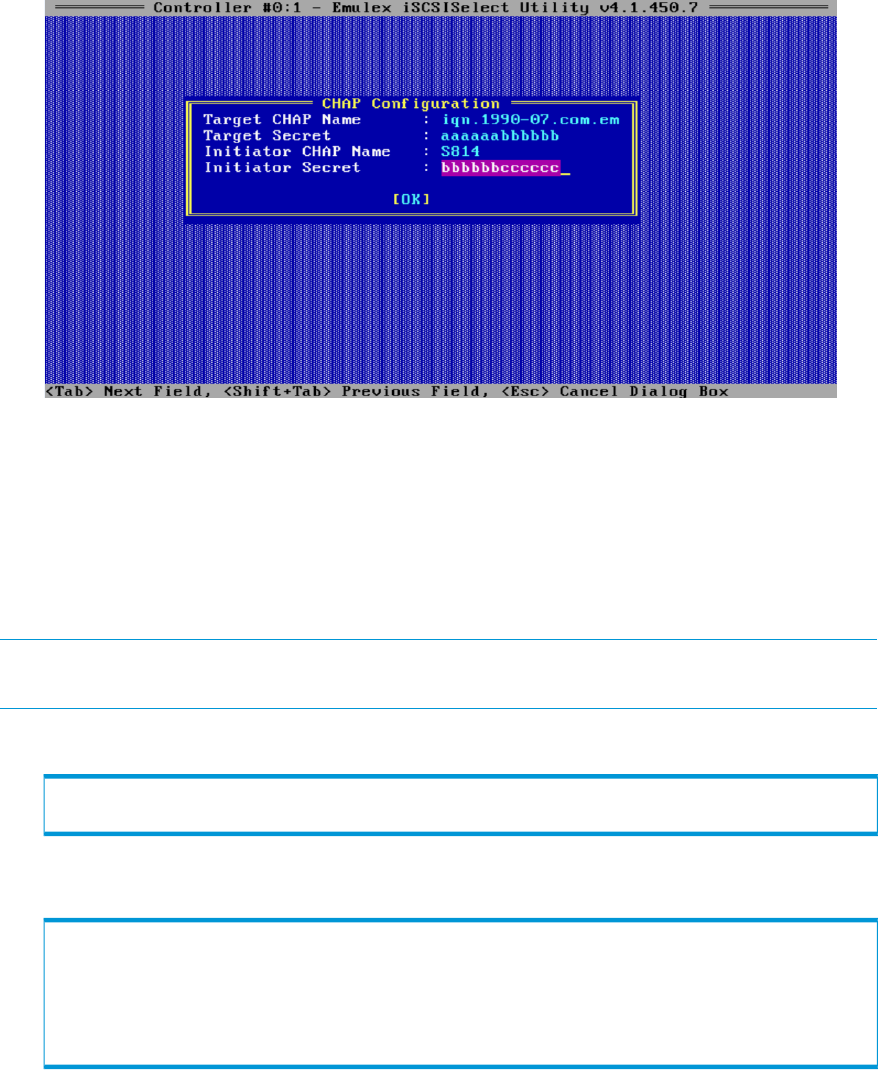
Figure 10 CHAP Configuration for Mutual CHAP
Fill in the Target CHAP Name (the initiator IQN name), the Target Secret, the Initiator
CHAP Name (which is the DNS name of the storage), and an Initiator Secret, and then
click OK.
• If you want to remove CHAP authentication later on, in the Authentication Method setting
on the Add-Ping iSCSI Target screen (“One-Way CHAP” (page 25)), select None.
12. If you have set up CHAP authentication, then before rebooting the host system, make sure to
set the matching CHAP parameters for the host in the HP 3PAR StoreServ Storage.
NOTE: If you do not want to configure CHAP using BIOS, you can alter the iSCSI initiator
properties after the system is booted.
• If one-way CHAP has been selected, enter the matching CHAP secret as follows:
root@jnodec103140:S99814# sethost initchap -f aaaaaabbbbbb EsxHost1
root@jnodec103140:S99814# showhost -chap
• If mutual CHAP has been selected, enter the mutual CHAP secrets as follows:
root@jnodec103140:S99814# sethost initchap -f aaaaaabbbbbb EsxHost1
root@jnodec103140:S99814# sethost targetchap -f bbbbbbcccccc EsxHost1
root@jnodec103140:S99814#
root@jnodec103140:S99814# showhost -chap
Id Name -Initiator_CHAP_Name- -Target_CHAP_Name-
1 EsxHost1 EsxHost1 S814
root@jnodec103140:S99814#
After entering the CHAP secret, exit the BIOS and reboot the host.
Dependent Hardware iSCSI
1. Install the CNA.
2. Install the OS to the local disk (Dependent Hardware iSCSI does not support boot-from-SAN).
3. Boot the system and, if you have not already done so, enter your CNA BIOS and change its
personality to iSCSI. The example below, from the CN1100E BIOS, appears after you press
Ctrl P:
26 Configuring the HP 3PAR StoreServ Storage for iSCSI