HP 3PAR Management Plug-in and Recovery Manager 2.5.0 Software for VMware® vSphere™ Client User Guide Abstract This guide is intended for VMware® and database administrators responsible for backing up databases and provides information how to install, configure, and use HP 3PAR Management Plug-in and Recovery Manager 2.5.0 Software for VMware® vSphere™.
© Copyright 2014 Hewlett-Packard Development Company, L.P. The information contained herein is subject to change without notice. The only warranties for HP products and services are set forth in the express warranty statements accompanying such products and services. Nothing herein should be construed as constituting an additional warranty. HP shall not be liable for technical or editorial errors or omissions contained herein. Acknowledgments Microsoft®, Windows®, Windows® XP, and Windows NT® are U.S.
Contents 1 Overview..................................................................................................6 HP 3PAR Management Plug-in and Recovery Manager Software for VMware vSphere.......................6 HP 3PAR Management Plug-in for VMware vCenter.......................................................................7 Virtual Volume Details..........................................................................................................
Installing and removing HP 3PAR Management plug-in and Recovery Manager Software for VMware vSphere.................................................................................................................................33 Upgrading from a previous version...........................................................................................33 Using secure service connections.........................................................................................
Unmounting from Virtual Copy table.....................................................................................91 Unmounting from Virtual Volume Mapping table....................................................................91 Deleting Remote Virtual Copies................................................................................................91 Deleting Local Virtual Copies...................................................................................................
1 Overview HP Insight Control for VMware vCenter Server (Insight Control for vCenter) is a single integrated application that you use to manage ProLiant servers and/or HP Storage Systems. The application consists of four modules. The core module is required along with at least one of the three optional components. • Server Module for vCenter—Adds HP Proliant and HP BladeSystem hardware monitoring into the vCenter Server console.
Recovery Manager Software for VMware vSphere provides its own web servers. For more information on Web Client, see the HP 3PAR Management Plug-in and Recovery Manager Software for VMware vSphere Web Client User Guide. HP 3PAR Management Plug-in and Recovery Manager Software for VMware vSphere is a suite of services designed to work with the vCenter Server.
See “Logging on and working with Virtual Volumes” (page 47) for additional information about viewing virtual volume details. LUN Provisioning for Recovery Manager for VMware This feature enables you to create virtual volumes based upon a storage system template or an existing Datastore and export the virtual volumes to the vCenter managed ESXi hosts.
RMVMwareCLI The RMVMware CLI module is the command line interface for Recovery Manager for VMware vSphere. NOTE: The recommended method for creating Virtual Copies is through the Graphical User Interface (see “Working with Virtual Copies” (page 60) for more details).
Example: The following command will add a new entry for the HP 3PAR StoreServ Storage System s124: C:\> RMVMware InServRegister -inserv s124 -inservuid root -inservpwd pass2word RMVMware vCenterRegister command The RMVMware vCenterRegister command manages the vCenter credentials.
RMVMware Create command The RMVMware create command creates a Virtual Copy on a Datastore or a Virtual Machine. The syntax for the RMVMware create command is as follows: RMVMware Create <[-ds "Datastore" [-consistency [-vmlist "VirtualMachine1, VirtualMachine2, ...
• -vcfile The VMware credential stores file location. The –vcfile option is optional when –vcpwd is specified. For example, C:\Users\[User Name]\AppData\Roaming\VMware\ credstore\myCred.xml. NOTE: For VMware credential store file creation, refer to the vCenterRegister option. NOTE: To run the RMVMware CLI command with the vCenter Credential Store File, you must be added as a user to have permission to access the credential file.
As an alternative to entering in all the command line options when creating a Virtual Copy of a Virtual Machine or a Datastore, you can reference the server password or credentials from a given file using the following command: C:\ RMVMware create -ds "My Datastore" -vcserver vc365 -vcuid admin -vcfile c:\myCred.xml -inserv s124 -inservuid rmvuser For information about creating a credential file in xml format, see “RMVMware vCenterRegister command” (page 10).
RMVMware Createrc command The RMVMware createrc command creates a remote Virtual Copy. NOTE: When using the RMVMware createrc command, you must use the identical name of the storage system registered in the HP 3PAR StoreServ Storage system credential database.
• -vcpwd VMware vCenter Server user password, optional when -vcfile is specified. • -vcfile Optional VMware credential store file location. • -remotehost Remote host where Recovery Manager for VMware vSphere is installed to take remote snapshot on. • -inserv Local HP 3PAR StoreServ Storage system name. • -inservuid Local HP 3PAR StoreServ Storage system user name, required when registered. • -inservpwd Local HP 3PAR StoreServ Storage system password, optional if -inserv is registered.
VMware vCenter Server Login for HP 3PAR Virtual Volume and Virtual Copy management HP 3PAR Management Plug-in and Recovery Manager Software for VMware vSphere creates a new vCenter Server role named HP 3PAR Recovery Manager Administrator upon plug-in registration. The following restrictions apply for the HP 3PAR Recovery Manager Administrator role: • All non-administrator users must be in this role. • If an administrator logs in as Administrator or DOMAIN\Administrator, the permission check is skipped.
retrieves the saved certificate, and sends a connection request to HP 3PAR StoreServ with the certificate details. If the HP 3PAR StoreServ certificate is the same as the one specified in the request, and if there are no other connection issues, then a connection is successfully established. However, if there are no saved certificates in the RMV database, then the RMV web service sends a connect request to HP 3PAR StoreServ without the server certificate.
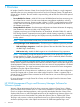
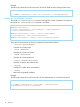
Figure 2 HP 3PAR Management Plug-in and Recovery Manager Software for VMware vSphere interface HP 3PAR Views in the vSphere Client The HP 3PAR Management Plug-in and the Recovery Manager Software for VMware vSphere adds its own plug-in views in the vSphere Client. Each plug-in view is associated with a VMware entity such as a VM or Datastore (Virtual Volume). The details of plug-in views are defined in an XML file URL, which is registered with the vCenter Server during plug-in registration.
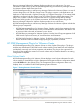
1. Under Inventory from the vSphere Client home page, click Datastores.
All Datastores residing in the data center are displayed in the navigation tree. Figure 4 Viewing Datastores in the navigation tree 2. Select a Datastore and then click the HP 3PAR tab. Information about the virtual volumes associated with the Datastore are displayed.
1. Under Inventory from the vSphere Client home page, click VMs and Templates. Figure 5 Selecting VMs and Templates All VMs in the data center are displayed in the navigation tree. Figure 6 Viewing VMs in the navigation tree 2. Select a VM and then click the HP 3PAR tab. Information about the virtual volumes associated with the VM is displayed.
ESXi host view To access the ESXi host view: 1. Under Inventory from the vSphere Client home page, click Hosts and Clusters. Figure 7 Selecting Hosts and Clusters All hosts in the data center are displayed in the navigation tree. Figure 8 Viewing Hosts in the navigation tree 2. Select a host and then click the HP 3PAR tab. Information about the virtual volumes associated with the host is displayed.
1. Under Inventory from the vSphere Client home page, click Hosts and Clusters (see Figure 7 (page 22)). All clusters in the data center are displayed in the navigation tree. Figure 9 Viewing clusters in the navigation tree 2. Select a cluster and then click the HP 3PAR tab. Information about the virtual volumes associated with the cluster is displayed. Datacenter view To access the datacenter view: 1.
Virtual Copy management NOTE: HP 3PAR Recovery Manager for VMware vSphere is not functional without the HP 3PAR Recovery Manager for VMware vSphere license. Additionally, the HP 3PAR Virtual Copy license is required for Virtual Copy operation and the HP 3PAR Virtual Lock license is required for using the volume retention policy. RMV will check for an existing HP 3PAR Virtual Lock license on the storage system when a Virtual Copy is created with retention is specified.
In Recovery Manager for VMware vSphere, the Virtual Copy policy contains the following attributes: • Maximum Number of Virtual Copy Sets - You can choose how many Virtual Copies to be retained. When the number of Virtual Copies is at the maximum limit, the oldest Virtual Copy is deleted when a new Virtual Copy is created. • Enable expirable Virtual Copies - Allows you to specify that created Virtual Copies are removed according to a specified schedule and are not affected by the maximum count.
NOTE: A VM with a Physical RDM mapped to it is not supported for taking Application Consistent Virtual Copy. Instead, you can take Crash Consistent Virtual Copy. However, the Virtual Copy is not taken for the Physical RDM. A VM Virtual Copy has the following restrictions: • Virtual disks used by a VM must be from the HP 3PAR Datastore, and the latter must satisfy the conditions mentioned in “Datastore Virtual Copies” (page 25).
Figure 11 Virtual Copy browser A Virtual Copy of a VM or Datastore has the following properties: • The Virtual Copy creation time. • The HP 3PAR StoreServ Storage system where Virtual Copy volumes exist. • The Virtual Copy set name (optional). • The number of Virtual Copy volumes in the Virtual Copy. • A list of pairs (source volume, Virtual Copy volume). Each pair can have a list of virtual disks and/or VM names. All Virtual Copies are organized in the browser based on their creation times.
Scheduling tool You can automatically have Virtual Copies created according to a specified schedule by using the scheduling tool (see “Scheduling Virtual Copies” (page 68) for details). You have the option of scheduling when (hourly, daily, weekly, monthly) the Virtual Copy is to be created and then specifying how often the task is to be performed. You can also schedule a Virtual Copy creation task to occur on a one-time basis.
2 Installing and removing HP 3PAR Management Plug-in and Recovery Manager Software for VMware vSphere This chapter describes how to install, register, remove, and upgrade HP 3PAR Management Plug-in and Recovery Manager Software for VMware vSphere. Supported platforms For information about supported platforms, refer to the HP 3PAR OS Configuration Matrix. For information about supported hardware and software platforms, refer to http://www.hp.
2. 3. 4. 5. Ensure that the RMV plug-in is registered with all vCenters associated with the Linked Mode configuration. Log on to vSphere client using Active Domain user name. Log on to an HP 3PAR StoreServ Storage system. a. Navigate to the home page, and click HP 3PAR Management Plug-in and Recovery Manager Software for VMware vSphere. The StoreServ home page for the vCenter appears. b. Use a valid user name and password to log on to the required StoreServ.
install the SMS certificate extracted from the vCenter server onto the VASA installed host. This process is required for every vCenter Server you intend to register with the VASA provider. The same process is also required if the SMS certificate has a new certificate. The SMS extraction and installation process is provided in the following section. Extracting the SMS Certificate Create the temp folder in the C:\ drive, before you perform the following procedure: For vCenter installed on Windows system: 1.
Installing the SMS certificate You need to install the SMS certificate on the VASA Provider host's Local Computer/Trusted Root Certification Authorities store. There are two methods to install SMS certificate: • Using the VASA Provider web service (only applicable when the VASA web service is running). • Manually registering the certificate through the certification store.
2. 3. 4. Navigate to HKEY_LOCAL_MACHINE\SYSTEM\CurrentControlSet\Control\SecurityProviders\SCHANNEL. Click Edit→New→DWORD (32-bit) Value. Enter SendTrustedIssuerList in Value name, and enter 1 (numeric value one) in Value data. Close the Registry Editor. To manually install the SMS certificate on Windows 2012/2012 R2: 1. Copy the certificate to the VASA installed host. 2. Right click the certificate and select Install Certificate. 3. Follow the instructions on the Certificate Import Wizard. 4.
You can upgrade to version 2.5 only from the versions 2.4.0 and 2.4.0 Patch 01. To upgrade, follow the instructions of the Installer. For more information on installation, see the HP Insight Control for VMware vCenter Server Installation Guide. CAUTION: Auto login credentials created in RMV 2.4 for vSphere Client should be removed manually using Admin Tool before you do an upgrade operation. When upgrading from a previous version, you are prompted with the message The installer has detected that RMV 2.
CAUTION: RMV 2.5 has an additional security enhancement that requires StoreServ certificate to be accepted to establish a successful connection. You are required to validate the StoreServ credentials registered through Admin Tool to accept the certificate; otherwise connections to the StoreServ will fail. NOTE: The Port number used by RMV will change as part of the upgrade and integration with HP Insight Control for VMware vCenter Server installation.
3 Modifying configuration settings using HP 3PAR RMV Admin Tool This chapter describes the default HP 3PAR Management Plug-in and Recovery Manager Software for VMware vSphere configuration, as well as how to edit configuration settings using the HP 3PAR RMV Admin Tool. Overview HP 3PAR Management Plug-in and Recovery Manager Software for VMware vSphere is provided with default configuration settings that are compatible with most environments.
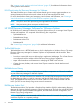
Figure 12 vCenter Plug-in tab Details concerning the fields of the vCenter Plug-in tab are provided in the following sections. vCenter Plug-in configuration The vCenter Plug-in configuration is used to view the host name and VM service port. You can configure the debug settings here.
1. Click Edit. The Edit Configuration dialog box appears. Figure 13 vCenter Plug-in configuration NOTE: You can change the Debug level. However, to change the Recovery Manager server name or the Recovery Manager service TCP port, you must run the HP Insight Control for VMware vCenter Server installation again, to modify the settings. The Configuration tab fields are shown in Table 1 (page 38).
Table 1 Configuration tab fields (continued) Group Field Description The SSL certificate for HP 3PAR Management Plug-in and Recovery Manager Software for VMware vSphere (provided by HP) must be installed. Debug 2. 3. Binded to thumbprint Displays the current thumbprint binded to the TCP port. Debug level Specifies the level of verbosity of the log file. The default value is Low. Log folder The trace file name.
The fields available from the Plug-in Registration tab are shown in Table 2 (page 40). Table 2 Plug-in registration fields Field Description vCenter Server The name of the vCenter Server. Recovery Manager Server Name The name of the Recovery Manager server. Service TCP Port The TCP port number. Type vSphere Client or VMware Web Client NOTE: Use Insight Control for vCenter Server Administrator Portal for vCenter to register or unregister the Plug-in.
• Remote StoreServ User—Name of the remote HP 3PAR StoreServ Storage system and associated user. • Remote StoreServ Credential Windows User—Windows user credentials for the accessing the remote system. • Remote Recovery Manager Server—Remote Recovery Manager Server host identifier. To add a new Remote Copy pair registration, click Register New.
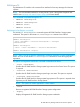
Figure 17 VASA configuration The options available in the VASA Configuration screen are described in Table 3 (page 42). Table 3 VASA configuration options Field Description VASA service TCP port Displays the port to which the VASA web service is binding. Secure service Displays if a secure service is selected. Web service URL Displays the URL address required to connect to VASA web service. Version Displays the installed RMV version. Log folder Shows the folder where log files are stored.
• Click the Edit button. The Edit Configuration dialog box appears. Table 4 VASA Configuration Edit options Field Description VASA service TCP port Displays the port number used by the VASA service. You can change the Port number only through the installation process. Secure services Indicates that secure communications are implemented. For security purposes, this option is fixed and cannot be modified. Binded to thumbprint Displays the current thumbprint binded to the TCP port.
Figure 19 StoreServ credential tab 44 Modifying configuration settings using HP 3PAR RMV Admin Tool
You have the option of viewing all existing Windows users that have registered credentials, or you can select a specific user from the list shown in the pull down menu. A listing of registered credentials is shown for the selected users with fields defined as follows: • StoreServ Name—Name of the HP 3PAR StoreServ Storage system. • StoreServ ID—System ID for the HP 3PAR StoreServ Storage system. • StoreServ User—User name for accessing the HP 3PAR StoreServ Storage system.
Figure 21 Accepting certificate You must accept the certificate to perform any tasks on the HP 3PAR StoreServ. However, if you do not accept the certificate, access to the HP 3PAR StoreServ is denied. 3. Click Close, to close the close the dialog box. When you add a new credential, it is associated with the current Windows user login account by default. The validation process returns the appropriate user privileges on successful connection and validation with the HP 3PAR StoreServ Storage system.
4 Logging on and working with Virtual Volumes The HP 3PAR Management Plug-in for VMware vCenter is used for viewing virtual volume mapping. You can also create and expose virtual volumes to an ESXi host based on a template where you fill in the details or based on the provisioning configuration of an existing Datastore. This chapter explains how to log on to vSphere Client, view information about virtual volume mapping and Transparent Failover setup, and create new virtual volumes.
2. Log a. b. c. on to the vSphere Client. Enter the IP address or name vCenter Server. Enter your user name and password. Click Login. The vCenter Server home page appears (Figure 23 (page 48)). Figure 23 Virtual Center Home Page 3. Under Solutions and Applications, click HP 3PAR Management Plug-in and Recovery Manager for VMware vSphere. A list of storage systems associated with the ESXi host displays on the left side.
Figure 25 HP 3PAR StoreServ connection screen 4. 5. 6. To connect to a specific storage system on the list, expand the list tree and click the desired system to connect or right-click the desired entry to show the popup menu and select Login. Enter the appropriate information In the connect dialog box: a. Enter the HP 3PAR StoreServ system name or IP address. b. Enter the StoreServ user name and password. c. Select the Remember Me check box to prevent having to log on each time you access this system.
Table 5 StoreServ Information Summary General Value System name Name of storage system System model Model of storage system Serial number Storage system serial number System ID Storage system ID number System WWN World Wide Name of storage system Number of nodes Number of nodes available in storage system Nodes online Nodes appearing online Logged on as Login user NOTE: You can login to a different StoreServ credential by right-clicking the specific StoreServ, and select Logout.
4. Click the HP 3PAR tab. The information for all virtual volumes on the selected VM or Datastore is displayed. Figure 27 Virtual Volume mapping Viewing Volume information After selecting a VM or Datastore, by default, all volumes on that VM or Datastore are displayed in the Virtual Volumes tab (as shown in Figure 28 (page 51)). The virtual volume information is divided into an upper and lower pane in the detail pane of the interface. • The upper pane displays general volume information.
The following filtering and sorting capabilities are provided: • To filter, click the upper right corner of the column header. The virtual volume details in the lower pane of the filtered virtual volumes are displayed. Click Clear Filter to clear the selected filter. Figure 29 Filtering Virtual Volumes NOTE: The filter operation details panel may display incorrect volume details. To update the details, select a volume from the grid to remove incorrect details.
The Lower pane The lower pane of the Virtual Volumes tab displays information about the selected volume in the upper pane. The lower pane provides three buttons, Details, Paths, and Alerts. • Details (default when viewing the Virtual Volumes tab) displays details about the selected volume in the upper pane (Figure 31 (page 53)). In addition, all the storage systems and their paths are also displayed.
Creating Virtual Volumes and Datastores You have the option of creating a new virtual volume on the HP 3PAR StoreServ Storage system and have it exported to the vCenter managed ESXi host where it can be accessed. Creating a Virtual Volume from an existing HP 3PAR StoreServ template Follow these steps to create a new virtual volume: 1. In the main menu navigation, click Home→Inventory→Host and Clusters. 2. Go to the HP 3PAR→Virtual Volumes. 3. Click Provision New.
Figure 35 Virtual Volume provisioning parameters 6. Provide the virtual volume parameters for the virtual volume being provisioned. An option is available to attach to a Virtual Machine when you want to create a raw disk only. Fill in the following parameters and click Next when done. • Number of virtual volumes: - Number of virtual volumes to create (1 – 99). The default is 1.
Figure 36 Datastore parameters review • VMFS-5/VMFS-3 option and Block Size - Specifies whether to use VMFS or VMFS-3. You can optionally specify the block size. VMFS-5 is only valid for ESXi 5.0 or above hosts. • Size (512 MB – 16 TB) - Size for the virtual volume. For VMFS-3, the VV size range is 512 MB to 2 TB, For VMFS-5, the VV size range is from 512 MB to 16 TB. When specifying the size for a virtual volume, 256 MB is reserved for each node.
Click Next. 7. Review the parameters, then click Create. Click OK for confirmation. A confirmation is displayed indicating that the Datastore is created. NOTE: If you choose “ESXi Cluster”, the storage is assigned to the ESXi Cluster hosts. Otherwise, the storage is only created on the selected host. NOTE: If the selected ESXi host is connected to a storage system and currently does not have LUNs exposed to the host, you need to log in to the summary page and create an entry for the storage system.
Creating a Virtual Volume from existing Datastores Follow these steps to create a virtual volume from an existing Datastore: 1. In the main menu navigation, click Home→Inventory→Datastores and Datastore Clusters. 2. Go to HP 3PAR→Virtual Volumes. 3. Click Provision Similar. The Welcome page appears. NOTE: To prevent the welcome page from displaying in the future, select the “Skip this page in the future when provisioning storage” check box. 4. 5. Click Next to enter the virtual volume parameters.
3. 4. 5. 6. 7. Select the storage system on the node tree pane view and right-click. Select Connect from the option menu. Enter the information of the storage system and click Login. Verify the new storage system is added to the node tree pane. Go to Home→Inventory→Hosts and Clusters→HP 3PAR. Click Refresh, select Update Recovery Manager Cache option and click Refresh. All associated HP 3PAR StoreServ Storage system virtual volume information should display. NOTE: client.
5 Working with Virtual Copies This chapter explains how to use HP 3PAR Recovery Manager Software for VMware vSphere to manage Virtual Copies. NOTE: In the following sections, the type of Virtual Copy being created, mounted, or modified is dependent on whether a VM or Datastore is selected from the navigation tree.
3. Click the Virtual Copies tab. Information about the selected VM or Datastore Virtual Copies is displayed. • Base Datastore/RDM LUN • Type • Base Volume • Base ID • Virtual Copy Volume • Virtual Copy ID • Status–Can be Available, Mounted, Missing or Mismatched. NOTE: When a Virtual Copy set is displayed as Missing, the Virtual Copy has been deleted from the storage system. The delete operation is only allowed to remove the Virtual Copy.
Viewing Virtual Copy event logs Virtual Copy operation event logs can be found at the vCenter Server level in the navigation tree, the Tasks & Events tab, and the Events tab. Use the keyword HP 3PAR to select all events performed by HP 3PAR Recovery Manager Software for VMware vSphere.
4. 5. (Optional) You can either accept the default name based on the time when the Virtual Copy is created, or you can enter a name of your choosing. The Virtual Copy name cannot exceed 32 characters. When creating the Virtual Copy, you have the choice of changing the Ensure Application Consistency option (set by default) to specify whether or not the newly created Virtual Copy should adhere to the data standards used by supported application.
Mounting Virtual Copies To mount a Virtual Copy: 1. Follow the instructions in “Viewing Virtual Copy information” (page 60). 2. Click the Virtual Copies tab. 3. Select the Virtual Copy to mount from the Virtual Copy Set list. 4. Right-click the Virtual Copy in the Virtual Copy table. A menu appears providing two mount choices: • Mount on ESX host as Datastore on—Select from the list of ESX/ESXi hosts managed by the vCenter Server that share access to the HP 3PAR StoreServ Storage system.
Figure 40 Unmounting Virtual Copies The Confirm dialog box appears. 6. Click OK. A message indicates that the request is being processed and the mounted copy is unmounted. Restoring Datastores by promoting a Virtual Copy Normal restore scenarios involve restoring virtual disk images. In a VMFS Datastore, there can be many virtual disks. Typically, you can identify the virtual disk to be restored and copy it over the old one.
Deleting Virtual Copies To delete a Virtual Copy: 1. Follow the instructions in “Viewing Virtual Copy information” (page 60). 2. Click the Virtual Copies tab. 3. Select the Virtual Copy you wish to delete from the Virtual Copy Set list. 4. Click Delete. The Confirm dialog box appears. 5. Click OK. The Virtual Copy deletion task is submitted and started and you are asked to confirm your intent to delete the Virtual Copy. The Virtual Copy is then removed from the Virtual Copy Set list.
b. (Optional) Select whether to enable expirable Virtual Copies. Expirable copies are removed according to a specified schedule and are not affected by the maximum count. When enabling the expirable Virtual Copies option, you must specify the length of time (Hours or Days) from the current time that the Virtual Copies are to expire. You can set the expiry period up to 1825 days. NOTE: Expirable Virtual Copies are not included in the maximum count.
d. Select whether to ensure application consistency. This option is used to create snapshots of Virtual Copy sets that adhere to data format standards used by the VMware Tools. NOTE: If new VMs are added to a Datastore, you also need to update the policy in order to make the VM application consistent.
1. Click Add. The Select Schedule Type dialog appears. Figure 42 Select Schedule Type dialog 2. 3. Select the time when the scheduled copy creation task is to be performed. You have the option of scheduling when (hourly, daily, weekly, monthly) the Virtual Copy is to be created. You can also schedule a Virtual Copy creation task to occur on a one-time basis. Click Next. The wizard will request the appropriate information based on the option time frame you have chosen.
5. Click Next. The Schedule Credential dialog appears. Figure 44 Schedule Credential 6. 7. Enter a name for the scheduled task and the associated user name and password. The task name must be unique. Click Next. The Snapshot Configuration dialog appears. Figure 45 Virtual Copy Configuration dialog 8. 9. Enter the appropriate vCenter server user name and location of the credential store file. Specify whether or not to use application consistency for the scheduled task.
NOTE: Use commas to separate the Virtual Machine names. 10. Enter the HP 3PAR StoreServ Storage system user name. 11. Specify any default policy overrides. a. Specify the amount of time (in hours or days) before the Virtual Copy expires. b. Specify the amount of time (in hours or days) to retain the Virtual Copy set. 12. Click Next. The Schedule Task Summary dialog appears.
13. Click Finish to complete the scheduling of the Virtual Copy task. A message indicates whether the task has been created successfully. A listing for the scheduled task is now shown in the Schedule List. Figure 47 Schedule list with task NOTE: If a VM or Datastore is removed, the associated scheduled tasks continues to run but is no longer manageable from the HP 3PAR Management Plug-in and Recovery Manager Software for VMware vSphere scheduling interface.
1. Right-click the virtual disk you wish to copy to a Datastore and click Copy to Datastore. NOTE: When using the Copy to Datastore option to copy a virtual disk to a Datastore, it is recommended that the copy and paste functions of the Datastore browser be used in order to preserve the VMware Thin Provisioning disk feature. 2. 3. Select a Datastore on the ESXi host where the Virtual Copy is mounted. Specify the target location and click OK.
6. When prompted for confirmation, click OK. The unmount commences. Virtual disks created using HP 3PAR Virtual Copy can be mounted on any VM. However, if you try to mount the Virtual Copy virtual disk on the same VM, the vSphere Client displays a prompted question message. In this case, you can choose whether to continue or not.
6 Working with VASA Provider The communication between HP 3PAR VASA Provider and vCenter server is a secure connection based on SSL certificate and Windows credential. License is not required for using VASA Provider. Before VASA Provider can be registered by the vCenter server, VASA Provider requires that you extract the SMS certificate from vCenter server and install it to the HP 3PAR Recovery Manager for VMware installed host to allow client certificate negotiation in the Transport Layer.
Table 6 Add Vendor Provider information fields Field Name Value Name Any name to identify the VASA provider. URL VASA Service Web URL. For example (https://:/). Login Windows user name to Recovery Manager for VMware installed host. Password Windows Password. Once registration is successful, the provider status is available online. NOTE: To register VASA Provider, the user must have the StorageViews Configure privilege.
Table 7 VASA Storage Capability Volume attributes Volume Attribute Value Storage Capability Name Segment Provisioning Type Fully Provisioned Full Thin Provisioned Thin Base Volume Base Virtual Copy Volume VCpy Fibre Channel Drive FC Near Line Drive NL Solid State Drive SSD Mixed Drive Mx RAID 0 R0 RAID 1 R1 RAID 5 R5 RAID 6 R6 Remote Copy Volume is in Remotecopy RC Volume is not in Remotecopy NoRC Volume Type Drive Type RAID Type Remote Copy NOTE: Consult the appropriate
7 Working with Remote Copy A Remote Copy feature is now available for you to create and manage both Synchronous or Periodic Virtual Copies at the RC Group level. In addition, the Remote Copy feature provides a GUI interface and basic CLI command functionality to register, create, schedule, update and remove Remote Copy pairings. NOTE: The system allows snapshots to be taken for more than eight VMs for application consistent Local or Remote Copy snapshots.
Registering Remote Copy Pairs 1. Launch Recovery Manager Software for VMware vSphere Admin Tool and click the HP 3PAR Management Plug-in and Recovery Manager Software for VMware vSphere Admin Tool→vCenter Plug-in. NOTE: If you have a single RMV server, HP recommends that you register the remote copy pairs in both directions. If you are using two RMV servers, register each direction just once on each RMV server. 2. Under the vCenter Plug-in tab, click Remote Copy Pairs tab.
Table 8 Register Remote Copy Storage System Pair fields Local Value StoreServ: Name of local storage system StoreServ username: Name of user for local storage system Windows user name: Name of user for Microsoft Windows Remote Value StoreServ: Name of remote storage system StoreServ username: Name of user for remote storage system Windows user name: Name of user for Microsoft Windows Recovery Manager server name: Name of remote Recovery Manager server on remote site Recovery Manager servic
Updating Registered Remote Copy Pairs information 1. 2. 3. 4. 5. Launch Recovery Manager Software for VMware vSphere Admin Tool and click the HP 3PAR Management Plug-in and Recovery Manager Software for VMware vSphere. Click Remote Copy Pairs tab. Select a Remote Copy pair from the list and click Update. Select the new system information from the Local and Remote drop-down menus. If applicable, enter another RMV host name. Click Update.
Viewing existing and newly added Remote Copy information Use the vSphere Client to navigate and view registered storage system Remote Copy pairs and Remote Copy groups for local and remote systems. Launch vSphere Client, select Home at the top of navigation bar and click HP 3PAR Management Plug-in... From the HP 3PAR StoreServ Storage system tree pane, select a storage system and click the Remote Copy tab.
Figure 56 Virtual Volumes/Machines • Virtual Copies On: The tab displays remote Virtual Copies creation and expiration dates, retention, mode, and application consistent status. The Remote Virtual Copies Mapping displays if you select a Remote Virtual Copy.
Figure 58 Local Virtual Copies On Creating Remote Virtual Copies You can create either synchronous and periodic Remote Virtual Copy for Remote Copy groups associated with a specific ESXi server. Other VMs from other ESXi hosts are not shown. When creating synchronous Remote Virtual Copies, Recovery Manager creates a copy on both the local and remote array. For periodic Remote Virtual Copies, a Remote Virtual Copy is only created on the remote array. 1. Select the desired storage system in the left pane. 2.
Figure 59 Create Remote Copy Virtual Copy 4. 5. 6. Click Create. Click Yes to confirm. Review the creation of the Virtual Copy in the Recent Tasks box at the bottom of the vSphere client. Click OK to complete. Setting Policy for Remote Virtual Copies To manage remote VCs, you can set specific expirable and retention policies for each Virtual Copy sets. Any policies set on a local storage system are also be applied to the virtual copy on remote storage system during creation time.
3. Check the applicable policy options: • Enable expirable Virtual Copies Specify the expiration period. Click the appropriate option button relating to the handling of existing non-expirable Virtual Copies. • Retain Virtual Copy Set Specify the expiration period. Figure 60 Policy dialog 4. 5. Ensure application consistency. Click Save. NOTE: After clicking Save, the process may take up to 15 minutes to complete depending on the number Virtual Copy Sets specified.
3. Choose the scheduling options for performing Virtual Copy creation tasks. Set the parameters of the selected schedule option. • Hourly Start time, Hour • Daily Start time, Day • Weekly Start time, Week, Day of the Week • Monthly Start time, Day of Every Month • One time only Start Date, Start Time Figure 62 Setting scheduled type for performing Virtual Copy creation task 4. 5. Click Next to continue. Enter the credentials to complete the scheduled tasks.
7. Select the schedule task settings. • vCenter server user • vCenter credential store file • Enable expirable Virtual Copies • Retain Virtual Copies • Create Remote Copy Virtual Copy with application consistency Figure 64 Setting RC Virtual Copy configuration 8. 9. Click Next to continue. Review the Scheduled Task Summary before continuing.
10. Click Finish to exit. Mounting Remote Virtual Copies Mounting from Virtual Copy table To mount a Remote Virtual Copy: 1. Click the Remote Copy tab. 2. Choose the appropriate Remote Copy Group system. 3. Click the Virtual Copies On tab to display the list of Remote Virtual Copies. 4. Select the appropriate remote VC from the Remote VC Groups table. NOTE: If the selected Remote VC has any unmounted VVs, the Mount above the VC table is enabled.
9. Click Ok to complete action. Figure 67 Mount Local Virtual Copy complete Mounting from Virtual Volume mapping table 1. 2. 3. 4. Click the Remote Copy tab. Choose the appropriate Remote Copy Group system. Click the Virtual Copies On tab to display the list of Remote Virtual Copy. Select the appropriate remote VC from the Virtual Volume Mapping table. NOTE: If one or more selected Remote VC has any unmounted VVs, the Mount above the VV table is enabled. 5. 6. Click the Mount.
Figure 68 Remote VC Mounting options 7. 8. 9. Click Mount. Click Yes to confirm. Click No to cancel action. Click OK to complete action. Unmounting Remote Virtual Copies Unmounting from Virtual Copy table To unmount a Remote Virtual Copy: 1. Click the Remote Copy tab. 2. Choose the appropriate Remote Copy Group system. 3. Click the Virtual Copies On tab to display the list of Remote Virtual Copy. 4. Select the appropriate mounted remote VC from the Remote VC Groups table.
1. 2. 3. Click Remote Virtual Copies tab. Select the specific remote Virtual Copy. To select multiple Remote Virtual Copies, press Ctrl and click. Click Delete. Deleting Local Virtual Copies When a local RC Group Virtual Copy under the Local Virtual Copies tab is no longer required, the tabs can be removed. 1. Click Local Virtual Copies tab. 2. Select the specific local Virtual Copy. To select multiple Local Virtual Copies, press Ctrl and click. 3. Click Delete.
Importing a Virtual Machine and reverting to a specific point-in-time Virtual Copy 1. 2. Issue setcopygroup failover to Failover the desired Remote Copy group from the secondary site. Verify the Remote Copy group displays Primary-Rev. (Optional) Select a desired Virtual Machine Virtual Copy and issue promotesv to the appropriate Virtual Volume(s) to revert. NOTE: Issuing promotesv promotes the entire data of the virtual volume to a specific point-in-time Virtual Copy.
8 Using HP 3PAR Peer Motion Manager Software with Recovery Manager HP 3PAR Peer Motion Manager is a feature of the HP 3PAR Operating System Software and manages the migration of data in between existing storage systems or third party storage arrays. HP 3PAR Recovery Manager now supports HP 3PAR Peer Motion Manager data migration activities without any impact on host operations while monitoring the primary storage system.
9 Support and Other Resources Contacting HP For worldwide technical support information, see the HP support website: http://www.hp.
For information about: See: Migrating data from one HP 3PAR storage system to another HP 3PAR-to-3PAR Storage Peer Motion Guide 96 Configuring the Secure Service Custodian server in order to monitor and control HP 3PAR storage systems HP 3PAR Secure Service Custodian Configuration Utility Reference Using the CLI to configure and manage HP 3PAR Remote Copy HP 3PAR Remote Copy Software User’s Guide Updating HP 3PAR operating systems HP 3PAR Upgrade Pre-Planning Guide Identifying storage system compo
For information about: See: Planning for HP 3PAR storage system setup Hardware specifications, installation considerations, power requirements, networking options, and cabling information for HP 3PAR storage systems HP 3PAR 7200, 7400, and 7450 storage systems HP 3PAR StoreServ 7000 Storage Site Planning Manual HP 3PAR StoreServ 7450 Storage Site Planning Manual HP 3PAR 10000 storage systems HP 3PAR StoreServ 10000 Storage Physical Planning Manual HP 3PAR StoreServ 10000 Storage Third-Party Rack Physic
Typographic conventions Table 10 Document conventions Convention Element Bold text • Keys that you press • Text you typed into a GUI element, such as a text box • GUI elements that you click or select, such as menu items, buttons, and so on Monospace text • File and directory names • System output • Code • Commands, their arguments, and argument values • Code variables • Command variables Bold monospace text • Commands you enter into a command line interface • Syste
10 Documentation feedback HP is committed to providing documentation that meets your needs. To help us improve the documentation, send any errors, suggestions, or comments to Documentation Feedback (docsfeedback@hp.com). Include the document title and part number, version number, or the URL when submitting your feedback.
A Troubleshooting VASA Provider For information about system alerts, go to http://www.hp.com/support/hpgt/3par and select your server platform. NOTE: If you are using HP 3PAR OS Software version 3.1.1 or lower, refer to HP 3PAR InForm OS 3.1.1 Messages and Operators Guide for information about system alerts.
MESSAGE (ID:e0002) -{Info} SUGGESTED ACTION Refer to Alert Code 0xe0002 in HP 3PAR InForm OS Message and Operator's Guide. MESSAGE (ID:e0006) -{Info} SUGGESTED ACTION Refer to Alert Code 0xe0006 in HP 3PAR InForm OS Message and Operator's Guide. MESSAGE (ID:110004) -{Info} SUGGESTED ACTION Refer to Alert Code 0x110004 in HP 3PAR InForm OS Message and Operator's Guide. MESSAGE (ID:150002) -{Info} SUGGESTED ACTION Refer to Alert Code 0x150002 in HP 3PAR InForm OS Message and Operator's Guide.
SUGGESTED ACTION Refer to Alert Code 0x230003 in HP 3PAR InForm OS Message and Operator's Guide. MESSAGE (ID:230004) -{Info} SUGGESTED ACTION Refer to Alert Code 0x230004 in HP 3PAR InForm OS Message and Operator's Guide. MESSAGE (ID:250002) -{Info} SUGGESTED ACTION Refer to Alert Code 0x250002 in HP 3PAR InForm OS Message and Operator's Guide. MESSAGE (ID:270001) -{Info} SUGGESTED ACTION Refer to Alert Code 0x270001 in HP 3PAR InForm OS Message and Operator's Guide.
MESSAGE (ID:270007) -{Info} SUGGESTED ACTION Refer to Alert Code 0x270007 in HP 3PAR InForm OS Message and Operator's Guide. MESSAGE (ID:270008) -{Info} SUGGESTED ACTION Refer to Alert Code 0x270008 in HP 3PAR InForm OS Message and Operator's Guide. MESSAGE (ID:270050) -{Info} SUGGESTED ACTION Refer to Alert Code 0x270050 in HP 3PAR InForm OS Message and Operator's Guide. MESSAGE (ID:30003) -{Info} SUGGESTED ACTION Refer to Alert Code 0x0030003 in HP 3PAR InForm OS Message and Operator's Guide.
SUGGESTED ACTION Refer to Alert Code 0x0050002 in HP 3PAR InForm OS Message and Operator's Guide. MESSAGE (ID:50003) -{Info} SUGGESTED ACTION Refer to Alert Code 0x0050003 in HP 3PAR InForm OS Message and Operator's Guide. MESSAGE (ID:60006) -{Info} SUGGESTED ACTION Refer to Alert Code 0x0060006 in HP 3PAR InForm OS Message and Operator's Guide. Message (ID:150004) -{Info} Suggested Action Refer to Alert Code 0x0150004 in HP 3PAR InForm OS Message and Operator's Guide.
Message (ID:460003) -{Info} Suggested Action Refer to Alert Code 0x0460003 in HP 3PAR InForm OS Message and Operator's Guide. Message (ID:1a000a) -{Info} Suggested Action Refer to Alert Code 0x01a000a in HP 3PAR InForm OS Message and Operator's Guide. Message (ID:1a000b) -{Info} Suggested Action Refer to Alert Code 0x01a000b in HP 3PAR InForm OS Message and Operator's Guide. Message (ID:1a000c) -{Info} Suggested Action Refer to Alert Code 0x01a000c in HP 3PAR InForm OS Message and Operator's Guide.
Suggested Action Refer to Alert Code 0x01a0011 in HP 3PAR InForm OS Message and Operator's Guide. Message (ID:1a0012) -{Info} Suggested Action Refer to Alert Code 0x01a0012 in HP 3PAR InForm OS Message and Operator's Guide. Message (ID:1a0021) -{Info} Suggested Action Refer to Alert Code 0x01a0021 in HP 3PAR InForm OS Message and Operator's Guide. Message (ID:1a001a) -{Info} Suggested Action Refer to Alert Code 0x01a001a in HP 3PAR InForm OS Message and Operator's Guide.
Message (ID:3b0002) -{Info} Suggested Action Contact HP Technical Support. MESSAGE (ID:2900de) -{Info} SUGGESTED ACTION Refer to Alert Code 0x2900de in HP 3PAR InForm OS Message and Operator's Guide. MESSAGE (ID:3700de) -{Info} SUGGESTED ACTION Refer to Alert Code 0x3700de in HP 3PAR InForm OS Message and Operator's Guide. MESSAGE (ID:3700fa) -{Info} SUGGESTED ACTION Refer to Alert Code 0x3700fa in HP 3PAR InForm OS Message and Operator's Guide.
SUGGESTED ACTION Refer to Alert Code 0x30005 in HP 3PAR InForm OS Message and Operator's Guide. Message (ID:a0004) -{Info} Suggested Action Refer to Alert Code 0x00a0004 in HP 3PAR InForm OS Message and Operator's Guide. Message (ID:e0016) -{Info} Suggested Action Refer to Alert Code 0x00e0016 in HP 3PAR InForm OS Message and Operator's Guide. Message (ID:e0017) -{Info} Suggested Action Refer to Alert Code 0x00e0017 in HP 3PAR InForm OS Message and Operator's Guide.
Event Type Message MESSAGE (ID:3000fa) -{Info} SUGGESTED ACTION Refer to Alert Code 0x3000fa in HP 3PAR InForm OS Message and Operator's Guide. MESSAGE (ID:3000de) -{Info} SUGGESTED ACTION Refer to Alert Code 0x3000de in HP 3PAR InForm OS Message and Operator's Guide. MESSAGE (ID:400fa) -{Info} SUGGESTED ACTION Refer to Alert Code 0x400fa in HP 3PAR InForm OS Message and Operator's Guide.
SUGGESTED ACTION Refer to Alert Code 0xe0002 in HP 3PAR InForm OS Message and Operator's Guide. MESSAGE (ID:e0005) -{Info} SUGGESTED ACTION Refer to Alert Code 0xe0005 in HP 3PAR InForm OS Message and Operator's Guide. MESSAGE (ID:1a0002) -{Info} SUGGESTED ACTION Refer to Alert Code 0x1a0002 in HP 3PAR InForm OS Message and Operator's Guide. MESSAGE (ID:1a00de) -{Info} SUGGESTED ACTION Refer to Alert Code 0x1a00de in HP 3PAR InForm OS Message and Operator's Guide.
MESSAGE (ID:270012) -{Info} SUGGESTED ACTION Refer to Alert Code 0x270012 in HP 3PAR InForm OS Message and Operator's Guide. MESSAGE (ID:27000e) -{Info} SUGGESTED ACTION Refer to Alert Code 0x27000e in HP 3PAR InForm OS Message and Operator's Guide. MESSAGE (ID:27000f) -{Info} SUGGESTED ACTION Refer to Alert Code 0x27000f in HP 3PAR InForm OS Message and Operator's Guide. MESSAGE (ID:270010) -{Info} SUGGESTED ACTION Refer to Alert Code 0x270010 in HP 3PAR InForm OS Message and Operator's Guide.
SUGGESTED ACTION Refer to Alert Code 0x270016 in HP 3PAR InForm OS Message and Operator's Guide. MESSAGE (ID:270017) -{Info} SUGGESTED ACTION Refer to Alert Code 0x270017 in HP 3PAR InForm OS Message and Operator's Guide. MESSAGE (ID:270019) -{Info} SUGGESTED ACTION Refer to Alert Code 0x270019 in HP 3PAR InForm OS Message and Operator's Guide. MESSAGE (ID:27001a) -{Info} SUGGESTED ACTION Refer to Alert Code 0x27001a in HP 3PAR InForm OS Message and Operator's Guide.
MESSAGE (ID:10000002) - Existing LUN in 3PAR Storage Server has been removed. Additional information: {Info} SUGGESTED ACTION This indicates that an existing exposure to the monitored ESXi host has been removed. Please contact your storage administrator if this is not an intended operation. MESSAGE (ID:10000005) - Existing LUN in 3PAR Storage Server has been renamed. Additional information: {Info} SUGGESTED ACTION No action is required.
MESSAGE (ID:1000000b) -Node status has been changed. Additional information: {Info} SUGGESTED ACTION This indicates that there is a node status change. This might be caused by node shutdown or recovery. Please check your storage system for more information.
B Troubleshooting for HP 3PAR Management plug-in Resolving HP 3PAR multi-tab issue You need to install HP 3PAR Plug-in certificate and all vCenter servers certificate that involves in linked mode configuration while prompted for the certificate warnings or security alert when logging on to vSphere client. Click HP 3PAR Management Plug-in and Recovery Manager Software for VMware vSphere under Solutions and Applications. 1. Click View Certificate. 2. On Certificate dialog, click Install Certificate. 3.
Index Symbols 3PAR, 16 C CLI, 8 Cluster view accessing, 22 configuration editing, 37 Configuration tab, 36 configuring, 36 conventions text symbols, 98 credential sharing, 15 D data consistency, 24 data store Virtual Copies restrictions, 25 datacenter view accessing, 23 Datastore view accessing, 18 Datastore Virtual Copies, 25 default configuration, 36 deleting Virtual Copies, 66 documentation providing feedback on, 99 E editing the plug-in configuration, 37 editing Virtual Copies, 68 ensuring volume con
TpdVmWebService, 8 U unmounting Virtual Copies, 64 user authentication, 15 V viewing Virtual Copies, 60 viewing Virtual Copy metadata, 26 viewing volume information, 51 Virtual Copies ensuring application consistency, 63 restrictions, 62 creating, 62 deleting, 66 editing, 68 mounting, 64 promoting, 65 unmount, 64 viewing, 60 Virtual Copy Datastore, 25 organization, 27 properties, 27 viewing metadata, 26 Virtual Machine, 25 VM consistent, 27 Virtual Copy browser, 26 Virtual Copy data consistency supported