
HP StorageWorks XP Cluster Extension Software Installation Guide (T1656-96034, April 2010)


Pre-installation procedures
This section describes the procedures you must perform to prepare the data centers for XP Cluster
Extension installation and configuration. Perform these procedures before you install XP Cluster
Extension.
IMPORTANT:
If you are not familiar with the following steps for configuring the disk array, contact your HP service
representative for assistance.
1. Establish bidirectional links between the disk arrays at the two sites (local and remote).
For greater fault tolerance, use two or more diversely routed links in each direction between the
two data centers.
2. Create volumes in the XP disk arrays and map them to servers, page 18.
3. Partition physical disks, page 19.
4. Create the XP RAID Manager configuration file and pair disk pairs, page 19.
5. Create a Microsoft cluster, page 19.
Create volumes in the XP disk arrays and map them to servers
You must create volumes in the XP disk arrays and map them to servers at the local and the remote
site.
Creating and mapping volumes at the local (primary) site
1. Create a 36-MB volume as the command device for the XP RAID Manager instance that will be
used by the XP Cluster Extension resource.
2. Create the array volumes that will be used as data disks that support your applications and shares
in the cluster.
NOTE:
You can set up additional command devices to provide for additional redundancy or use
other HP integration products such as HP OpenView Data Protector Zero Downtime Backup
Integration.
The CVS volumes can usually be created from available free space on a disk parity group.
The application/data disks can be of any size supported by the disk array.
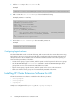
3. Assign the command device and application/data disks to the FC ports that will be connected
to the local cluster nodes.
4. Record the volume assignment details for the XP RAID Manager configuration files.
Installing XP Cluster Extension Software for Windows18