
HP StorageWorks EVA Cluster Extension Software Administrator Guide (T3667-96045, April 2010)
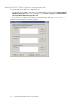


5. Select the arrays that present disks to cluster nodes, and then click OK.
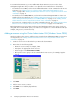
6. Click Add in the Cluster Node Configuration section to open the Add Server dialog box.
The available servers are listed.
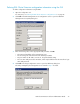
7. Select the servers that are possible owners of the EVA Cluster Extension-managed disks, and then
click OK.
NOTE:
See the Microsoft Failover Cluster Management documentation for more information about
possible owners.
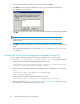
8. Click OK to close the configuration tool and save the information to all of the configured cluster
nodes.
Your configuration information is now saved in the clxevacfg file in the %HPCLX_EVA_PATH%\
bin directory.
Defining EVA Cluster Extension configuration information using the CLI
You can configure EVA Cluster Extension using the CLI command CLXEVACONFIG. Enter
CLXEVACONFIG -?, CLXEVACONFIG /?, or CLXEVACONFIG /help to view usage information.
1. Use the following command to add the EVA management servers:
CLXEVACONFIG SMA /ADD NAME=servername IPADDRESS=IP address PORT=port
SSL=YES|NO USERNAME=username PASSWORD=password
2. Use the following command to add the arrays managed by the management servers entered in
Step 1:
CLXEVACONFIG ARRAY /ADD [NAME=arrayname|WWN=WWN]
[NAME=arrayname|WWN=WWN...]
3. Use the following command to add the available cluster nodes:
CLXEVACONFIG SERVER /ADD [NAME=servername] [NAME=servername...]
4. Use the procedures in “Importing and exporting configuration information” on page 29 to copy
the configuration information to the other cluster nodes.
Configuring EVA Cluster Extension for Windows28