HP 3PAR SUSE Linux Enterprise Implementation Guide Abstract This implementation guide provides the information you need to configure an HP 3PAR StoreServ Storage system with SUSE Enterprise Linux 10 or 11. General information is also provided on the basic steps required to allocate storage on the HP 3PAR StoreServ Storage that can then be accessed by the SUSE Enterprise Linux host.
© Copyright 2014 Hewlett-Packard Development Company, L.P. Confidential computer software. Valid license from HP required for possession, use or copying. Consistent with FAR 12.211 and 12.212, Commercial Computer Software, Computer Software Documentation, and Technical Data for Commercial Items are licensed to the U.S. Government under vendor's standard commercial license. The information contained herein is subject to change without notice.
Contents 1 Introduction...............................................................................................6 Supported Configurations..........................................................................................................6 HP 3PAR OS Upgrade Considerations.........................................................................................6 Audience................................................................................................................................
5 Configuring a Host with iSCSI....................................................................37 Setting Up the Switch and iSCSI Initiator....................................................................................37 Configuring SUSE 10 & SUSE 11 for iSCSI.................................................................................37 Installing iSCSI on SUSE.....................................................................................................37 Setting Up iSCSI for SUSE......
10 Using SUSE Linux Virtualization................................................................74 11 Using SUSE Cluster Services.....................................................................75 12 SUSE Enterprise Linux High Availability Extension........................................76 13 Using Novell Open Enterprises Server 11...................................................77 14 Using IBM General Parallel File System......................................................
1 Introduction This implementation guide provides the information you need to configure an HP 3PAR StoreServ Storage system with SUSE Enterprise Linux 10 or 11. General information is also provided on the basic steps required to allocate storage on the HP 3PAR StoreServ Storage that can then be accessed by the SUSE Enterprise Linux host.
Audience This implementation guide is intended for system and storage administrators who monitor and direct system configurations and resource allocation for the HP 3PAR StoreServ Storage. The tasks described in this guide assume that the administrator is familiar with SUSE Enterprise Linux and the HP 3PAR OS.
2 Configuring the HP 3PAR StoreServ Storage for Fibre Channel Required If you are setting up a fabric along with your installation of the HP 3PAR StoreServ Storage, see “Setting Up and Zoning the Fabric” (page 13) before configuring or connecting your HP 3PAR StoreServ Storage. Configuring the HP 3PAR StoreServ Storage Running HP 3PAR OS 3.1.x or OS 2.3.x This section describes how to configure the HP 3PAR StoreServ Storage running HP 3PAR OS 3.1.x or OS 2.3.x.
2. After all ports have been configured, verify that the ports are configured for a host in a direct connection by issuing the showport -par command on the HP 3PAR StoreServ Storage.
1. To determine whether a port has already been configured for a host port in fabric mode, issue showport -par on the HP 3PAR StoreServ Storage. 2. If the port has not been configured, take the port offline before configuring it for connection to a host. To take the port offline, issue the HP 3PAR OS CLI command controlport offline ; for example: # controlport offline 1:5:1 3.
1. To create host definitions, issue the createhost [options] [...] command. For example: # createhost -persona 1 2. susehost 1122334455667788 1122334455667799 As of HP 3PAR OS 3.1.3, a second host persona that enables asymmetric logical unit access (ALUA) is available: host persona 2 (UARepLun,SESLun,ALUA). Host persona 2 is recommended for SLES 10.4 or later and SLES 11.3 or later..
Required The following setup must be completed before connecting the HP 3PAR StoreServ Storage port to a device. Configuring Ports for a Direct Connection To configure the HP 3PAR StoreServ Storage ports for a direct connection, complete the following steps. 1. Set each HP 3PAR StoreServ Storage port to port persona 1 by issuing controlport persona 1 , where is the port location, expressed as node:slot:port. 2. Issue controlport vcn disable -f . 3.
Connecting the HP 3PAR StoreServ Storage to the Host During this stage, connect the HP 3PAR StoreServ Storage to the host directly or to the fabric. This set of tasks includes physically cabling the HP 3PAR StoreServ Storage to the host or fabric.
After configuring zoning and connecting each host HBA port and HP 3PAR StoreServ Storage port to the fabric(s), verify the switch and zone configurations using the HP 3PAR OS CLI showhost command, to ensure that each initiator is zoned with the correct target(s). HP 3PAR Coexistence The HP 3PAR StoreServ Storage array can coexist with other HP array families.
• Cisco switch ports that connect to HP 3PAR StoreServ Storage ports or host HBA ports should be set to AdminMode = FX and AdminSpeed = auto port, with the speed set to auto negotiate. • QLogic switch ports should be set to port type GL-port and port speed auto-detect. QLogic switch ports that connect to the HP 3PAR StoreServ Storage should be set to I/O Stream Guard disable or auto, but never enable.
Each FC target storage array port has a partner array port automatically assigned by the system. Partner ports are assigned across array node pairs. HP 3PAR OS Persistent Ports allows an HP 3PAR StoreServ Storage FC port to assume the identity (port IP address) of a failed port while retaining its own identity. Where a given physical port assumes the identity of its partner port, the assumed port is designated as a persistent port.
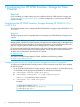
Figure 1 Initiator FCoE to FC Target Connect the SUSE host (FCoE initiator) ports to the FCoE-enabled switch and connect the HP 3PAR StoreServ Storage (FC target) ports of a FC switch. NOTE: For Figure 1 (page 17), the FCoE switch must be able to convert FCoE traffic to FC and must also be able to trunk this traffic to the fabric that the HP 3PAR StoreServ Storage target ports are connected to. FCoE switch VLANs and routing setup and configuration are beyond the scope of this implementation guide.
3 Configuring the HP 3PAR StoreServ Storage for iSCSI Configuring Ports for an iSCSI Connection To configure an iSCSI target port on the HP 3PAR StoreServ 10000 Storage for connection to an iSCSI Initiator, complete the following steps: NOTE: To use more than one initiator port, different subnets should be used for effective adapter utilization. 1. A 10 Gb iSCSI connection requires a one-time configuration using the controlport command.
4. Verify the changed settings by issuing showport -iscsi. # showport -iscsi N:S:P State IPAddr Netmask Gateway TPGT MTU Rate DHCP iSNS_Prim iSNS_Port 0:3:1 ready 10.100.0.201 255.255.0.0 0.0.0.0 31 1500 1Gbps 0 0.0.0.0 3205 0:3:2 loss_sync 0.0.0.0 0.0.0.0 0.0.0.0 32 500 n/a 0 0.0.0.0 3205 1:3:1 ready 10.101.0.201 255.255.0.0 0.0.0.0 131 1500 1Gbps 0 0.0.0.0 3205 1:3:2 loss_sync 0.0.0.0 0.0.0.0 0.0.0.0 132 1500 n/a 0 0.0.0.
On an HP 3PAR StoreServ Storage system running HP 3PAR OS 3.1.3, use the createhost command with the -persona 2 option for the Generic-ALUA persona: # createhost -iscsi -persona 2 susehost iqn.1994-05.com.suse:a3df53b0a32d On an HP 3PAR StoreServ Storage system running HP 3PAR OS 3.1.2, OS 3.1.1, or OS 2.3.x, use createhost with option -persona 1 for a generic persona: # createhost -iscsi -persona 1 susehost iqn.1996-04.de.
Target Port Limits and Specifications for iSCSI To avoid overwhelming a target port and ensure continuous I/O operations, observe the following limitations on a target port: • I/O queue depth on each HP 3PAR StoreServ Storage HBA model, as follows: ◦ QLogic 1G: 512 ◦ QLogic 10G: 2048 (HP 3PAR StoreServ 10000 and HP 3PAR StoreServ 7000 systems only) • The I/O queues are shared among the connected host HBA ports on a first-come, first-served basis.
HP Support Center • The HP 3PAR Command Line Interface Administrator’s Manual, “Using Persistent Ports for Nondisruptive Online Software Upgrades” This document is available on the following HP SC website: HP Support Center iSCSI HP 3PAR OS Persistent Ports Setup and Connectivity Guidelines for iSCSI Starting with HP 3PAR OS 3.1.3, the HP 3PAR OS Persistent Ports feature is supported for iSCSI.
4 Configuring a Host with Fibre Channel This chapter describes the tasks necessary for connecting the host to Fibre Channel. Checking the Host for Required Packages Make sure the Developmental Tool package that contains the gcc compiler is installed on the SUSE Enterprise Linux server. If not, install them from the SUSE Enterprise Linux installation CD. After installation, verify that the following gcc packages were installed. Some gcc packages may not be needed.
3. Change to the driver source directory by issuing cd lpfc_ _driver_kit-. For example: # cd 4. lpfc_2.6_driver_kit-8.2.0.29-1 Run the lpfc-install script that builds and installs the lpfc driver. Check the installed README for more details. # ./lpfc-install The script performs the following: a. The driver source is installed at /usr/src/lpfc from the installed rpm packages lpfcdriver-_. For example: # ls /usr/src/lpfc/lpfcdriver* lpfcdriver-2.
1. Before building the ramdisk, add the following required HBA parameters to the/etc/ modprobe.conf.local file when using the in-box driver if the HP 3PAR array is running HP 3PAR OS 3.1.1 or later: NOTE: If the HP 3PAR array is running an HP 3PAR OS version earlier than 3.1.1, then the lpfc_devloss_tmo setting should be set to 1 instead of 14.
locations, because some parameters are in both locations, but some are in only one. For example: # cat /sys/module/lpfc/parameters/lpfc_devloss_tmo 14# cat /sys/class/scsi_host/host4/lpfc_devloss_tmo 14# cat /sys/module/lpfc/parameters/lpfc_discovery_threads 32 5.
1. Download the driver package (SANsurfer Linux Installer for SUSE Enterprise Linux kernel) from http://www.qlogic.com and extract the driver contents. The example below demonstrates this step: Follow the provided README to build the driver. # tar xvfz For example: # tar xvzf qlafc-linux-8.02.14.01-1-install.tgz qlafc-linux-8.02.14.01-1-install/ qlafc-linux-8.02.14.01-1-install/LinuxTools/ . . . . . . . . . . . . . . . . . . . qlafc-linux-8.02.14.
Rebuild the ramdisk image using the mkinitrd command, which includes each instance of the kernel and initrd images, including the default and xen images. # /sbin/mkinitrd Example: # /sbin/mkinitrd Kernel image: Initrd image: Root device: ext3) Resume device: Kernel Modules: ide-pci-generic Features: Bootsplash: 26842 blocks /boot/vmlinuz-2.6.27.19-5-default /boot/initrd-2.6.27.
Building the Brocade Driver NOTE: Use this section only if you are installing and building the Brocade driver. If you are using the Brocade driver that was installed by the SUSE installation, skip to “Setting up the NVRAM and BIOS with the Brocade HBA” (page 29). If you are installing the Brocade driver instead of using the in-box Brocade driver that was already installed by the SUSE installation, follow these steps: 1. Download the driver package from www.brocade.
6. 7. Press Alt-S to save your changes. If you need to configure more boot devices or another adapter choose Return to Brocade Config Menu, otherwise choose Exit Brocade Config Menu. Configuring the Brocade HBA using the BCU Utility This section describes how to configure the Brocade HBA using the BCU utility. Brocade provides a CLI utility to configure their HBAs. This is also available as a GUI. These tools, once installed, can be used to configure many HBA and driver parameters.
Check for the installed multipath tools package. # rpm -qa |grep multipath multipath-tools-0.4.7-34.38 The following commands are user-space processes: • multipath inspects Linux devices to see if there are multiple paths to the same device and communicates to the kernel Device-mapper to set up a device map (dm) device for the device and is responsible for the path coalescing and device map creation.
2. Edit the device structure to add entries for HP 3PAR array and remove other product entries that are not needed. After all of the edits are made, the relevant sections of /etc/multipath.conf should appear as follows, if the HP 3PAR array that the SLES host is connecting to is running HP 3PAR OS 3.1.1 or 3.1.2. NOTE: If the HP 3PAR array is running an HP 3PAR OS version earlier than 3.1.
NOTE: The example above is for host persona 2(Generic-ALUA). Enabling Multipath Perform the following actions to enable multipath. 1. Invoke the multipath command for any name changes to be effective. # chkconfig multipathd on 2. Verify that the multipathd daemon is enabled. The following output shows it turned on for run-level 3 and 5. Enable it appropriately for your configuration: # chkconfig --list multipathd multipathd 0:off 1:off 3.
Setting Up Veritas DMP Multipathing For Active/Active multipath load balancing and failover, install Veritas Storage Foundation and High Availability Software, following the instructions provided in the Veritas Storage Foundation installation and administrator guides, available on the following website: Symantec NOTE: If you are using QLogic HBAs, the QLogic non-failover driver should be installed for Veritas DMP support.
2. 3. 4. To install the ASL, the Veritas vxconfigd daemon must be running. Running vxinstall will start the daemon. Once you install the ASL package, you must run the vxdctl enable command to claim the disk array as an HP 3PAR array. Configure the Veritas vxdmp driver to manage the HP 3PAR StoreServ Storage paths providing path failure management and dynamic load balancing.
When using VxDMP 5.1 with SUSE Enterprise Linux 11: According to Symantec Support Document #347065: 1. The general availability (GA) version of SUSE Enterprise Linux 11 kernel must be upgraded to 2.6.27.45-0.1.1 or later. 2. A UDEV Rules file must be created named /etc/udev/rules.d/40-rport.
5 Configuring a Host with iSCSI Setting Up the Switch and iSCSI Initiator Connect the Linux host iSCSI initiator port(s) and the HP 3PAR StoreServ Storage iSCSI target ports to the switch(es). If you are using VLANs, make sure that the switch ports which connect to the HP 3PAR StoreServ Storage iSCSI target ports and iSCSI initiator ports reside in the same VLANs and/or that you can route the iSCSI traffic between the iSCSI initiator ports and the HP 3PAR StoreServ Storage iSCSI target ports.
3. Change the time interval to wait for a connection before sending a ping. node.conn[0].timeo.noop_out_interval = [noop_out_interval] This allows for more time for the connections that were broken to be re-established before a ping is sent out (in case of a bad cable or a broken link). Set this parameter to 10 seconds for a ping to succeed after a connection is made. node.conn[0].timeo.noop_out_interval = 10 4.
SCSI layer will still perform CRC error recovery at the session level rather than at the PDU level. CAUTION: Enabling Header and Data Digest will cause some I/O performance degradation due to data checking. You can enable the Header and Data Digest by adding the following lines in iSCSI configuration file /etc/iscsi/iscsid.conf: node.conn[0].iscsi.HeaderDigest = CRC32C node.conn[0].iscsi.DataDigest = CRC32C NOTE: In order for the parameters changes to take effect, run the iSCSI service after the change. 9.
Starting the iSCSI Daemon for SUSE You can use either the various open-iSCSI utilities available from the CLI or YAST to configure and start open-iSCSI on SUSE. This document refers to the open-iSCSI CLI utilities. To start the open-iSCSI, complete the following steps: 1. Run the init script that is installed when the open-iSCSI rpm packs located at “etc/init.d/open-script”: # /etc/init.d/open-iscsi start 2. Check state of the iSCSI service run level information with the chkconfig command.
3. Login to iscsiadm: # iscsiadm --mode node –login 4. Now examine the iSCSI session and content session of the node information by issuing iscsiadm --mode session. For example: # iscsiadm --mode session tcp: [1] 10.102.2.2:3260,31 iqn.2000-05.com.3pardata:20310002ac0000b1 tcp: [2] 10.103.3.3:3260,131 iqn.2000-05.com.3pardata:21310002ac0000b1 For more information about SUSE Linux iscsiadm command usage, run the man iscsiadm and see the online documents in the /usr/share/doc/packages/open-iscsi folder.
1. Go to the iSCSI Initiator host console, or, at a terminal, edit the /etc/iscsid.conf file and enable CHAP authentication: # To enable CHAP authentication for a discovery session to the target # set discovery.sendtargets.auth.authmethod to CHAP. The default is None. discovery.sendtargets.auth.authmethod = CHAP # To enable CHAP authentication set node.session.auth.authmethod # to CHAP. The default is None. node.session.auth.authmethod = CHAP 2.
1. Verify that a host definition has been created on the HP 3PAR StoreServ Storage. The following example uses host_secret0 for the host CHAP password and target_secret0 for the target CHAP password. For HP 3PAR OS 3.1.x or OS 2.3.x, the output shows: # showhost Id Name Persona ----------WWN/iSCSI_Name----------0 SuSElinux Generic-legacy iqn.1996-04.de.suse:01:9282cfbddd49 iqn.1996-04.de.suse:01:9282cfbddd49 Port 0:3:1 1:3:1 For HP 3PAR OS 2.2.
1. Perform the CHAP configuration settings for the host initiator: # To enable CHAP authentication for a discovery session to the target # set discovery.sendtargets.auth.authmethod to CHAP. The default is None. discovery.sendtargets.auth.authmethod = CHAP # To enable CHAP authentication set node.session.auth.authmethod # to CHAP. The default is None. node.session.auth.authmethod = CHAP 2.
3. Perform discovery and login as described in “Creating the iSCSI Connection in SUSE Using the iscsiadm Command” (page 40). If the targets have been discovered previously, you must logout of the iSCSI sessions, delete the node and send target records before performing discovery and login by completing the following steps: a. Stop and start the open-iscsi daemon: # /etc/init.d/open-iscsi stop Logout session [0][10.1.1.100:3260 iqn.2000-05.com.3pardata:20110002ac0001a6] Logout session [1][10.0.0.
6 Allocating Storage for Access by the SUSE Host Creating Storage on the HP 3PAR StoreServ Storage This section describes the general steps and commands that are required to create the virtual volumes (VV) that can then be exported for discovery by the SUSE host. For additional information, see the HP 3PAR Command Line Interface Administrator’s Manual, which is available on the HP SC website: HP Support Center Creating Virtual Volumes Virtual volumes (VVs) are the only data layer visible to hosts.
Creating Thinly-provisioned Virtual Volumes To create thinly-provisioned virtual volumes (TPVVs), see the following documents: • HP 3PAR StoreServ Storage Concepts Guide • HP 3PAR Command Line Interface Administrator’s Manual • HP 3PAR Command Line Interface Reference These documents are available on the HP SC website: HP Support Center Exporting LUNs to the Host This section explains how to export LUNs to the host as VVs, referred to as virtual LUNs (VLUNs).
NOTE: Exporting VLUNs to an iSCSI host is the same as exporting VLUNs to a host that has a Fibre Channel connection to the HP 3PAR StoreServ Storage. The showvlun output is different for hosts with iSCSI connection. For example: # showvlun Active VLUNs Lun VVName HostName --------Host_WWN/iSCSI_Name-------- Port Type 0 TESTLUNS.0 sqa-dl145-04 iqn.1994-05.com.suse:a3df53b0a32d 0:3:1 host 1 TESTLUNS.1 sqa-dl145-04 iqn.1994-05.com.suse:a3df53b0a32d 0:3:1 host 2 TESTLUNS.2 sqa-dl145-04 iqn.1994-05.com.
2. Run the multipath command to recognize the devices for DM-MPIO configuration. # multipath 3. Verify that the device is seen. ls -ltr /dev/dm-* (The link has a new time stamp) 4. Verify the new WWN of the device appears. # tail /var/log/messages 5. Create a partition table for the device. fdisk /dev/dm- or parted /dev/dm- 6. Trigger udev by # echo 'add' > /sys/block/dm-/uevent 7. Verify that the new partition is recognized by multipathd.
Method 1 - sysfs Scan After exporting VLUNS to the host using the createvlun command in “Exporting LUNs to the Host” (page 47), use the echo statement on the sysfs file system to scan for devices: # echo “- ” > Example: The device path is /sys/class/scsi_host/host2 and the target is 0 (target2:0:0) and the exported device is LUN 1. The following is the echo command to be used.
(The SCSI midlayer will re-scan.) # echo "scsi add-single-device 2 0 0 14" > /proc/scsi/scsi You can see the new LUN presented to the OS by the SCSI Mid-Layer in the /var/log/messages file.
Vendor: 3PARdata Model: VV Type: Direct-Access Rev: 0000 ANSI SCSI revision: 05 scsi0 and scsi1 refer to the HBA adapter instance (/sys/class/scsi_host/host0 & /sys/class/scsi_host/host1). The ID refers to the HP 3PAR StoreServ Storage target port (four HP 3PAR StoreServ Storage target ports exist: Id 0, 1, 2, 4). Discovering Devices with a QLogic HBA There are several methods of dynamically adding new LUNs: • Method 1: Use rescan-scsi-bus.
BIOS version 1.29 FCODE version 1.27 EFI version 1.09 Flash FW version 4.00.
3.
2. Once the new LUN is visible to the QLogic driver layer, force the SCSI mid-layer to do its own scan and build the device table entry for the new device: # echo "scsi add-single-device 0 1 2 3" >/proc/scsi/scsi The SCSI midlayer will re-scan, where 0 1 2 3 is replaced by your host, channel, ID, and LUN.
Vendor: 3PARdata Model: VV Type: Direct-Access Host: scsi1 Channel: 00 Id: 01 Lun: 00 Vendor: 3PARdata Model: VV Type: Direct-Access Host: scsi1 Channel: 00 Id: 02 Lun: 00 Vendor: 3PARdata Model: VV Type: Direct-Access Host: scsi1 Channel: 00 Id: 04 Lun: 00 Vendor: 3PARdata Model: VV Type: Direct-Access Rev: 0000 ANSI SCSI revision: 05 Rev: 0000 ANSI SCSI revision: 05 Rev: 0000 ANSI SCSI revision: 05 Rev: 0000 ANSI SCSI revision: 05 scsi0 and scsi1 refer to the HBA adapter instances (/proc/scsi/qla2xxx/0
7 Modifying HP 3PAR Devices on the Host Creating Device-mapper Devices Complete the following steps to create Device-mapper devices. 1. Run the multipath command to create new Device-mapper nodes under the /dev/mapper directory. # multipath 2. Verify the Device-mapper devices have been created by issuing multipath -11.
===== paths list ===== uuid hcil dev dev_t pri dm_st chk_st 3600508b100104a3953553431574c000d 0:0:0:0 cciss!c0d0 104:0 1 [undef][ready] 350002ac001dc0031 2:0:2:99 sdc 8:32 1 [undef][ready] 350002ac001dc0031 3:0:0:99 sde 8:64 1 [undef][ready] Oct 19 09:33:46 | params = 1 queue_if_no_path 0 1 1 round-robin 0 2 1 8:32 1000 8:64 1000 Oct 19 09:33:46 | status = 2 0 0 0 1 1 A 0 2 0 8:32 A 0 8:64 A 0 Oct 19 09:33:46 | 350002ac001dc0031: disassemble map [1 queue_if_no_path 0 1 1 round-robin 0 2 1 8:32 1000 8:64 100
NOTE: With no_path_retry set to a value other than 0 in the /etc/multipath.conf file, I/O will be queued for the period of the retries and features=1 queue_if_no_path will be shown in multipath -l command output. Example: #multipath -l 350002ac001dc0031 dm-0 [size=2.
Use fdisk on the underlying disks /dev/sdXX and execute the following command when Device-mapper multipath maps the device to create a /dev/mapper/ partition. # multipath -l 50002ac001b40031 [size=5 GB][features="1 queue_if_no_path"][hwhandler="0"] \_ round-robin 0 [active] \_ 0:0:0:0 sda 8:0 [active] \_ 1:0:0:0 sdb 8:16 [active] Device-mapper node 350002ac001b40031 is formed from underlying devices sda and sdb representing two paths from the same storage volume.
3. On the iSCSI host, run ls /dev/mapper. # ls /dev/mapper 350002AC0004B0079 4. On the iSCSI host, run showvlun -lvw -a |grep -i . # showvlun -lvw -a |grep -i 50002ac0004b0079 0 testvlun 50002AC0004B0079 susehost iqn.1994-05.com.suse:a3df53b0a32d 1:3:1 host 0 testvlun 50002AC0004B0079 susehost iqn.1994-05.com.
NOTE: When using the echo command, make sure the devices are removed from each of the host HBA instances. • Method 2 Issue the following commands: # kpartx -d /dev/mapper/ #dmsetup remove #echo "scsi remove-single-device X X X X " > /proc/scsi/scsi where is the HBA number, is the channel on the HBA, is the SCSI target ID, and is the LUN. Example: Remove LUN 2 # multipath -ll 350002ac000160121 dm-3 3PARdata,VV size=5.
NOTE: The removed SCSI device is updated in /proc/scsi/scsi , /proc/partitions and in /sys/device path. Symantec Space Reclaim Support Symantec provides space reclaim support on TPVVs using the WRITE SAME SCSI primitive, which is supported by HP 3PAR OS. Use the vxdisk -o thin list to show that the type of disk is thinrclm. The thin reclaim is supported using the vxdisk reclaim command. See Symantec documentation for details.
8 Booting the Host from the HP 3PAR StoreServ Storage HP 3PAR StoreServ Storage Setup Requirements Booting from the HP 3PAR StoreServ Storage is supported in fabric and direct connect modes. You can connect each of the HBA ports to an HP 3PAR StoreServ Storage port. Make sure you have allocated enough space when creating your virtual volumes to be able to install your SUSE OS on it.
1. During the host boot, press Alt-E or Ctrl-E when prompted by the Emulex HBA Utility, a screen appears that will show the Emulex adapters in the system. Select and press Enter. a. After that, if a screen is being displayed that says: The BIOS of the Adapter is Disabled. If the screen says, The BIOS of the Adapter is Enabled, then skip to Step 2. b. Select option 2 Configure This Adapter's Parameters and press Enter. c.
Important • During the installation, make sure only a single HP 3PAR StoreServ Storage VLUN is exported to the host and leave all other HP 3PAR StoreServ Storage VLUNs not exported until the SUSE installation is complete. • Mount the devices by using the /dev/disk/by-id path. • Check by-id information is used in the /etc/fstab and /boot/grub/menu.lst. • Rebuild the ramdisk by running /sbin/mkinitrd -f
NOTE: When considering the use of the Device-mapper user_friendly_names, be aware of the following - Using the user_friendly_names option can be problematic in the following situations: w Root Device Is Using Multipath: If the system root device is using multipath and you use the user_friendly_names option, the user-friendly settings in the /var/lib/multipath/bindings file are included in the initrd.
2. 3. Edit the device structure to add entries for the HP 3PAR array and remove other product entries that are not needed. See “Modifying the /etc/multipath.conf File” (page 31). Start Device-mapper multipath daemons by issuing the following command: chkconfig multipathd on chkconfig boot.device-mapper on chkconfig boot.multipath on To complete the system configuration, depending on the HBA that you are using, continue on to the next appropriate section.
4. After the server is rebooted, you can check that devices are multipathed by issuing a multipath -ll command. # multipath -ll 350002AC00003011Bdm-0 3PARdata,VV [size=20G][features=1 queue_if_no_path][hwhandler=0] \_ round-robin 0 [prio=0][active] \_ 0:0:0:0 sda 8:0 [active][ready] \_ 1:0:0:0 sdb 8:16 [active][ready] 5. Verify that the Emulex HBA driver parameter has taken its correct value: # cat 14 6.
2. Required It is required that the RAMDisk be rebuilt with multipath support. For SLES10, issue the following command: # mkinitrd -f mpath For SLES11, issue the following command: mkinitrd -f multipath 3. 4. After the RAMDisk is built, reboot the server. After the server is rebooted you can check that device are multipathed by issuing a multipath -ll command.
8. Reboot the server. QLogic DD-Kits Use the following procedure to update the driver during installation. QLogic provides DD-Kits (driver update disk) for Novell SLES Linux platforms. NOTE: 1. 2. 3. 4. 5. Refer to the readme released with DD-Kits for steps. Insert the SLES CD number 1 in CD drive and boot the system. On the main installation screen, press F5 for SLES 10 SP3 or press F6 for SLES 11 and SLES11 SP1. The system prompts you to select Yes, No, or File. Select Yes.
9 Using Veritas Storage Foundation Veritas Cluster Server HP 3PAR supports use with Veritas Cluster Server. There are no special setup considerations for the HP 3PAR StoreServ Storage. For installation and setup instructions, see the Veritas Cluster Server Installation Guide and Veritas Cluster Server User's Guide, available on the following website: Symantec CAUTION: software.
• To find a physical device associated with an enclosure: # vxdisk list ENC_NAME # vxdmpadm getsubpaths dmpnodename=ENC_NAME • To get all paths known to DMP: # vxdmpadm getsubpath • To get all paths to a LUN controlled by the DMP (example used here is for LUN sdu): vxdmp getsubpaths dmpnodename=sdu • To get enclosure I/O policy attributes: # vxdmpadm getattr enclosure iopolicy • To display attributes of all enclosures: # vxdmpadm listenclosure all • To ch
10 Using SUSE Linux Virtualization HP 3PAR supports the use of SUSE Enterprise Linux virtualization. There are no special setup considerations for the HP 3PAR StoreServ Storage.
11 Using SUSE Cluster Services HP supports SUSE Enterprise Linux cluster services. For installation and administration of SUSE Enterprise Linux cluster services, see the SUSE Linux Installation Guide and Configuring and Managing a SUSE Cluster, available on the following website: Novell There are no special considerations for the HP 3PAR StoreServ Storage besides the standard setup procedures described in this implementation guide.
12 SUSE Enterprise Linux High Availability Extension HP 3PAR supports the SUSE Enterprise Linux High Availability Extension. For installation and administration of SUSE Enterprise Linux High Availability Extension, refer to the SUSE Enterprise Linux High Availability Extension Guide, available on the following website: Novell There are no special considerations for the HP 3PAR StoreServ Storage besides the standard setup procedures described in this implementation guide.
13 Using Novell Open Enterprises Server 11 HP supports Novell Open Enterprise Server (OES) running on a SUSE Linux Enterprise Server 11 with SP1 or later. Novell Cluster Service 2.0 is also supported with OES 11. There are no special considerations for the HP 3PAR StoreServ Storage besides the standard setup procedures described in this implementation guide.
14 Using IBM General Parallel File System HP supports use with IBM General Parallel File System (GPFS). There are no special setup considerations for the HP 3PAR StoreServ Storage. For installation and setup instructions, see the GPFS V3.x Concepts, Planning, and Installation Guide, available at the following website: IBM NOTE: When using Device-mapper multipathing, make sure that you refer to the /dev/dm-x devices when creating the network shared disk (NSD) devices.
15 Using the HP PolyServe Matrix Server The HP 3PAR StoreServ Storage supports use with the HP PolyServe Matrix Server (a.k.a. HP Scalable NAS File Serving Software). Refer to the HP PolyServe Matrix Server Installation Guide and Administration Guide for installation and configuration instructions. There are no special setup considerations for the HP 3PAR StoreServ Storage array. When configuring Linux Device-mapper MPIO, refer to Appendix C of the HP Scalable NAS File Serving Software installation guide.
16 Support and Other Resources Contacting HP For worldwide technical support information, see the HP support website: http://www.hp.
For information about: See: Migrating data from one HP 3PAR storage system to another HP 3PAR-to-3PAR Storage Peer Motion Guide Configuring the Secure Service Custodian server in order to monitor and control HP 3PAR storage systems HP 3PAR Secure Service Custodian Configuration Utility Reference Using the CLI to configure and manage HP 3PAR Remote Copy HP 3PAR Remote Copy Software User’s Guide Updating HP 3PAR operating systems HP 3PAR Upgrade Pre-Planning Guide Identifying storage system components
For information about: See: Planning for HP 3PAR storage system setup Hardware specifications, installation considerations, power requirements, networking options, and cabling information for HP 3PAR storage systems HP 3PAR 7200, 7400, and 7450 storage systems HP 3PAR StoreServ 7000 Storage Site Planning Manual HP 3PAR StoreServ 7450 Storage Site Planning Manual HP 3PAR 10000 storage systems HP 3PAR StoreServ 10000 Storage Physical Planning Manual HP 3PAR StoreServ 10000 Storage Third-Party Rack Physic
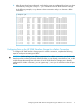
Typographic conventions Table 2 Document conventions Convention Element Bold text • Keys that you press • Text you typed into a GUI element, such as a text box • GUI elements that you click or select, such as menu items, buttons, and so on Monospace text • File and directory names • System output • Code • Commands, their arguments, and argument values • Code variables • Command variables Bold monospace text • Commands you enter into a command line interface • System
17 Documentation feedback HP is committed to providing documentation that meets your needs. To help us improve the documentation, send any errors, suggestions, or comments to Documentation Feedback (docsfeedback@hp.com). Include the document title and part number, version number, or the URL when submitting your feedback.